

Keep Your IAM Users Close, Keep Your Third Parties Even Closer – Part 2
In the first part of this blog series, we reviewed how third-party access is configured and controlled, and how it can go sideways — that is, create undue risk to your organization. In this post, the second part in the series, we’ll explore best practices for protecting against third-party access risk and how automated analysis can help you control this extremely sensitive aspect of identity and access management.
Best Practices When Allowing Third-Party Access
Build in least privilege
One of the most crucial steps in allowing third-party access to your environment is the configuration of the policy that the third-party will use and the permissions that the policy will grant it. When configuring policy, always use extreme caution and never (!) take the vendor’s recommended policy for granted without examining it thoroughly, and understanding the extent of permissions it grants and exactly why each part is necessary. Even if just part of a policy is extreme yet necessary for using the service and you can’t think of an obvious way to remove it and still use the service, at least be aware of the situation so you can perhaps mitigate it using one of the other controls discussed here.
Ideally, you want to provide a third party only the permission it absolutely needs to perform its job, and nothing more. A good example is when configuring permissions for services performing specific actions on your system, such as Skeddly. Skeddly enables you to schedule actions triggered externally, such as invoking a Lambda function or starting an EC2 instance at a specific time or periodically. By nature, Skeddly requires that you configure only the action it performs; consequently, you can easily tailor a policy that is effective for these actions only. Skeddly even offers an IAM policy generator for this very reason.

Unfortunately, on third-party platforms that perform actions that are more extensive and not confined to specific services it is much harder to define so specific a policy. And be aware that some vendors have hidden caveats in their “recommended policy.” For example, below is an actual policy, among many, that is generated by a CloudFormation script that a certain vendor provides. The automatic process at which the access is configured is quite impressive, yet looking closely at the policy reveals that the third- party is using a role that receives access to kms:Decrypt (!) and kms:CreateGrant (!) on “*”. This means that the role, unless restricted otherwise, can gain access to the plain text of all the data encrypted using customer managed keys in KMS—access that is extremely sensitive.
{
   "Statement": [
       {
           "Effect": "Allow",
           "Action": [
               "kms:Decrypt",
               "kms:ListKeyPolicies",
               "kms:GenerateRandom",
               "kms:ListRetirableGrants",
               "kms:GetKeyPolicy",
               "kms:GenerateDataKeyWithoutPlaintext",
               "kms:ListResourceTags",
               "kms:ReEncryptFrom",
               "kms:ListGrants",
               "kms:ListKeys",
               "kms:Encrypt",
               "kms:ListAliases",
               "kms:GenerateDataKey",
               "kms:CreateAlias",
               "kms:ReEncryptTo",
               "kms:DescribeKey",
               "kms:DeleteAlias",
               "kms:CreateGrant",
               "kms:RevokeGrant"
           ],
           "Resource": "*"
       }
   ]
}
It is not so rare for a “recommended” policy from a vendor to include such extensive permissions. For example, below is a policy from another vendor that instructs configuration that grants the role access to the client’s account. The policy also includes “kms:CreateGrant” on “*” —a permission that can be just as destructive and even more permissive than “kms:Decrypt” as it allows creating grants that can allow additional cryptographic operations, such as signing. The policy even includes “ec2:StopInstances” on “*”. You can easily imagine how that permission might be abused in the wrong hands.
{
   "Version": "2012-10-17",
   "Id": "Excessive3rdPartyRecommendedPolicyAsOf2020-04-17",
   "Statement": [
       {
           "Sid": "Excessive3rdPartyManagement",
           "Effect": "Allow",
           "Action": [
               "autoscaling:Describe*",
               "autoscaling:ResumeProcesses",
               "autoscaling:SuspendProcesses",
               "autoscaling:UpdateAutoScalingGroup",
               "ce:Describe*",
               "ce:Get*",
               "ce:List*",
               "ec2:Describe*",
               "ec2:ModifyInstanceAttribute",
               "ec2:StartInstances",
               "ec2:StopInstances",
               "ecs:Describe*",
               "ecs:List*",
               "ecs:UpdateService",
               "eks:Describe*",
               "eks:List*",
               "eks:UpdateNodegroupConfig",
               "iam:GetUser",
               "redshift:Describe*",
               "redshift:PauseCluster",
               "redshift:ResizeCluster",
               "redshift:ResumeCluster",
               "rds:Describe*",
               "rds:ListTagsForResource",
               "rds:ModifyDBInstance",
               "rds:StartDBCluster",
               "rds:StartDBInstance",
               "rds:StopDBCluster",
               "rds:StopDBInstance",
               "savingsplans:Describe*"
           ],
           "Resource": "*"
       },
       {
           "Sid": "Excessive3rdPartyStartInstanceWithEncryptedBoot",
           "Effect": "Allow",
           "Action": "kms:CreateGrant",
           "Resource": "*"
       },
       {
           "Sid": "Excessive3rdPartyCloudWatchAccess",
           "Effect": "Allow",
           "Action": [
               "cloudwatch:GetMetricStatistics",
               "cloudwatch:ListMetrics"
           ],
           "Resource": "*",
           "Condition": {
               "Bool": {
                   "aws:SecureTransport": "true"
               }
           }
       }
   ]
}
Even if you don’t feel confident altering the vendor’s recommended policy, you may still have controls available to mitigate the possible risks from such policies. However you must first be aware of the problem before solving it. If you implement a vendor’s recommended policy without reviewing it, you are attaching it “as is” to the IAM Role and may be setting yourself up for a world of trouble.
Use a permission boundary
One of the most effective ways to limit what an IAM User or IAM Role can do is a permission boundary. Even if you feel compelled to install the vendor’s IAM policy as is, you are fully justified in taking steps to protect what matters to you in your account.
A permission boundary is a set of permissions you can define for a principal such as an IAM User or IAM Role that creates a limit (or, as suggested by its name, a boundary) on the actions that the principal can perform. It doesn’t grant permissions to a principal; rather, limits the potential of what a principal can do. This means that even if you’ve configured an IAM policy, even extremely overprivileged, as requested by the vendor, you have the power to determine which actions that role cannot perform and, more importantly, which resources it cannot access. If policies attached to the principal grant it permissions for something that are not included in the permissions boundary, those actions will not be allowed. Learn more on using an AWS permissions boundary here.
Let’s look at an example: let’s say we want to use services from the vendor that instructed us to install the IAM policy shown above. It could be pretty complex to figure out why the vendor needs “ec2:StopInstance” on “*” but, to get the most bang for the buck we are paying the vendor, we prefer not to remove it. However, some EC2 instances are extremely sensitive, and we don’t want the role the vendor uses to be able to perform any action on them—let alone stop them from running. So we decide to place this permission boundary on the role:
{
   "Version": "2012-10-17",
   "Statement": [
       {
           "Sid": "ServiceBoundaries",
           "Effect": "Allow",
           "Action":"*",
           "Resource": "*"
       },
       {
           "Sid": "DenyEC2Production",
           "Effect": "Deny",
           "Action": "ec2:*",
           "Resource": "arn:aws:ec2:*:*:instance/i-<INSTANCE_ID>"
       }
   ]
}
This permission boundary means the maximum permissions set that the role can have access to is all the permissions of AWS (as specified in the first statement) minus the ability to perform any “ec2” action on the EC2 with the arn: arn:aws:ec2:*:*:instance/i-<INSTANCE_ID>". This permission boundary does not give any permissions to the principal however prevents any policy attached to the principal (including the policy you attach at the instruction of the vendor) from providing it with permissions for that EC2. You can of course configure this permission boundary to also limit access to any sensitive resources and actions you wish.
Require an External ID on third-party roles – the right way
An important mechanism we mentioned earlier is setting an External ID string on the role that the third party assumes through coordination between the AWS account administrator and the third party. The string is not considered a secret but is an important means for dealing with AWS’s “confused deputy” problem.
Simply put, a confused deputy situation is when a malicious entity takes advantage of the fact that it doesn’t need access to values which are considered (and protected as) “secret” to make a third-party perform actions in your AWS account. For example, if all that’s needed to perform such actions is your Account ID (which is not secret but should not be exposed without reason) and the role’s ARN, a bad actor can fairly easily set up a user profile with the third-party vendor and have it perform actions and/or retrieve sensitive information from your AWS account.
An attack of this sort would go like this:
- An attacker sets up a new profile with the third-party vendor that the victim uses, using the victim’s Account ID and ARN Role.
- The attacker can now log into this profile with the third-party vendor and use the third-party service posing as the victim.
For example, if the third party is a service that optimizes billing or creates reports about usage in AWS, the attacker might be able to access all the information presented by the vendor and, if possible, even perform changes to the environment.
Alternatively, when an External ID—and specifically one generated by the vendor for each account—is in use and the attacker tries to set up an account with a third-party vendor the victim uses, the attacker will receive a new External ID from the third party that is different from the one the victim received. The attacker will therefore not be able to trigger actions on the victim’s environment unless the new External ID is configured on the IAM role (which it is not).
This use case helps illustrate why using a coordinated, hard-to-guess string provides an important additional layer of security. Learn more about this mechanism and AWS’s confused deputy problem here: AWS documentation.
That said, simply using the External ID is not enough; you have to do it right (and make sure your vendors do their part right, as well). Security researcher Kesten Broughton published a highly recommended, fascinating article about a sample of vendors and just how well and securely they are using the External ID mechanism. For the vendors (who are indeed third parties), Broughton’s article offers the following five recommendations:
- Generate a cryptographic Universally Unique Identifier (UUID) for the ExternalId
- Do not allow the customer to modify the UUID in the UI
- Do not include the ExternalId in any PUT or POST requests which may accidently be consumed and used to modify the ExternalId on the server side
- Treat the ExternalId as you would a private key. Do not log it in clear text, or display it to the user after the initial connection test succeeds
- Ensure that the assume-role call fails when no ExtrnalId is supplied
For you, as a client, it can be telling to see how well your third-party vendor implements External ID. For example, if the vendor lets you modify the External ID and/or provides you with an External ID that is not a lengthy UUID, that’s probably a bad sign. If you can set up the connection without an External ID at all—and you should of course avoid doing so—consider it bad practice on the vendor’s side.
Track third-party activity
As the title of this article suggests, we highly recommend monitoring the activity of all entities with access to your AWS environment—and that of your third-party entities with even more vigor.
An easy-to-close security gap which many times eludes us is inactive third parties. This phenomenon actually happens quite a bit; for example, you use a third party for a trial period, choose not to make the purchase and forget about the IAM Role you created for it—and it stays in your account forever. If the vendor is somehow compromised or has a serious malfunction you may be affected by this inactive role for no good reason. This access risk can be even more destructive when the access granted involves access keys to an IAM User that are not limited to use from a specific external AWS account.
You can actually close this gap quite easily straight from the AWS IAM Roles console. Sort the roles based on “Last Activity” in descending order from “None” (never used) to “Today” (used today). You can easily see which are third-party roles by looking under “Trusted Entities”. Determine a threshold from which the existence of such a role seems suspicious (we recommend 90 days) and look into all third-party roles that meet it. In fact, while you’re at it: look into all roles that cross that threshold. The AWS IAM Users console has a similar feature.

Figure 1 – Sorting roles in the IAM Console based on “Last activity” to find roles not used at all or not used over a certain period of time
Additionally, you can also use the AWS Access Analyzer to review current roles that have a trust relationship outside your organization. Access Analyzer can take you a step further: as described in our recent post about managing access to secrets, you can configure Access Analyzer along with EventBridge and CloudWatch to get an alert when new access is configured, such as if anyone configures a new third-party access. The process is similar to the one described in the post about managing access to KMS keys. The only difference is that when configuring the EventBridge pattern, under the value of “resourceType”, you need to swipe the value "AWS::KMS::Key" with "AWS::IAM::Role" as you’re tracking access to a different type of resource. Learn more about Access Analyzer filter keys here.
Finally, to keep a close watch on what third parties are up to in your account, we recommend using CloudTrail, CloudWatch or Athena filtering to review the actions they’ve performed. We recognize that this is easier said than done as such granular monitoring can be rigorous and time consuming, and like looking for a needle in a haystack. Also, using Athena can be expensive. However—especially when you have reason to closely review a third party’s activity, such as upon a breach—a granular review of actions really is the best (and possibly only) way to get a clue as to the impact of third-party access on your organization.
In addition, reviewing the actions the third party actually performs can allow you to further rightsize the policy that grants it access by removing any permission not utilized. Doing so is of course extremely difficult without the means for automated analysis.
Rotate keys regularly
When it comes to best practice related to access keys and secrets for IAM Users, especially those provided to third parties, rotating them regularly, at least every three months, is extremely important.
The Case for Automated Analysis
Performing all or even some of the best practices suggested above can be extremely beneficial in reducing the attack surface your organization is exposed to from third parties. However, doing so using only the out-of-the-box tools provided by AWS can be tedious—and is prone to human error.
Let’s review how a cloud infrastructure entitlements management platform such as Ermetic can help you perform these actions with greater ease and accuracy. The Ermetic platform monitors your environment continuously, regularly analyzing its configuration and activity logs, so does much of the legwork described above for you.
The visual output gives you visibility into all third-party roles configured in your environment:

Figure 2 – List of third-party IAM Roles ordered, as per the Findings column, by severity of risks detected for each .
The Ermetic platform has a dedicated panel that lists third-party roles that it detects as exposed to certain risks, such as roles that are inactive or over privileged. You can review each role, get detailed information about its access permissions and mitigate the detected risks as you see fit.

Figure 3 – Risks panel for third-party roles
Let’s see how remediating risk plays out in Ermetic. The “inactive role for more than 90 days” example is too simple since its obvious remedy is to remove the role. Let’s look at a more interesting example, such as the vendor recommended policy featured earlier in the post. That policy allowed the use of "kms:CreateGrant" on "*", creating a grossly over permissive and unnecessary risk.
In the Ermetic platform you would see the risk and open its associated Findings page, which would look something like this:

Figure 4 – Findings page associated with the detected excessive risk
Using the Findings page, you can review an access graph of the policy that the role uses. The graph shows in a clearly and intuitively exactly which services the role has access to, which permissions it has and, based on an automatic analysis of the actual activity the role performs, information about which permissions are completely or partially excessive:

Figure 5 – Access graph on a Findings page
Below is the remediation panel from which you can perform actions to rightsize the policies attached to the role.

Figure 6 – Remediation panel
Before taking any action, you can view the difference between the existing policies and the suggested one. In this case, you can see the exact statement that allows the over permissive action that you are about to remove.

Figure 7 – Difference between existing and suggested policies
The Ermetic platform also provides an easy to use auditing console for tracking the activity that a third party has performed through the role that gave it access:
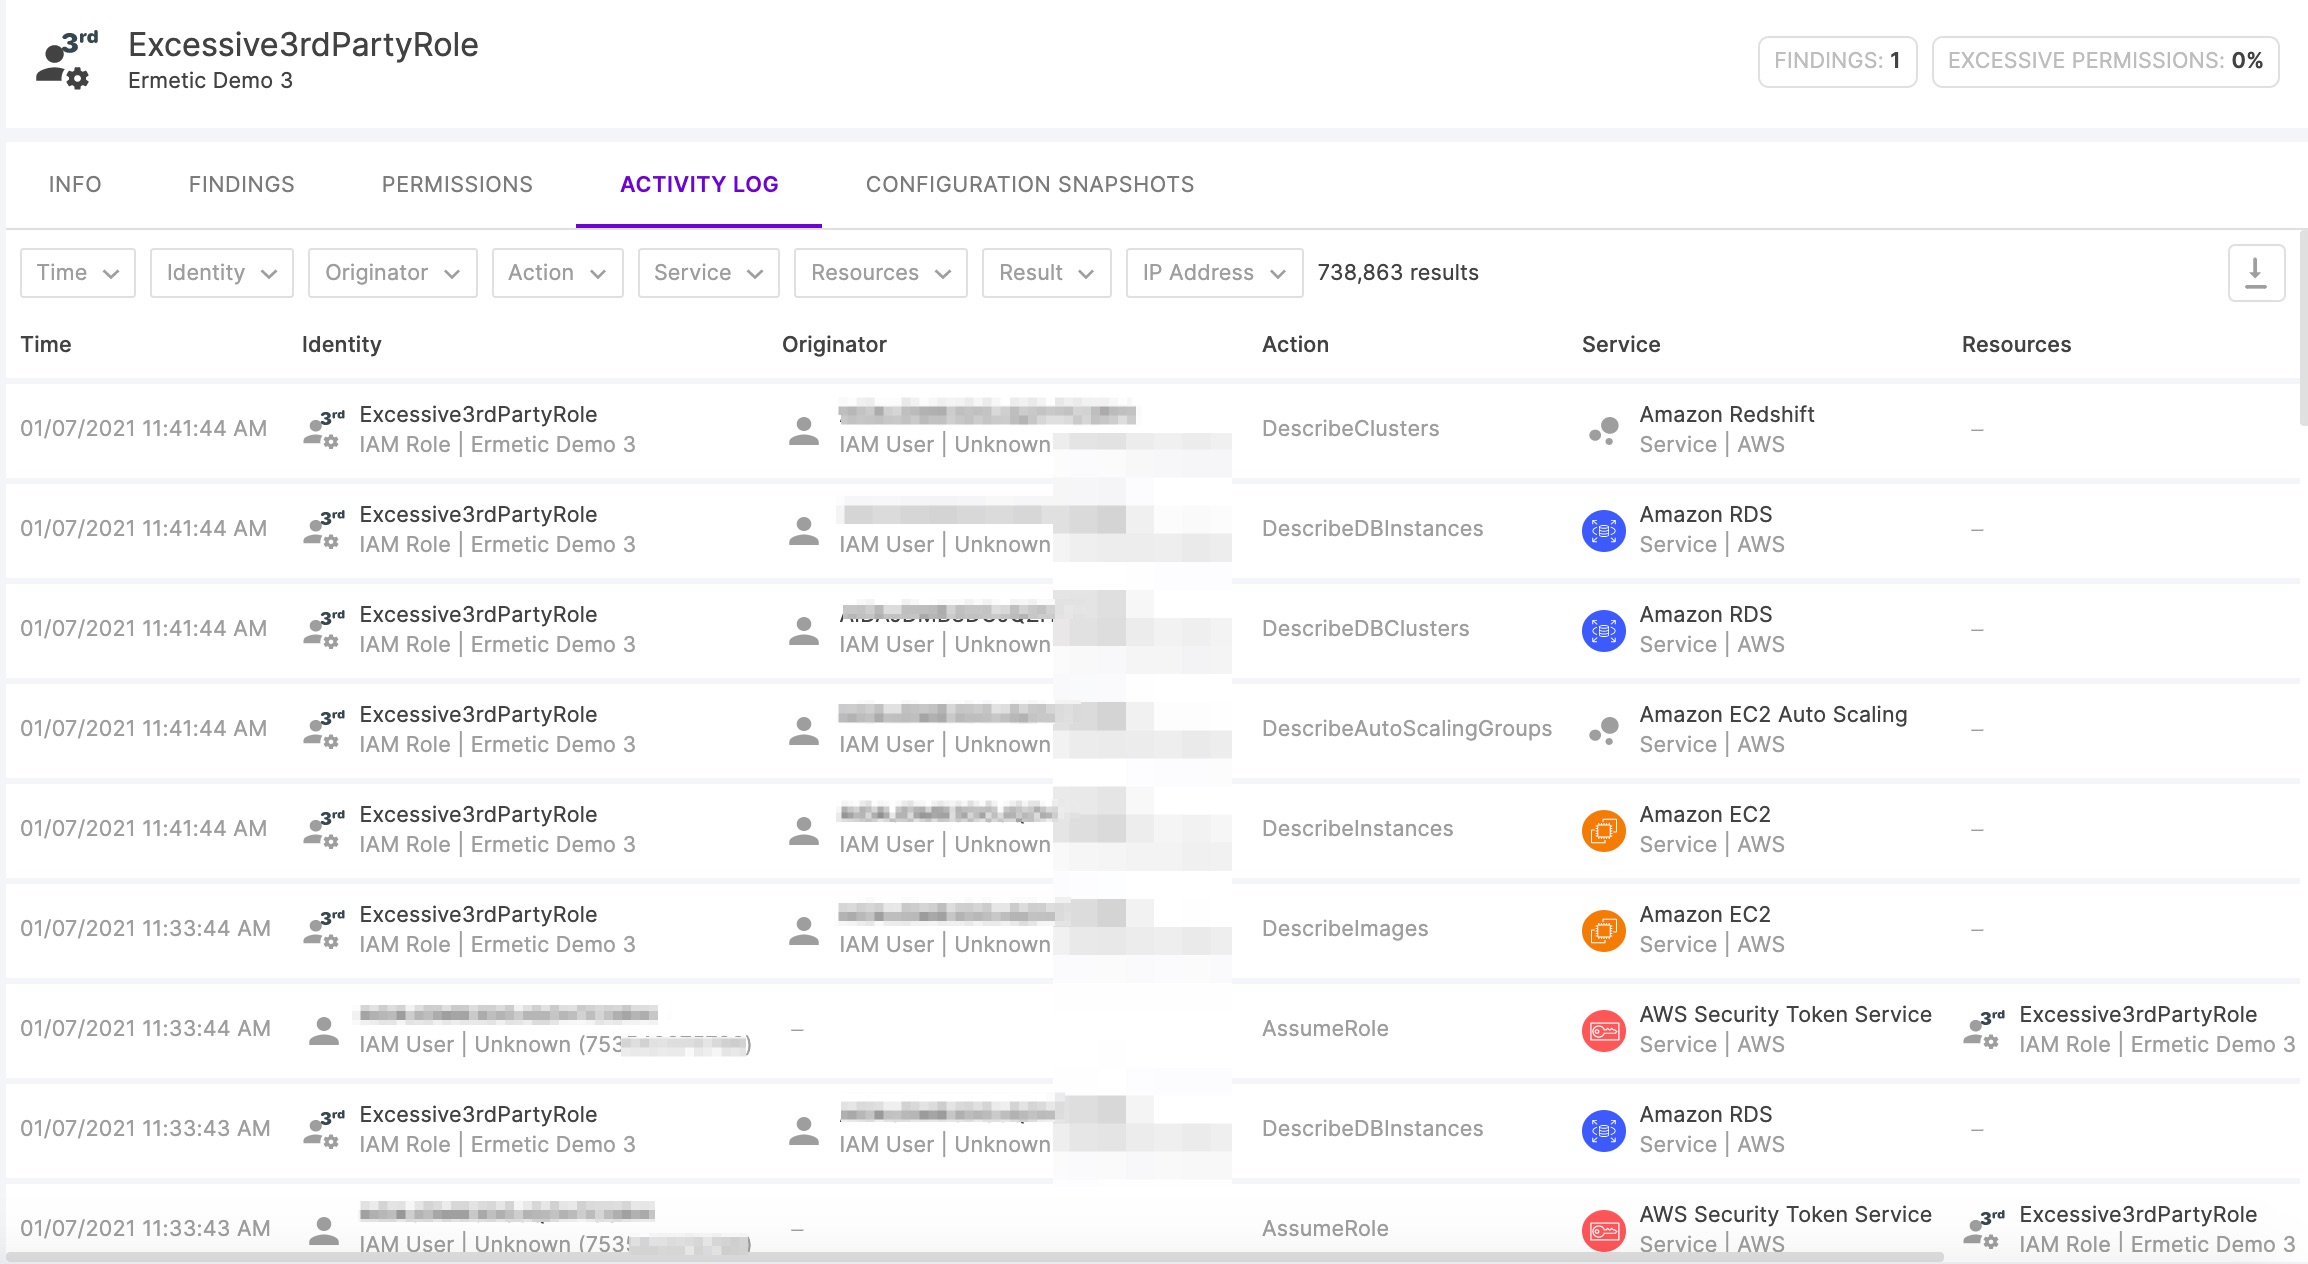
Figure 8 – Activity log
Among the risks that the Ermetic platform reviews are keys that aren’t rotated. Looking for such keys manually is nearly impossible without a huge investment of time. The automated review sends you notification of the risk, enabling you to start the process of rotating the keys and updating the third party.

Figure 9 – Unrotated keys on a Findings page
Where To Go From Here?
We hope you found this article helpful to understanding ways that you can practice least privilege amid the sensitive yet often unavoidable need to allow third parties to access your AWS environment.
If you’d like to know more about how Ermetic can help you mitigate third-party access risk and achieve least privilege, we invite you to contact us for a demo or register for a free trial.
The post Keep Your IAM Users Close, Keep Your Third Parties Even Closer – Part 2 appeared first on Ermetic.
*** This is a Security Bloggers Network syndicated blog from Ermetic authored by Ermetic Team. Read the original post at: https://ermetic.com/whats-new/blog/keep-your-iam-users-close-keep-your-third-parties-even-closer-part-2/
