

June Product Update
It’s a celebration!
🎵♪🎵♪
♩Automate your scores, come on (Let’s automate)
Automate your scores, come on (Let’s automate)
There’s a party goin’ on right here
An automation to last throughout the years
So bring your tests, scans, and your audits too
We gonna automate compliance with you!
🎵♪🎵♪
With the summer season fast approaching, we know the last thing you want to do is stay late at the office (even if that’s a home office), updating and scoring control after control after control. That’s why CyberSaint is here to save your summer and get you back to what matters most – BBQ, pool parties, and, let’s not forget, the libations… Margarita, anyone?
Keep reading below to see which integrations and features we’re celebrating this summer.
Featured Updates:
-
Automation
- Azure Integration
- Tenable.io Integration
-
Risk
- FAIR Model
- Frameworks
- CMMC 2.0
- Synced Crosswalking
- Governance Dashboards
- View History Slider
- Reports
- Plan of Action and Milestones Excel Report
- System Security Plan (SSP) Word Report
Automation
Azure Integration
This integration is long-awaited for our customers leveraging Microsoft Azure policies via the Azure Security Center! With this latest release, CyberStrong maps policies from Azure to assessments of your choosing and automatically scores control actions based on your policy compliance.
So take a seat, kick up your feet, and watch this integration get to work (so you don’t have to)!
Administrators can configure the Azure integration by following the step-by-step guidance below:
- Navigate to the ‘Administration’ tab within the home navigation bar and select ‘Integrations’ from the dropdown menu.
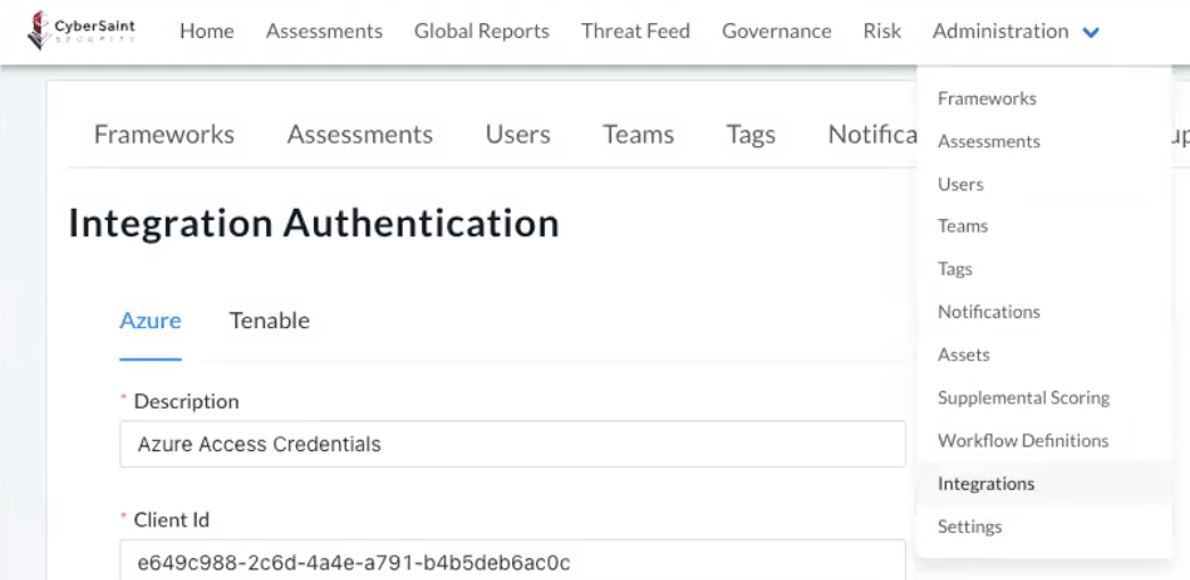
- Click on the ‘Azure’ tab on the Integration Authentication page, populate the requested fields, and then submit your settings by clicking the blue ‘Submit’ button at the bottom of the page.
Note: Currently, you can only add one authentication entry for Azure. For additional guidance on where to find the data for the requested fields, please contact your designated Customer Success Manager or Implementation Specialist.

To automate scores for a particular assessment via the Azure integration, follow the step-by-step guidance below:
- Navigate to the ‘Administration’ tab within the home navigation bar and select ‘Assessments’ from the dropdown menu.
- Find the assessment you want to automate and click the corresponding ‘Create Assessment Automation’ box icon from the ‘Actions’ column.
Note: Automation is currently only available for Action View frameworks, so the automation icon will not be visible alongside assessments leveraging a Control View framework.
- Click the blue ‘+ Add Automation’ button in the top right corner of the page.
- Select ‘Microsoft Azure’ from the dropdown menu that appears in a popup window on the right-hand side of the page.
- Select the appropriate ‘Control Mapping Set’ and ‘Authentication’ source and click the blue ‘Submit’ button.


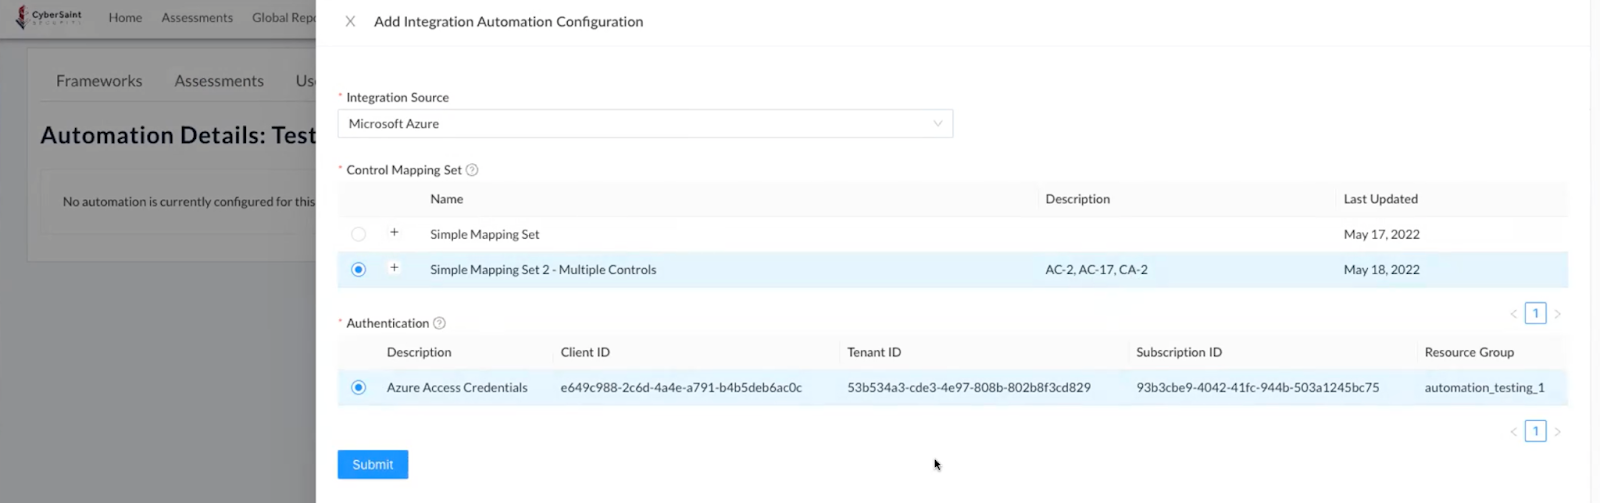
Note: If you don’t see a Control Mapping Set that meets your needs, please reach out to your designated Customer Success Manager or Implementation Specialist.
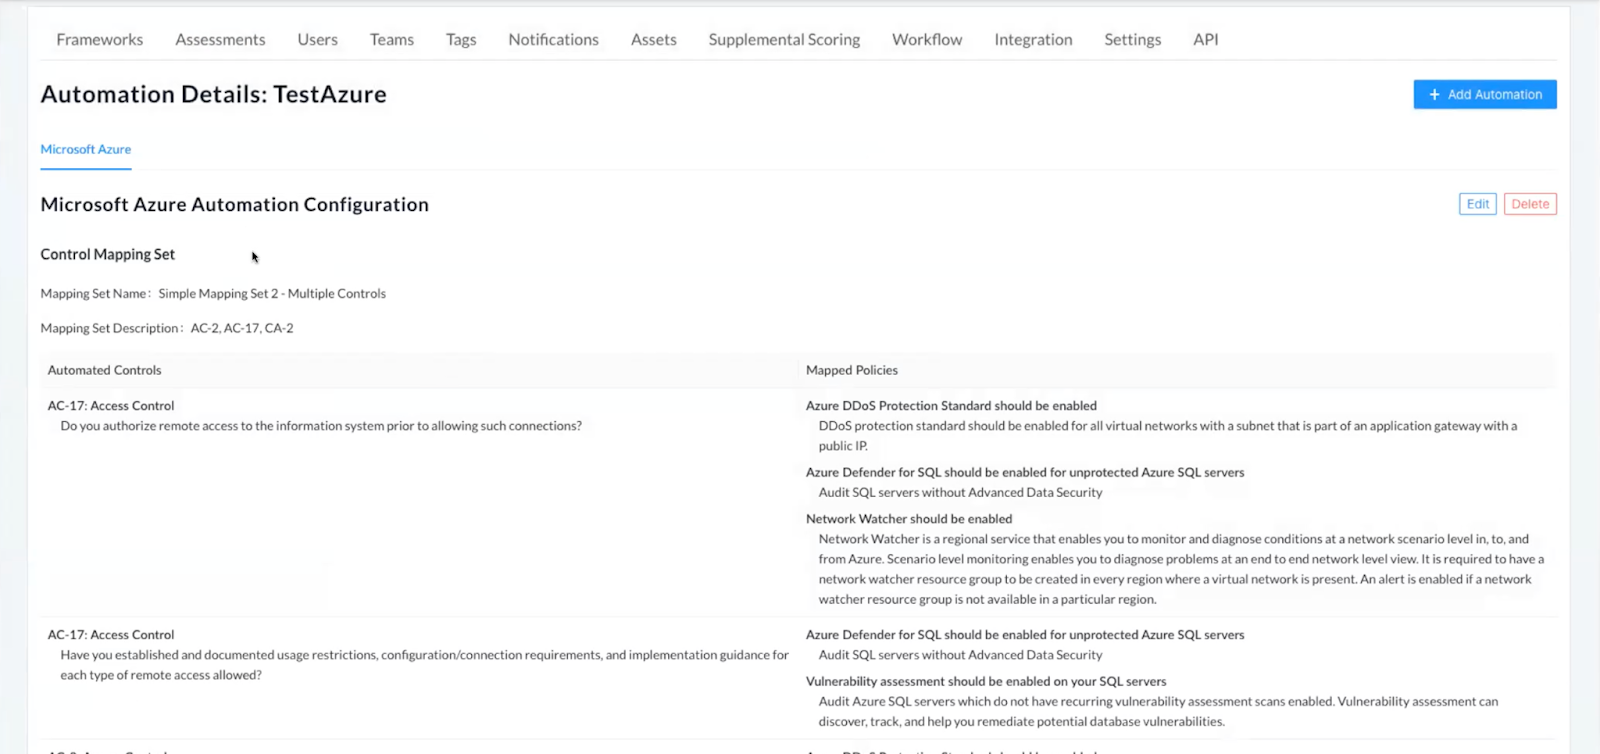
After submitting your selections, you will be brought to a summary page. On this page, you can edit or delete the configured automation using the respective buttons in the top right corner of the page.
Suppose you happen to navigate away from this page. In that case, you can return to it by clicking the ‘View Assessment Automation’ box icon from the ‘Actions’ column of the Manage Assessments page (accessed via the ‘Administration’ tab).

Note: Once the automation is configured, CyberStrong will sync with Azure once per day.
Within an assessment, control actions that are automated by Azure will be marked with a blue banner that reads, “This control has been automated by Microsoft Azure. Score Updates will be handled automatically.” The ability to manually select the current and target score will be disabled and both response options will be grayed out.

Below the response options, you can click on the ‘Microsoft Azure’ tab to the right of the Annotation/POAM tab to view the policies associated with the control action, when they were last assessed, and the associated compliance value.

Note: If any one of the policies associated with a control action is not compliant, the control action will receive the lowest possible score as grading is performed as an all or nothing, pass/fail. The control action will receive the highest score if all policies are compliant. The Target Score will match the value of the Current Score.
Tenable.io
Still feeling overworked and underpaid? Unfortunately, we don’t sign your paycheck, but we can take a few more controls off your plate! With the new Tenable.io integration, controls related to vulnerability scanning can be automatically scored.
Administrators can configure the Tenable.io integration by following the step-by-step guidance below:
- Navigate to the ‘Administration’ tab within the home navigation bar and select ‘Integrations’ from the dropdown menu.
- Click on the ‘Tenable’ tab on the Integration Authentication page and follow the instructions within the blue banner at the top of the page.

When you click the ‘here’ link in step 2, a pop-up window will appear and ask you to provide the following fields:

Once you have completed the requested fields, click the blue ‘Save’ button at the bottom of the popup window.
Note: Unlike the Azure integration, you can create multiple authentication entries for Tenable.io.
To automate scores for a particular assessment via the Tenable.io integration, follow the step-by-step guidance below:
- Navigate to the ‘Administration’ tab within the home navigation bar and select ‘Assessments’ from the dropdown menu.
- Find the assessment you want to automate and click the corresponding ‘Create Assessment Automation’ box icon from the ‘Actions’ column.
- Click the blue ‘+ Add Automation’ button in the top right corner of the page.
- Select ‘Tenable.io’ from the dropdown menu that appears in a popup window on the right-hand side of the page.
- Select the appropriate ‘Vulnerability Scan Template’, ‘Threshold (In Days)’ – i.e., the time period in which you want the system to search for a completed scan – this can be 1-365 days and ‘Authentication’ source. Then click the blue ‘Submit’ button to submit your selections.
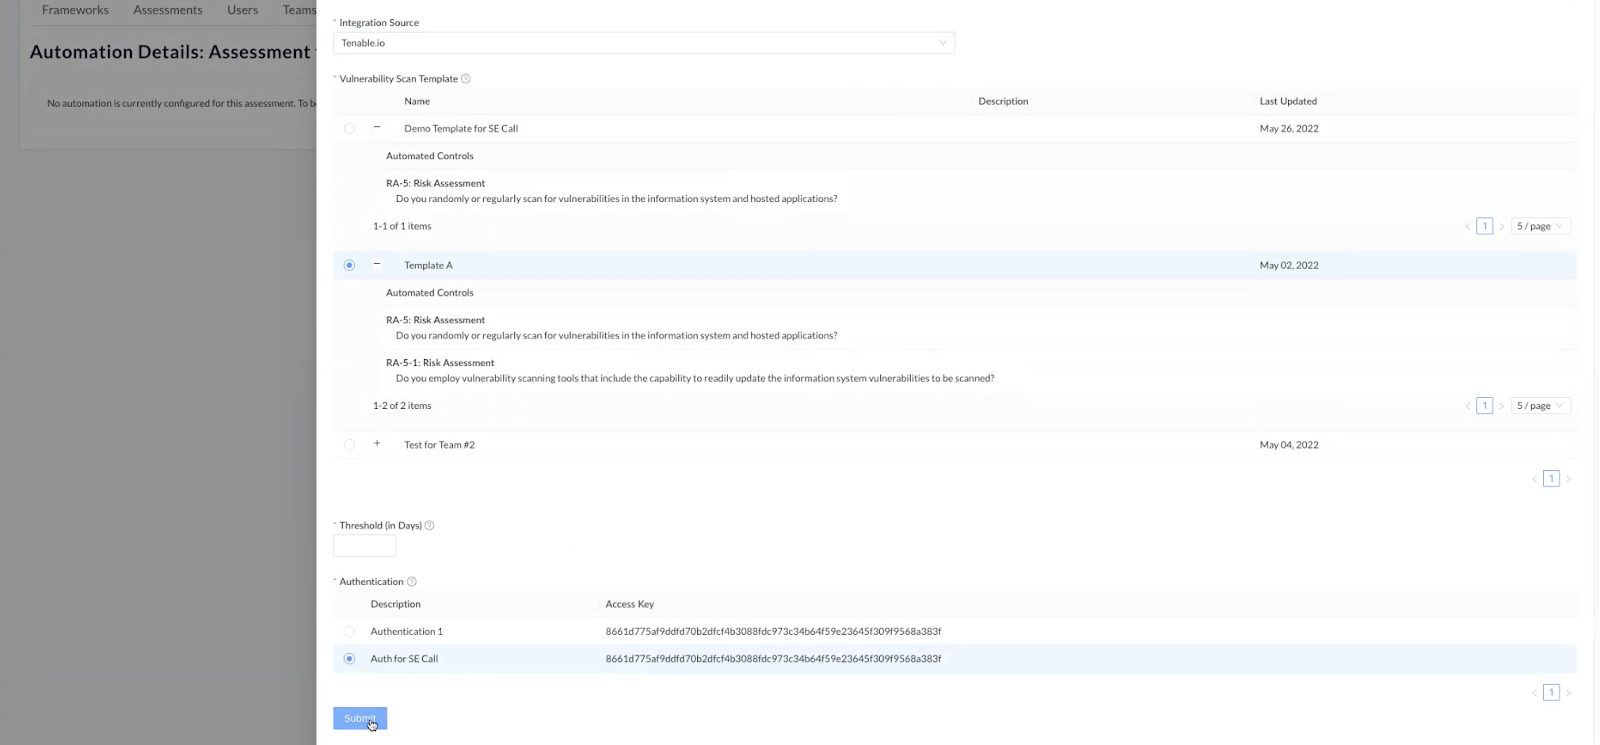
Note: If you don’t see a Vulnerability Scan Template that meets your needs, please reach out to your designated Customer Success Manager or Implementation Specialist.
After submitting your selections, you will be brought to a summary page. On this page, you can edit or delete the configured automation using the respective buttons in the top right corner of the page.

Suppose you happen to navigate away from this page. In that case, you can return to it by clicking the ‘View Assessment Automation’ box icon from the ‘Actions’ column of the Manage Assessments page (accessed via the ‘Administration’ tab).
Note: Once the automation is configured, CyberStrong will sync with Tenable.io once per day.
Within an assessment, control actions that Azure automates will be marked with a blue banner that reads, “This control has been automated by Tenable.io. Score Updates will be handled automatically.” The ability to manually select the current and target score will be disabled, and both response options will be grayed out.

Below the response options, you can click on the ‘Tenable.io’ tab to the right of the Annotation/POAM tab to view the scans associated with the control action, when the scan was last performed, and when the control action was last updated based on the scan.

If you make updates to the Vulnerability Scan Template, the Tenable.io tab will be cleared out to eliminate clutter.
If a scan is not found within the threshold you designated earlier, you will receive the following alert in the table.

Risk
FAIR Model
Money! Money! Money! Mon-ey! Moneeeeyyyyy! Regardless of your country of origin or field of study, you understand the language of money – it’s universal. With the release of the FAIR model, we’re putting our money where our mouth is… well, where the risk is.
FAIR warning, you’ll want to pay close attention to this one! (Pun intended)
By redefining some common risk terminology, prescribing what and how to measure, leveraging a machine to perform some math-based permutations, and repeating the process for various scenarios, the FAIR model allows you to translate cyber risk into a business context (that doesn’t sound like complete gibberish to those outside of cyber) and create a narrative that will help get executive buy-in.
It almost sounds too good to be true, right? It isn’t! Take a look below to see how the platform supports FAIR with a few new fields related to your risk profile.
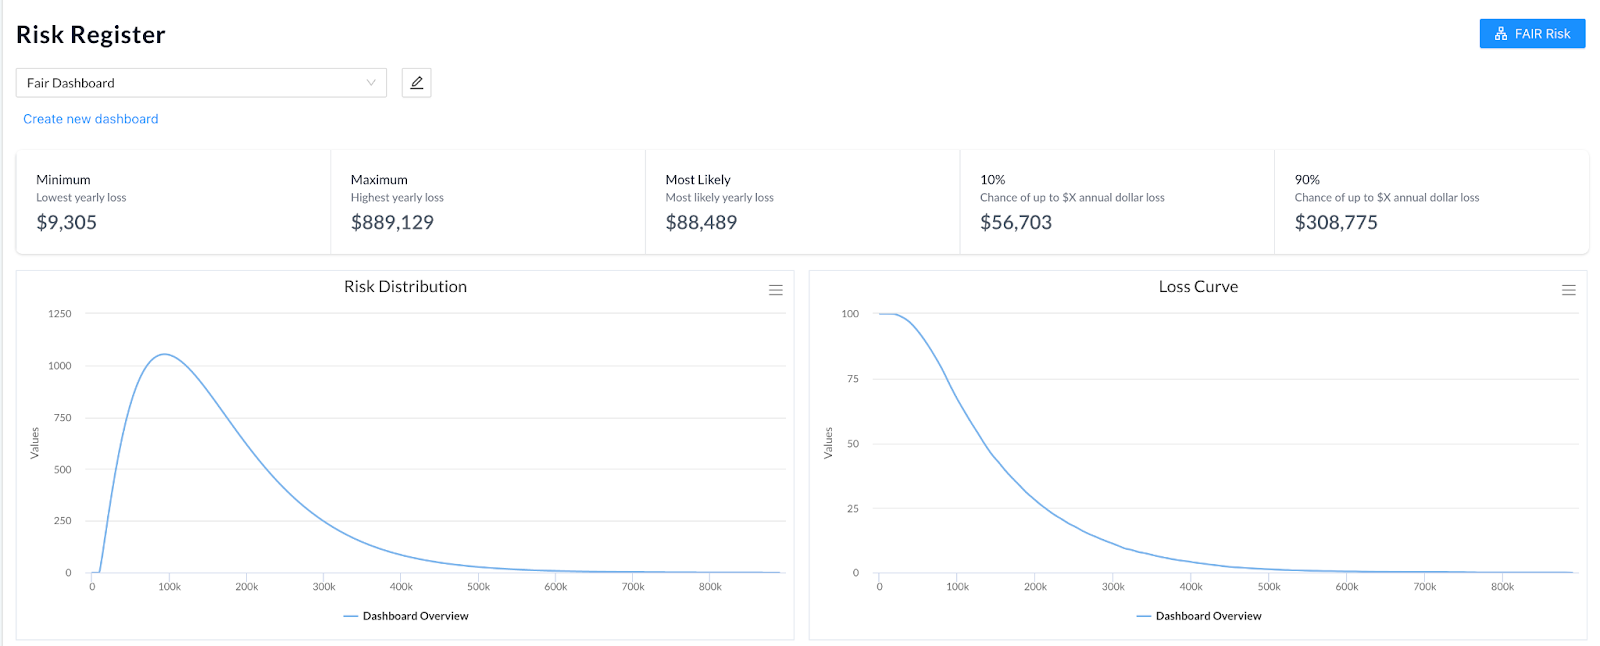
Because the FAIR model comes with its own unique graphs, you’ll want to create a separate dashboard for your FAIR risks. To create a FAIR Dashboard, follow the step-by-step guidance outlined below:
- Navigate to the ‘Risk’ tab within the home navigation bar.
- Click the ‘Create new dashboard’ link in the top left corner of the page.
- Within the popup window, name your new dashboard and select FAIR from the ‘Type’ dropdown menu. Once you’ve populated the fields, click the blue ‘Create’ button at the bottom of the popup window.


In the FAIR dashboard, the standard heatmap and financial bubble chart are replaced by the following distribution curves:
To add a new FAIR risk, follow the step-by-step guidance outlined below:
- Click the blue ‘FAIR Risk’ button in the top right corner of the dashboard.
- Populate the required fields and click the blue ‘Create Risk’ button at the bottom of the page.
The creation form is similar to that of an Adversarial / Non-Adversarial Risk; however, likelihood and impact have been removed, and Threat Event Frequency and Single Loss Expectancy have been replaced with Loss Frequency and Loss Magnitude, respectively.

Note: External ID is a new field available across all risk types that can be used to create a unique identifier for your risks.
To view the dashboard of the FAIR Risk you just created, return to your FAIR dashboard and click on the name of the risk you wish to view.

Within the risk’s dashboard, you will see a summary of all inputs entered when creating the risk and distribution curves for risk and loss, as shown below:

You can edit the risk from this page by clicking the white ‘Edit’ button in the top right corner.
Over time, as performance metrics change for the controls you linked to the risk, you may wish to re-evaluate the risk to reflect those changes. You can do this by clicking the white ‘Re-evaluate’ button in the top right corner of the dashboard for that risk.
Note: Links to edit and re-evaluate the risk can also be found on the main risk dashboard.
When re-evaluating a risk, you will see a summary of the risk inputs you entered upon creation, the controls you’ve associated with the risk, and how the control scores of the linked controls have changed since the last evaluation.
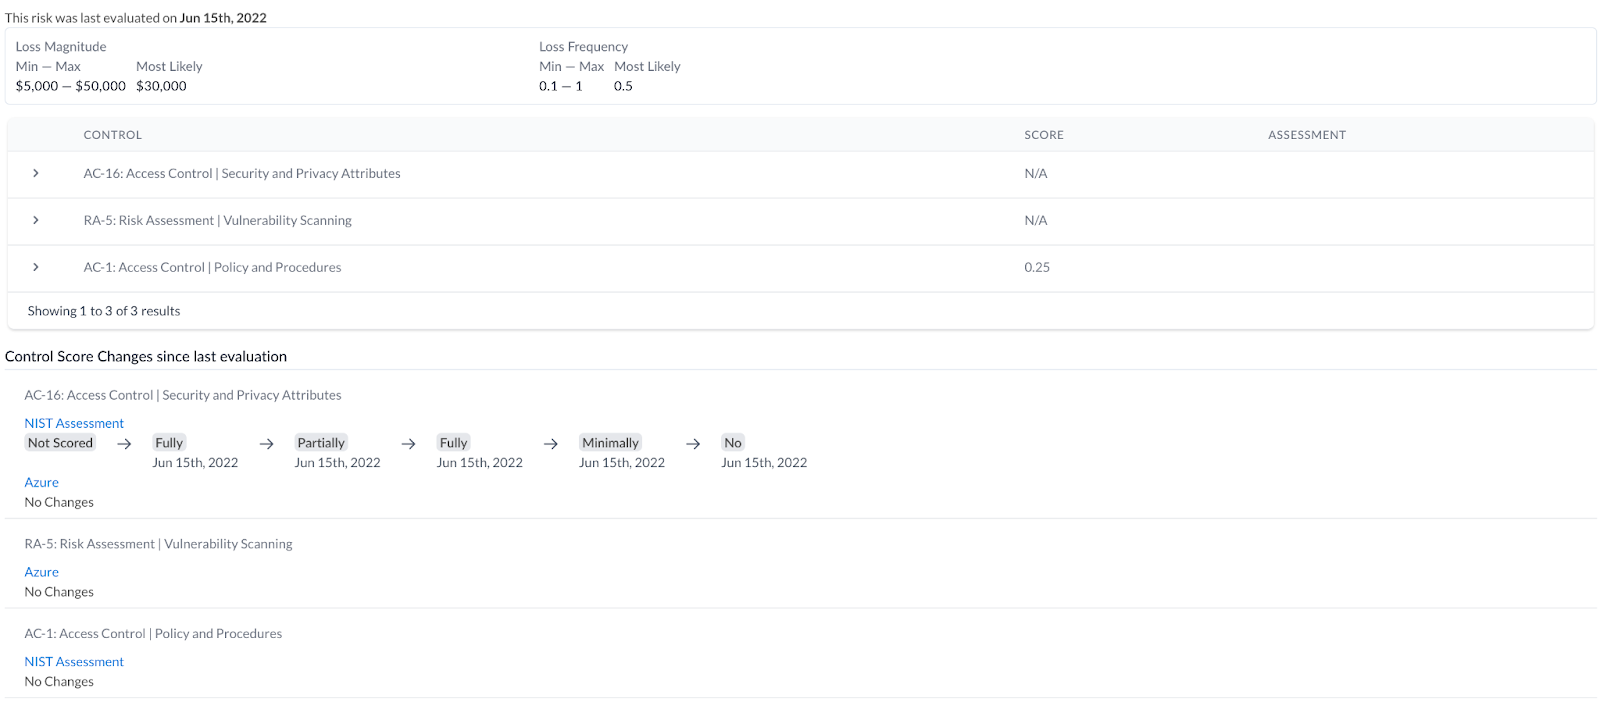
After reviewing those details, the bottom of the page will ask you to designate a title for your new evaluation and re-evaluate loss frequency and loss magnitude.

Note: The ‘Title’ field is optional. The date will automatically be assigned as the title if no text is entered into the ‘Title’ field.
Once you have completed the requested fields, click the blue ‘Add Evaluation’ button at the bottom of the page. Any new data points will be reflected on your risk distribution and loss curve graphs.
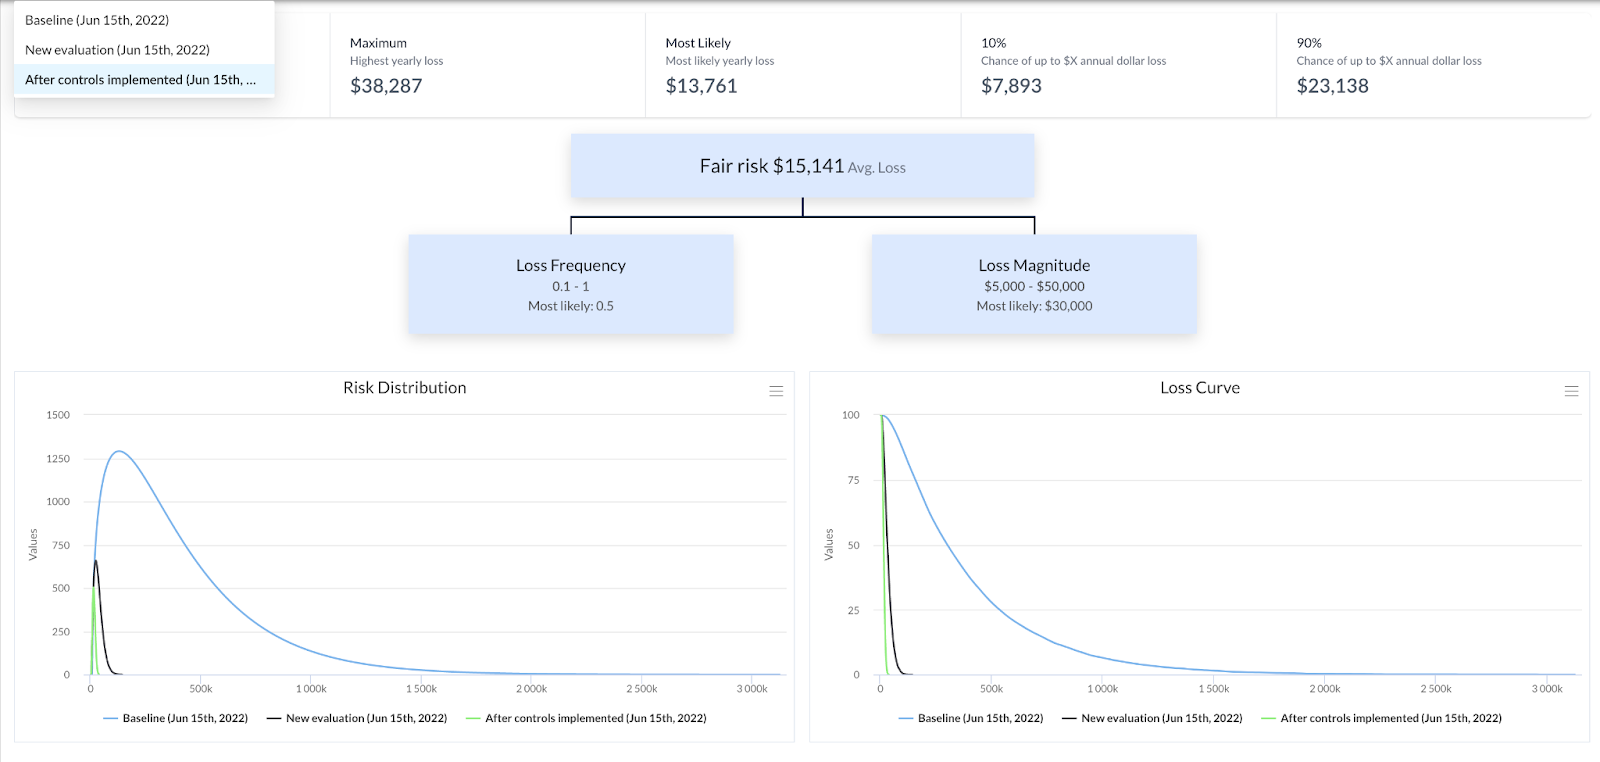
You’ll notice via the dropdown menu in the top left corner of the risk’s dashboard that a new page is generated for each re-evaluation. Select the desired evaluation from the dropdown menu to navigate between different evaluations.

Frameworks
CMMC 2.0
What’s that saying, “out with the old, in with the new?” Or should we say, in with version two?! CMMC 2.0 has officially been added to the CyberSaint framework library!
Just like us, the DoD values feedback from its constituents. After consulting several cybersecurity and acquisition leaders, reviewing 850 public responses to the interim DFARS rule, and conducting a comprehensive internal review of CMMC 1.0, the Department has issued refinements to CMMC policy and program implementation.
They have creatively named the new and improved version CMMC 2.0. Clever, isn’t it? It must have taken ages to come up with that one…
This new version of the CMMC brings simplified standards (e.g., no process maturity), less red tape for small and medium businesses, and a new semi-automated scoring model (that’s where we come in).
To better align CMMC with DFARS 800-171 Interim Rule, CMMC 2.0 follows a subtractive “innocent until proven guilty” scoring model. This means each new assessment begins with a perfect score of 110 (it’s almost like getting credit just for writing your name on the SAT – has anyone ever proven that to be true?… We digress). Each control holds a point value ranging from 1 to 5 based on the control’s significance (not all controls are created equal according to the DoD). The associated value is subtracted from the overall score for every control/control action that is not implemented.
Negative scores are possible with CMMC 2.0 (you knew there had to be a catch, right?). Negative scores result in detention, summer school, or some other form of government equivalent punishment like additional paperwork.
With this subtractive model, there are five possible values –
Not Met (-5), Not Met (-3), Not Met (-1), Partially (-3), and Met (0) – combined into four possible value sets:
- Not Met (-5), Partially (-3), Met (0)
- Not Met (-5), Met (0)
- Not Met (-3), Met (0)
- Not Met (-1), Met (0)
Previously, when using subtractive Interim Rule scoring within the platform, whether each control was worth -1, -3, or -5 points was denoted in the text of the control action itself. Users would read this text and then select the appropriate response option. Admittedly, there was some room for error here. Whether you’re an aging boomer or a gen Z’er whose eyes are damaged from watching countless hours of TikToks with your phone 2 inches from your nose, you could accidentally select the wrong value. Some may argue there’s not much difference between a -3 and a -5, but when dealing with negative scores, every point counts.
Allow us to be your glasses. With this release, the CMMC control values are now intrinsically built into the platform. Simply select whether or not the control is met, and the platform will automatically deduct the appropriate amount of points.
For controls with more than one control action, the control score is equal to the lowest scoring control action. For example, in the control shown below, there are two control actions. Control action #1 is scored as Met (0). Control Action #2 is scored as Not Met (-5). As a result, the control score equals -5.


Note: The ability to disable individual control actions has been disabled in version 2.0. You can still disable the overall control, but you will not be able to disable select control actions within that control.

Synced Crosswalking
Choreographed dances, Olympic swimming, cuckoo clocks, boy bands, and crosswalks… all things that are better N*SYNC. (Get it, N*SYNC?)
With this latest release, we’re saying Bye ✋, Bye ✋, Bye ✋ to manually updating downstream crosswalked assessments. Previously, when you crosswalked one assessment into a new target framework, if you returned to the original assessment to make changes, those changes would not carry over to the crosswalked assessment. Now, they will! (and in real-time!)
For our more clever clientele, this means you can crosswalk a blank assessment immediately after creation (or whenever you’d like, maybe you’re a procrastinator – we don’t judge) into each of the frameworks you’ll eventually need. Later, as you populate the original parent assessment, the data will flow downstream, populating all other synced assessments.
Note: With this release, synced crosswalking is only available for frameworks in Control View. Synced crosswalking for Action View frameworks is in the works and will be included in a future release.
“But daddy, I want it now!” Patience, Veruca. Your golden goose is coming!
To sync crosswalked assessments, follow the step-by-step guidance below:
- Navigate to the crosswalking page
To see the crosswalking options for a particular assessment, navigate to ‘Assessments’ under the ‘Administration’ tab and click the Crosswalk icon to the right of the assessment title.

- Select a target framework
Once you click the crosswalk icon, select the framework you’d like to crosswalk your assessment into from the provided options.
Frameworks in a different view than the one you’re attempting to crosswalk will be disabled or grayed out.

- Accept relevant mappings
Once you’ve selected which framework to crosswalk into, you’ll be taken to the main crosswalking page.

Here you will see the controls from your original assessment displayed in the left-hand panel. When you select a control from the panel, potential matches from your target framework will appear on the right.
Each target control shows the confidence level (provided by CyberSaint’s patented Natural Language Processor) that the original and target control map to each other. If you’re unsure of the pairing, click the expand button to the right of the target control title to view a description of the control.
To accept a mapping, check the box to the left of the target control title. As shown below, multiple target controls can be accepted for a single control from the original assessment.

Short on time? Automatically accept the top mapping for each control by clicking the “Accept Top Mapping For Each Control” button at the top of the left-hand panel.

- Create a new assessment and sync it with the parent assessment
Once you’ve chosen the appropriate mappings, click the ‘Create New Assessment’ button in the top right corner of the page to proceed to the next step.
Once on the ‘Create New Assessment’ page, name your new assessment as appropriate. If the framework you are crosswalking into has metadata fields configured, you will be prompted to populate those fields below the new assessment name.
To sync the new assessment with the original, click the checkbox under the name of the new assessment labeled ‘Keep new assessment synced with [Name of Parent Assessment].’

Once all fields are populated/checked, click the blue ‘Submit’ button to create your new crosswalked assessment. After submitting your selections, all parent assessment data will be copied to the crosswalked assessment.
Note: This is the only time you will be given the option to sync the crosswalked assessment to the parent assessment. After you click the blue ‘Submit’ button, you will not be able to go back and change your selection.
After checking the ‘Keep new assessment synced with [Name of Parent Assessment]’ checkbox and creating a new assessment, each control from the crosswalked assessment will now have a blue banner indicating synced status at the top of the control page.

As before, if you have been granted access to the parent assessment, you will be able to see the ‘Crosswalk History’ below the ‘Collaboration’ section on the right-hand side of the ‘Score’ tab. The ‘Crosswalk History’ will indicate the name of the parent assessment you crosswalked from and which controls from the parent assessment are contributing to the score of the control you’re currently viewing. The name of the parent assessment and the synced controls are presented as hyperlinks that will take you directly to them when clicked.
Note: All data fields for synced controls on the crosswalked child assessment will be disabled, including the ability to add evidence or make changes via bulk update.

To edit a synced control, you have three options:
- Cascade changes from the parent assessment
Edit the synced controls from the parent assessment (i.e., those listed in the Crosswalk History of the control) and allow the changes to cascade down to the child assessment.
When a change is made, the crosswalk is rerun in the backend, and all changes (e.g., evidence added, risk assessment determinations, control assignments, due dates, completion costs) made to the parent assessment will cascade down to the child assessment automatically.
Note: When multiple controls from the parent assessment are contributing to a control from the child assessment, the score of the control from the child assessment will reflect the highest-scoring synced control from the parent assessment. For the workflow state, the opposite is true. The workflow state will reflect the state of the least progressed control from the parent assessment.
- Unsync the control from the parent assessment. (This option is irreversible once enacted)
To unsync a control, follow the guidelines outlined below:
- Navigate to the control you wish to unsync from the parent assessment.
- Click the ‘Unsync control to edit it’ button at the far right of the blue banner.
- Confirm your intent to unsync the control by clicking the blue ‘Yes’ button within the pop-up prompt.
Note: Once you click ‘Yes,’ a notification will appear at the top of the page saying, “The control is no longer being synced with [name of parent assessment],” The control will be permanently unsynced from the parent assessment and cannot be relinked.


- Clone the child assessment and edit the control within the new clone
Cloning the assessment will allow you to retain the original synced crosswalked assessment while creating an identical unsynced copy that can be edited.
Administrators and Managers can clone an assessment by navigating to ‘Assessments’ within the ‘Administration’ tab of the home navigation bar and clicking the clone icon in the ‘Actions’ column to the right of the assessment name. Clicking the clone icon will generate a pop-up that asks you to confirm your action and name your new assessment.

Governance Dashboards
View History Slider
You know what they say about good things? They come in small packages! You thought we were going to say they come to those who wait, didn’t you? Nahhh, not this time – speaking of time.
Take the Infinity Stones, for example. You wouldn’t underestimate the power of one of those, would you? They’re tiny, but as Thanos knows, they pack a punch. The ‘View History Slider’ is no different – it’s a small addition packed with a lot of value. Think of it as your own personal time stone – your key to viewing the past. We don’t have a fancy necklace to house it like Dr. Strange but rest assured, it’s tied up with a pretty HTML bow. Let’s unwrap it together.
The View History Slider can be used as an alternative to the Compare feature within the Governance Dashboard widgets. Rather than selecting two points in time, the View History Slider allows you to view the full historical progression of current and target scores for a given widget on a sliding timeline.
To use the ‘View History Slider,’ follow the guidelines outlined below:
- Navigate to the ‘Governance’ tab within the home navigation bar.
- Click the white ‘View History’ button below the widget graph whose sliding timeline you wish to view.
- Click a point on the slider and drag your cursor left or right to view your compliance at different points in time.


Reports
Plan of Action and Milestones (POAM) Excel Report
Ever been dragging yourself along a hike in the heat of summer and checked an app to see how far away the trail end is, only to realize you’re only halfway there? Sometimes hitting your target is easier when you can’t see how far you have left to go. If you’re one of those people, there’s now a checkbox for that!
When downloading the Excel version of the POAM report, for both Control View and Action View frameworks, you can choose to exclude Target Scores from the report.

System Security Plan (SSP) Word Report
Whether you’re at a wedding or a restaurant, there’s a reason why so many people opt for the buffet. You get exactly what you want and none of what you don’t want. In this release, we’ve brought the buffet to the SSP!
Now, when downloading the Word version of the SSP, for both Control View and Action View frameworks, you can pick and choose which fields you want to be included for both Control View and Action View frameworks.
For Control View frameworks, you will have the following options:

For Action View frameworks, when choosing the SSP with control actions, you will have the following options:

Note: Total Score is a new field that will provide you with the assessment score.
It’s a celebration!
🎵♪🎵♪
♩Automate your scores, come on (Let’s automate)
Automate your scores, come on (Let’s automate)
There’s a party goin’ on right here
An automation to last throughout the years
So bring your tests, scans, and your audits too
We gonna automate compliance with you!
🎵♪🎵♪
With the summer season fast approaching, we know the last thing you want to do is stay late at the office (even if that’s a home office), updating and scoring control after control after control. That’s why CyberSaint is here to save your summer and get you back to what matters most – BBQ, pool parties, and, let’s not forget, the libations… Margarita, anyone?
Keep reading below to see which integrations and features we’re celebrating this summer.
Featured Updates:
-
Automation
- Azure Integration
- Tenable.io Integration
-
Risk
- FAIR Model
- Frameworks
- CMMC 2.0
- Synced Crosswalking
- Governance Dashboards
- View History Slider
- Reports
- Plan of Action and Milestones Excel Report
- System Security Plan (SSP) Word Report
Automation
Azure Integration
This integration is long-awaited for our customers leveraging Microsoft Azure policies via the Azure Security Center! With this latest release, CyberStrong maps policies from Azure to assessments of your choosing and automatically scores control actions based on your policy compliance.
So take a seat, kick up your feet, and watch this integration get to work (so you don’t have to)!
Administrators can configure the Azure integration by following the step-by-step guidance below:
- Navigate to the ‘Administration’ tab within the home navigation bar and select ‘Integrations’ from the dropdown menu.
- Click on the ‘Azure’ tab on the Integration Authentication page, populate the requested fields, and then submit your settings by clicking the blue ‘Submit’ button at the bottom of the page.
Note: Currently, you can only add one authentication entry for Azure. For additional guidance on where to find the data for the requested fields, please contact your designated Customer Success Manager or Implementation Specialist.
To automate scores for a particular assessment via the Azure integration, follow the step-by-step guidance below:
- Navigate to the ‘Administration’ tab within the home navigation bar and select ‘Assessments’ from the dropdown menu.
- Find the assessment you want to automate and click the corresponding ‘Create Assessment Automation’ box icon from the ‘Actions’ column.
Note: Automation is currently only available for Action View frameworks, so the automation icon will not be visible alongside assessments leveraging a Control View framework.
- Click the blue ‘+ Add Automation’ button in the top right corner of the page.
- Select ‘Microsoft Azure’ from the dropdown menu that appears in a popup window on the right-hand side of the page.
- Select the appropriate ‘Control Mapping Set’ and ‘Authentication’ source and click the blue ‘Submit’ button.
Note: If you don’t see a Control Mapping Set that meets your needs, please reach out to your designated Customer Success Manager or Implementation Specialist.
After submitting your selections, you will be brought to a summary page. On this page, you can edit or delete the configured automation using the respective buttons in the top right corner of the page.
Suppose you happen to navigate away from this page. In that case, you can return to it by clicking the ‘View Assessment Automation’ box icon from the ‘Actions’ column of the Manage Assessments page (accessed via the ‘Administration’ tab).
Note: Once the automation is configured, CyberStrong will sync with Azure once per day.
Within an assessment, control actions that are automated by Azure will be marked with a blue banner that reads, “This control has been automated by Microsoft Azure. Score Updates will be handled automatically.” The ability to manually select the current and target score will be disabled and both response options will be grayed out.
Below the response options, you can click on the ‘Microsoft Azure’ tab to the right of the Annotation/POAM tab to view the policies associated with the control action, when they were last assessed, and the associated compliance value.
Note: If any one of the policies associated with a control action is not compliant, the control action will receive the lowest possible score as grading is performed as an all or nothing, pass/fail. The control action will receive the highest score if all policies are compliant. The Target Score will match the value of the Current Score.
Tenable.io
Still feeling overworked and underpaid? Unfortunately, we don’t sign your paycheck, but we can take a few more controls off your plate! With the new Tenable.io integration, controls related to vulnerability scanning can be automatically scored.
Administrators can configure the Tenable.io integration by following the step-by-step guidance below:
- Navigate to the ‘Administration’ tab within the home navigation bar and select ‘Integrations’ from the dropdown menu.
- Click on the ‘Tenable’ tab on the Integration Authentication page and follow the instructions within the blue banner at the top of the page.
When you click the ‘here’ link in step 2, a pop-up window will appear and ask you to provide the following fields:
Once you have completed the requested fields, click the blue ‘Save’ button at the bottom of the popup window.
Note: Unlike the Azure integration, you can create multiple authentication entries for Tenable.io.
To automate scores for a particular assessment via the Tenable.io integration, follow the step-by-step guidance below:
- Navigate to the ‘Administration’ tab within the home navigation bar and select ‘Assessments’ from the dropdown menu.
- Find the assessment you want to automate and click the corresponding ‘Create Assessment Automation’ box icon from the ‘Actions’ column.
- Click the blue ‘+ Add Automation’ button in the top right corner of the page.
- Select ‘Tenable.io’ from the dropdown menu that appears in a popup window on the right-hand side of the page.
- Select the appropriate ‘Vulnerability Scan Template’, ‘Threshold (In Days)’ – i.e., the time period in which you want the system to search for a completed scan – this can be 1-365 days and ‘Authentication’ source. Then click the blue ‘Submit’ button to submit your selections.
Note: If you don’t see a Vulnerability Scan Template that meets your needs, please reach out to your designated Customer Success Manager or Implementation Specialist.
After submitting your selections, you will be brought to a summary page. On this page, you can edit or delete the configured automation using the respective buttons in the top right corner of the page.
Suppose you happen to navigate away from this page. In that case, you can return to it by clicking the ‘View Assessment Automation’ box icon from the ‘Actions’ column of the Manage Assessments page (accessed via the ‘Administration’ tab).
Note: Once the automation is configured, CyberStrong will sync with Tenable.io once per day.
Within an assessment, control actions that Azure automates will be marked with a blue banner that reads, “This control has been automated by Tenable.io. Score Updates will be handled automatically.” The ability to manually select the current and target score will be disabled, and both response options will be grayed out.
Below the response options, you can click on the ‘Tenable.io’ tab to the right of the Annotation/POAM tab to view the scans associated with the control action, when the scan was last performed, and when the control action was last updated based on the scan.
If you make updates to the Vulnerability Scan Template, the Tenable.io tab will be cleared out to eliminate clutter.
If a scan is not found within the threshold you designated earlier, you will receive the following alert in the table.
Risk
FAIR Model
Money! Money! Money! Mon-ey! Moneeeeyyyyy! Regardless of your country of origin or field of study, you understand the language of money – it’s universal. With the release of the FAIR model, we’re putting our money where our mouth is… well, where the risk is.
FAIR warning, you’ll want to pay close attention to this one! (Pun intended)
By redefining some common risk terminology, prescribing what and how to measure, leveraging a machine to perform some math-based permutations, and repeating the process for various scenarios, the FAIR model allows you to translate cyber risk into a business context (that doesn’t sound like complete gibberish to those outside of cyber) and create a narrative that will help get executive buy-in.
It almost sounds too good to be true, right? It isn’t! Take a look below to see how the platform supports FAIR with a few new fields related to your risk profile.
Because the FAIR model comes with its own unique graphs, you’ll want to create a separate dashboard for your FAIR risks. To create a FAIR Dashboard, follow the step-by-step guidance outlined below:
- Navigate to the ‘Risk’ tab within the home navigation bar.
- Click the ‘Create new dashboard’ link in the top left corner of the page.
- Within the popup window, name your new dashboard and select FAIR from the ‘Type’ dropdown menu. Once you’ve populated the fields, click the blue ‘Create’ button at the bottom of the popup window.
In the FAIR dashboard, the standard heatmap and financial bubble chart are replaced by the following distribution curves:
To add a new FAIR risk, follow the step-by-step guidance outlined below:
- Click the blue ‘FAIR Risk’ button in the top right corner of the dashboard.
- Populate the required fields and click the blue ‘Create Risk’ button at the bottom of the page.
The creation form is similar to that of an Adversarial / Non-Adversarial Risk; however, likelihood and impact have been removed, and Threat Event Frequency and Single Loss Expectancy have been replaced with Loss Frequency and Loss Magnitude, respectively.
Note: External ID is a new field available across all risk types that can be used to create a unique identifier for your risks.
To view the dashboard of the FAIR Risk you just created, return to your FAIR dashboard and click on the name of the risk you wish to view.
Within the risk’s dashboard, you will see a summary of all inputs entered when creating the risk and distribution curves for risk and loss, as shown below:
You can edit the risk from this page by clicking the white ‘Edit’ button in the top right corner.
Over time, as performance metrics change for the controls you linked to the risk, you may wish to re-evaluate the risk to reflect those changes. You can do this by clicking the white ‘Re-evaluate’ button in the top right corner of the dashboard for that risk.
Note: Links to edit and re-evaluate the risk can also be found on the main risk dashboard.
When re-evaluating a risk, you will see a summary of the risk inputs you entered upon creation, the controls you’ve associated with the risk, and how the control scores of the linked controls have changed since the last evaluation.
After reviewing those details, the bottom of the page will ask you to designate a title for your new evaluation and re-evaluate loss frequency and loss magnitude.
Note: The ‘Title’ field is optional. The date will automatically be assigned as the title if no text is entered into the ‘Title’ field.
Once you have completed the requested fields, click the blue ‘Add Evaluation’ button at the bottom of the page. Any new data points will be reflected on your risk distribution and loss curve graphs.
You’ll notice via the dropdown menu in the top left corner of the risk’s dashboard that a new page is generated for each re-evaluation. Select the desired evaluation from the dropdown menu to navigate between different evaluations.
Frameworks
CMMC 2.0
What’s that saying, “out with the old, in with the new?” Or should we say, in with version two?! CMMC 2.0 has officially been added to the CyberSaint framework library!
Just like us, the DoD values feedback from its constituents. After consulting several cybersecurity and acquisition leaders, reviewing 850 public responses to the interim DFARS rule, and conducting a comprehensive internal review of CMMC 1.0, the Department has issued refinements to CMMC policy and program implementation.
They have creatively named the new and improved version CMMC 2.0. Clever, isn’t it? It must have taken ages to come up with that one…
This new version of the CMMC brings simplified standards (e.g., no process maturity), less red tape for small and medium businesses, and a new semi-automated scoring model (that’s where we come in).
To better align CMMC with DFARS 800-171 Interim Rule, CMMC 2.0 follows a subtractive “innocent until proven guilty” scoring model. This means each new assessment begins with a perfect score of 110 (it’s almost like getting credit just for writing your name on the SAT – has anyone ever proven that to be true?… We digress). Each control holds a point value ranging from 1 to 5 based on the control’s significance (not all controls are created equal according to the DoD). The associated value is subtracted from the overall score for every control/control action that is not implemented.
Negative scores are possible with CMMC 2.0 (you knew there had to be a catch, right?). Negative scores result in detention, summer school, or some other form of government equivalent punishment like additional paperwork.
With this subtractive model, there are five possible values –
Not Met (-5), Not Met (-3), Not Met (-1), Partially (-3), and Met (0) – combined into four possible value sets:
- Not Met (-5), Partially (-3), Met (0)
- Not Met (-5), Met (0)
- Not Met (-3), Met (0)
- Not Met (-1), Met (0)
Previously, when using subtractive Interim Rule scoring within the platform, whether each control was worth -1, -3, or -5 points was denoted in the text of the control action itself. Users would read this text and then select the appropriate response option. Admittedly, there was some room for error here. Whether you’re an aging boomer or a gen Z’er whose eyes are damaged from watching countless hours of TikToks with your phone 2 inches from your nose, you could accidentally select the wrong value. Some may argue there’s not much difference between a -3 and a -5, but when dealing with negative scores, every point counts.
Allow us to be your glasses. With this release, the CMMC control values are now intrinsically built into the platform. Simply select whether or not the control is met, and the platform will automatically deduct the appropriate amount of points.
For controls with more than one control action, the control score is equal to the lowest scoring control action. For example, in the control shown below, there are two control actions. Control action #1 is scored as Met (0). Control Action #2 is scored as Not Met (-5). As a result, the control score equals -5.
Note: The ability to disable individual control actions has been disabled in version 2.0. You can still disable the overall control, but you will not be able to disable select control actions within that control.
Synced Crosswalking
Choreographed dances, Olympic swimming, cuckoo clocks, boy bands, and crosswalks… all things that are better N*SYNC. (Get it, N*SYNC?)
With this latest release, we’re saying Bye ✋, Bye ✋, Bye ✋ to manually updating downstream crosswalked assessments. Previously, when you crosswalked one assessment into a new target framework, if you returned to the original assessment to make changes, those changes would not carry over to the crosswalked assessment. Now, they will! (and in real-time!)
For our more clever clientele, this means you can crosswalk a blank assessment immediately after creation (or whenever you’d like, maybe you’re a procrastinator – we don’t judge) into each of the frameworks you’ll eventually need. Later, as you populate the original parent assessment, the data will flow downstream, populating all other synced assessments.
Note: With this release, synced crosswalking is only available for frameworks in Control View. Synced crosswalking for Action View frameworks is in the works and will be included in a future release.
“But daddy, I want it now!” Patience, Veruca. Your golden goose is coming!
To sync crosswalked assessments, follow the step-by-step guidance below:
- Navigate to the crosswalking page
To see the crosswalking options for a particular assessment, navigate to ‘Assessments’ under the ‘Administration’ tab and click the Crosswalk icon to the right of the assessment title.
- Select a target framework
Once you click the crosswalk icon, select the framework you’d like to crosswalk your assessment into from the provided options.
Frameworks in a different view than the one you’re attempting to crosswalk will be disabled or grayed out.
- Accept relevant mappings
Once you’ve selected which framework to crosswalk into, you’ll be taken to the main crosswalking page.
Here you will see the controls from your original assessment displayed in the left-hand panel. When you select a control from the panel, potential matches from your target framework will appear on the right.
Each target control shows the confidence level (provided by CyberSaint’s patented Natural Language Processor) that the original and target control map to each other. If you’re unsure of the pairing, click the expand button to the right of the target control title to view a description of the control.
To accept a mapping, check the box to the left of the target control title. As shown below, multiple target controls can be accepted for a single control from the original assessment.
Short on time? Automatically accept the top mapping for each control by clicking the “Accept Top Mapping For Each Control” button at the top of the left-hand panel.
- Create a new assessment and sync it with the parent assessment
Once you’ve chosen the appropriate mappings, click the ‘Create New Assessment’ button in the top right corner of the page to proceed to the next step.
Once on the ‘Create New Assessment’ page, name your new assessment as appropriate. If the framework you are crosswalking into has metadata fields configured, you will be prompted to populate those fields below the new assessment name.
To sync the new assessment with the original, click the checkbox under the name of the new assessment labeled ‘Keep new assessment synced with [Name of Parent Assessment].’
Once all fields are populated/checked, click the blue ‘Submit’ button to create your new crosswalked assessment. After submitting your selections, all parent assessment data will be copied to the crosswalked assessment.
Note: This is the only time you will be given the option to sync the crosswalked assessment to the parent assessment. After you click the blue ‘Submit’ button, you will not be able to go back and change your selection.
After checking the ‘Keep new assessment synced with [Name of Parent Assessment]’ checkbox and creating a new assessment, each control from the crosswalked assessment will now have a blue banner indicating synced status at the top of the control page.
As before, if you have been granted access to the parent assessment, you will be able to see the ‘Crosswalk History’ below the ‘Collaboration’ section on the right-hand side of the ‘Score’ tab. The ‘Crosswalk History’ will indicate the name of the parent assessment you crosswalked from and which controls from the parent assessment are contributing to the score of the control you’re currently viewing. The name of the parent assessment and the synced controls are presented as hyperlinks that will take you directly to them when clicked.
Note: All data fields for synced controls on the crosswalked child assessment will be disabled, including the ability to add evidence or make changes via bulk update.
To edit a synced control, you have three options:
- Cascade changes from the parent assessment
Edit the synced controls from the parent assessment (i.e., those listed in the Crosswalk History of the control) and allow the changes to cascade down to the child assessment.
When a change is made, the crosswalk is rerun in the backend, and all changes (e.g., evidence added, risk assessment determinations, control assignments, due dates, completion costs) made to the parent assessment will cascade down to the child assessment automatically.
Note: When multiple controls from the parent assessment are contributing to a control from the child assessment, the score of the control from the child assessment will reflect the highest-scoring synced control from the parent assessment. For the workflow state, the opposite is true. The workflow state will reflect the state of the least progressed control from the parent assessment.
- Unsync the control from the parent assessment. (This option is irreversible once enacted)
To unsync a control, follow the guidelines outlined below:
- Navigate to the control you wish to unsync from the parent assessment.
- Click the ‘Unsync control to edit it’ button at the far right of the blue banner.
- Confirm your intent to unsync the control by clicking the blue ‘Yes’ button within the pop-up prompt.
Note: Once you click ‘Yes,’ a notification will appear at the top of the page saying, “The control is no longer being synced with [name of parent assessment],” The control will be permanently unsynced from the parent assessment and cannot be relinked.
- Clone the child assessment and edit the control within the new clone
Cloning the assessment will allow you to retain the original synced crosswalked assessment while creating an identical unsynced copy that can be edited.
Administrators and Managers can clone an assessment by navigating to ‘Assessments’ within the ‘Administration’ tab of the home navigation bar and clicking the clone icon in the ‘Actions’ column to the right of the assessment name. Clicking the clone icon will generate a pop-up that asks you to confirm your action and name your new assessment.
Governance Dashboards
View History Slider
You know what they say about good things? They come in small packages! You thought we were going to say they come to those who wait, didn’t you? Nahhh, not this time – speaking of time.
Take the Infinity Stones, for example. You wouldn’t underestimate the power of one of those, would you? They’re tiny, but as Thanos knows, they pack a punch. The ‘View History Slider’ is no different – it’s a small addition packed with a lot of value. Think of it as your own personal time stone – your key to viewing the past. We don’t have a fancy necklace to house it like Dr. Strange but rest assured, it’s tied up with a pretty HTML bow. Let’s unwrap it together.
The View History Slider can be used as an alternative to the Compare feature within the Governance Dashboard widgets. Rather than selecting two points in time, the View History Slider allows you to view the full historical progression of current and target scores for a given widget on a sliding timeline.
To use the ‘View History Slider,’ follow the guidelines outlined below:
- Navigate to the ‘Governance’ tab within the home navigation bar.
- Click the white ‘View History’ button below the widget graph whose sliding timeline you wish to view.
- Click a point on the slider and drag your cursor left or right to view your compliance at different points in time.
Reports
Plan of Action and Milestones (POAM) Excel Report
Ever been dragging yourself along a hike in the heat of summer and checked an app to see how far away the trail end is, only to realize you’re only halfway there? Sometimes hitting your target is easier when you can’t see how far you have left to go. If you’re one of those people, there’s now a checkbox for that!
When downloading the Excel version of the POAM report, for both Control View and Action View frameworks, you can choose to exclude Target Scores from the report.
System Security Plan (SSP) Word Report
Whether you’re at a wedding or a restaurant, there’s a reason why so many people opt for the buffet. You get exactly what you want and none of what you don’t want. In this release, we’ve brought the buffet to the SSP!
Now, when downloading the Word version of the SSP, for both Control View and Action View frameworks, you can pick and choose which fields you want to be included for both Control View and Action View frameworks.
For Control View frameworks, you will have the following options:
For Action View frameworks, when choosing the SSP with control actions, you will have the following options:
Note: Total Score is a new field that will provide you with the assessment score.
*** This is a Security Bloggers Network syndicated blog from CyberSaint Blog authored by CyberSaint Customer Success. Read the original post at: https://www.cybersaint.io/blog/june-product-update
