

How to Simplify Access to S3 and Stop Spillage
Amazon S3 is a great place to store data in transit as well as cold storage for data backups and data purged from other systems. But how safe is the data in S3? Do you know who’s fishing around in your bucket? Is data leaking?
In this blog, we’ll explore:
- Typical missteps making setup insecure
- Amazon’s tools for securing S3 buckets
- How Cyral’s expertise at securing and monitoring data in S3 can simplify access and prevent data leakage.
Typical S3 Configuration
Let’s create a bucket in the typical way. From the Amazon S3 Web Portal, we can easily create a bucket.
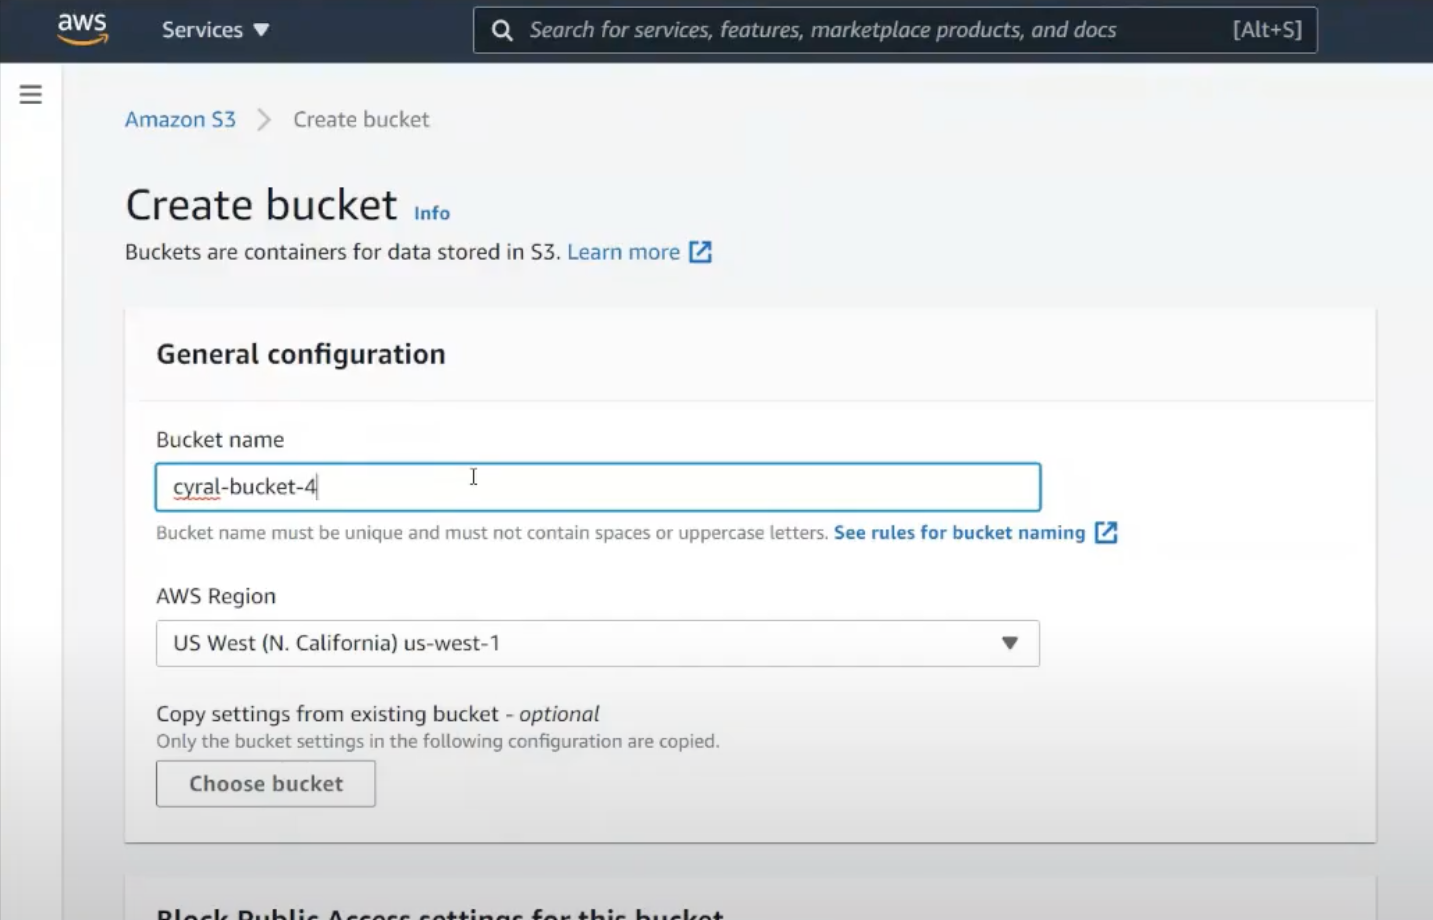
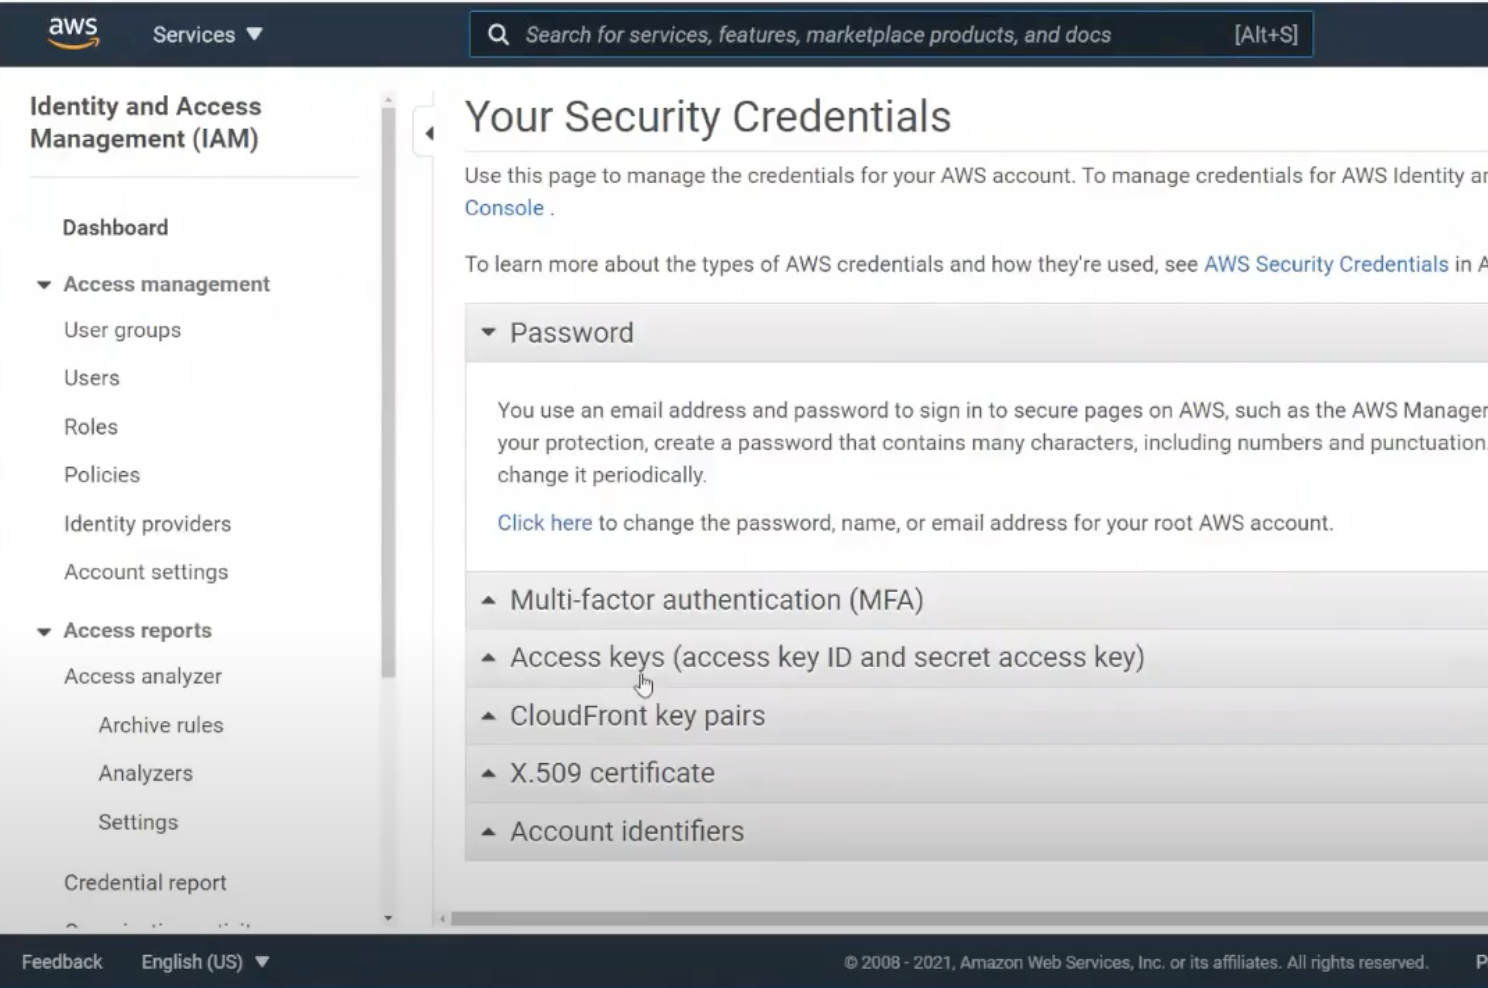
Now how do we authenticate into this bucket? We often head to the user profile, choose security credentials, and grab the key & secret.
We’ll set the key & secret into our app, and we’re running. This is definitely easy, but it’s also the least secure. What’s unique about S3 compared to more traditional data stores like Postgres and SQL Server is that this access key and secret is not specific to the bucket or even to S3. Rather it’s specific to a user. The key & secret can do anything the user can do.
So often we create a bucket with the root user, grab the root user’s key & secret, and call it done. However, this key & secret could now literally do anything in the account: spin up extra EC2 instances, start a crypto-mine farm, anything.
Let’s try again.
Securing an S3 Bucket the Wrong Way
Let’s create another S3 bucket from the Amazon S3 portal.
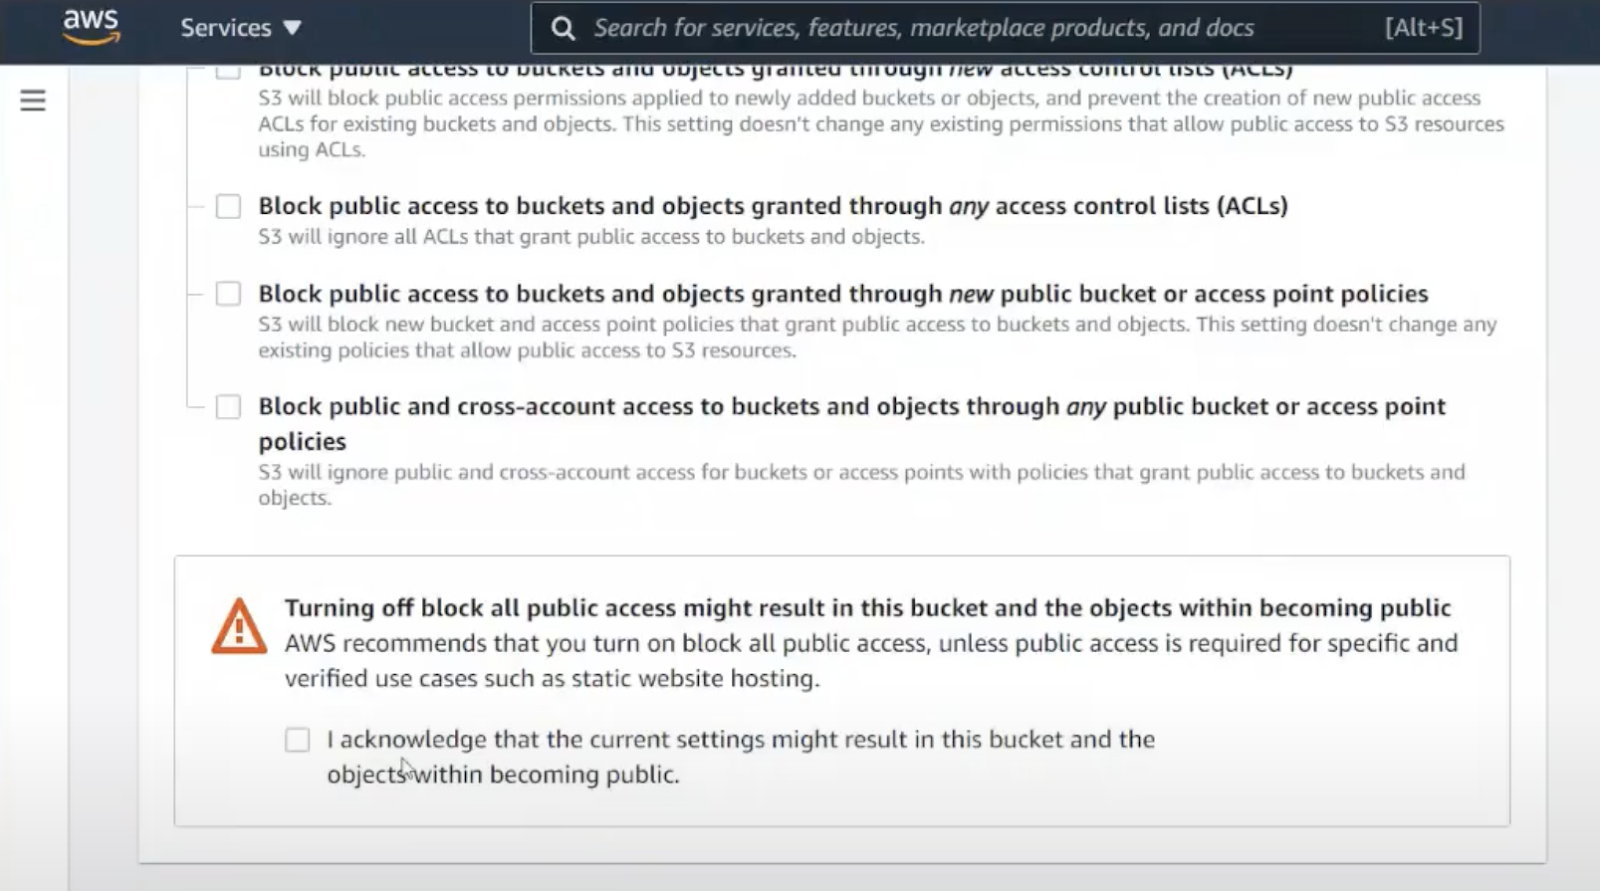
Where are the security settings? The only setting available is to leave the bucket completely exposed. The portal warns us this is almost always a bad idea and makes us opt into this insecure behavior. Let’s leave this setting alone.
Where are the security settings? Sadly, we can’t secure the bucket as we create it. Let’s save the bucket and modify it to find the permissions.
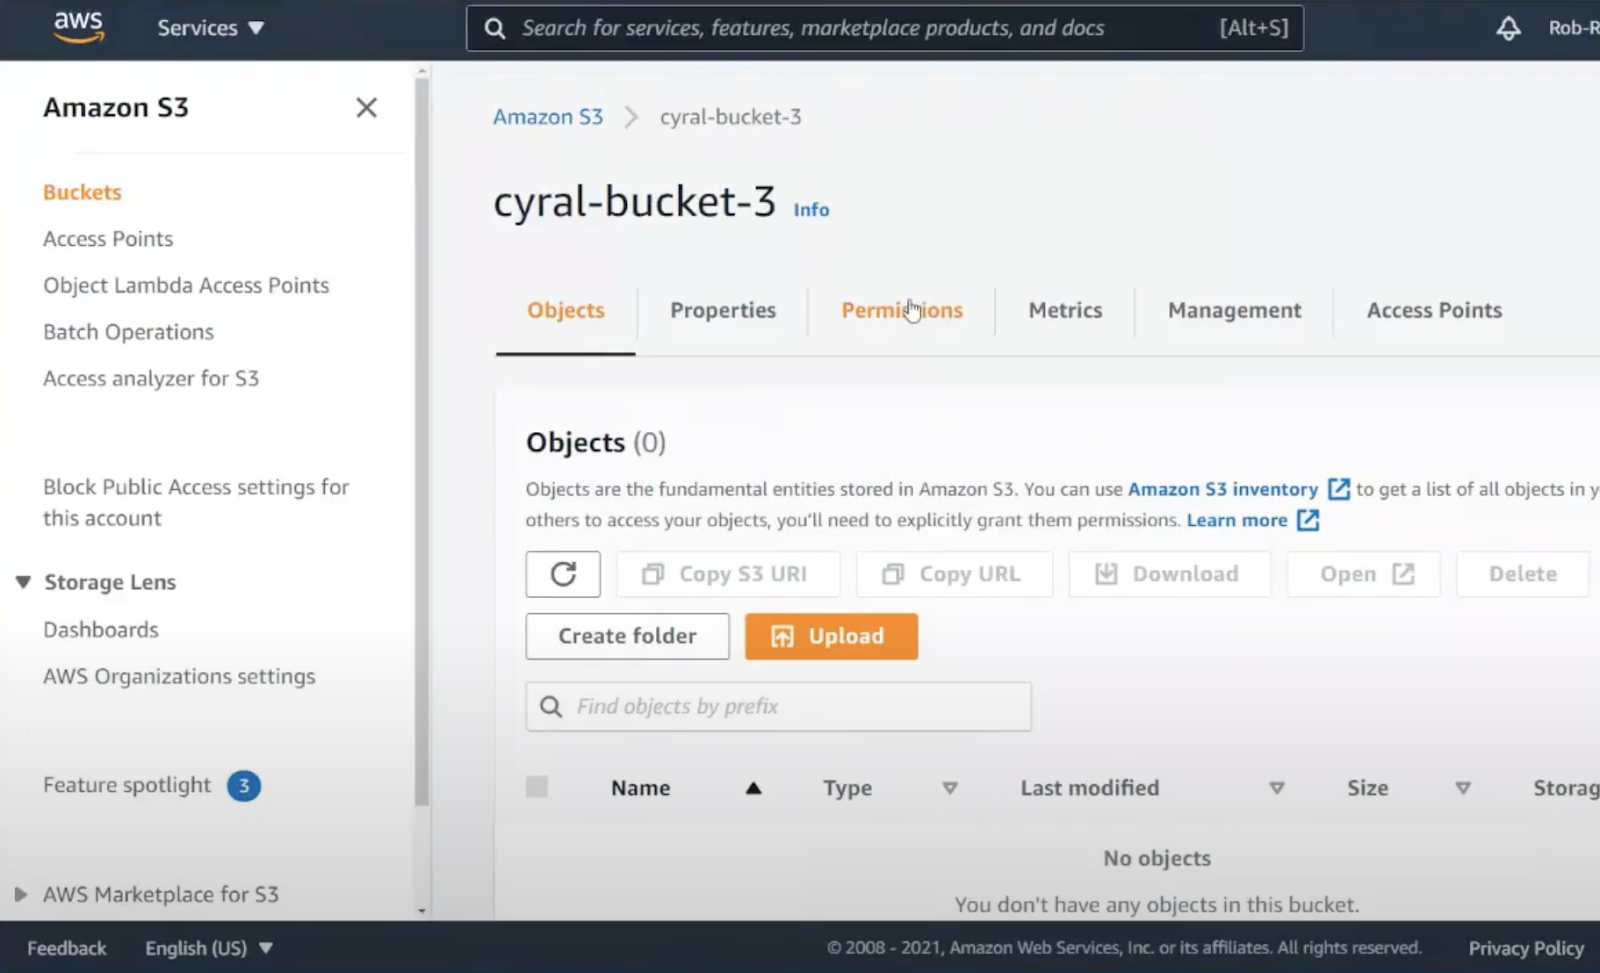
As we switch to the permissions tab, we could also turn on full access, but that’s still not a good idea. Scrolling down further, we find ACLs – Access Control List.
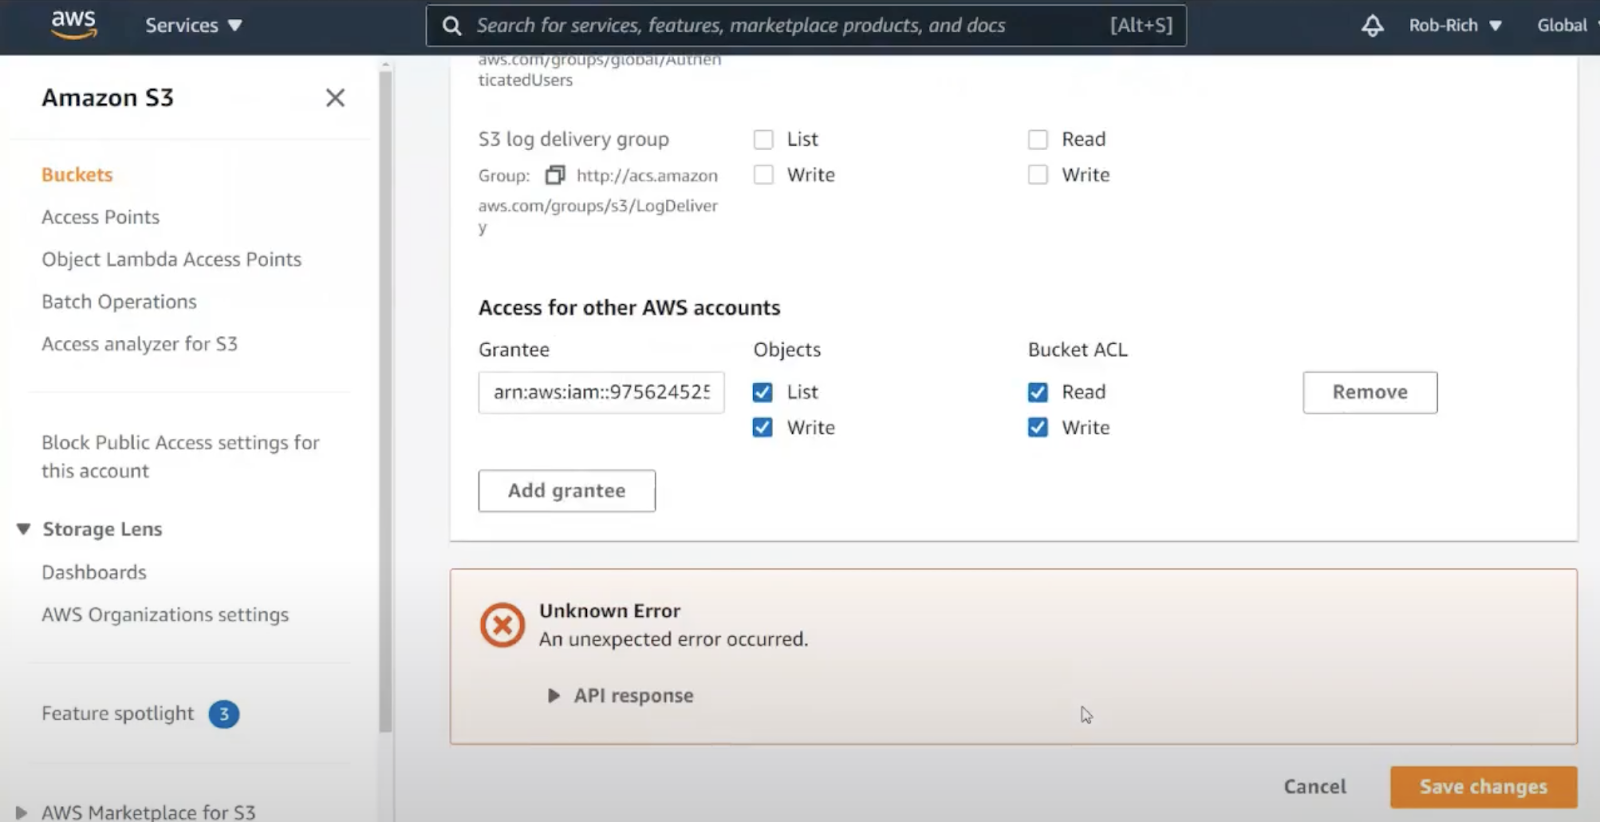
From AWS IAM, we can copy a user’s ARN, and try pasting it here. Sadly, this doesn’t work. This section is not for adding user permissions but rather for linking different AWS accounts together. Let’s keep looking.
S3 Bucket Policies
Let’s create a new S3 Bucket. After creating the bucket, we’ll edit it, switch to the Permissions tab, and scroll down to Policies. We saw how ACLs were about linking accounts, not granting permissions. Policies are the S3 way to secure a bucket. Let’s click on the Policy Generator.
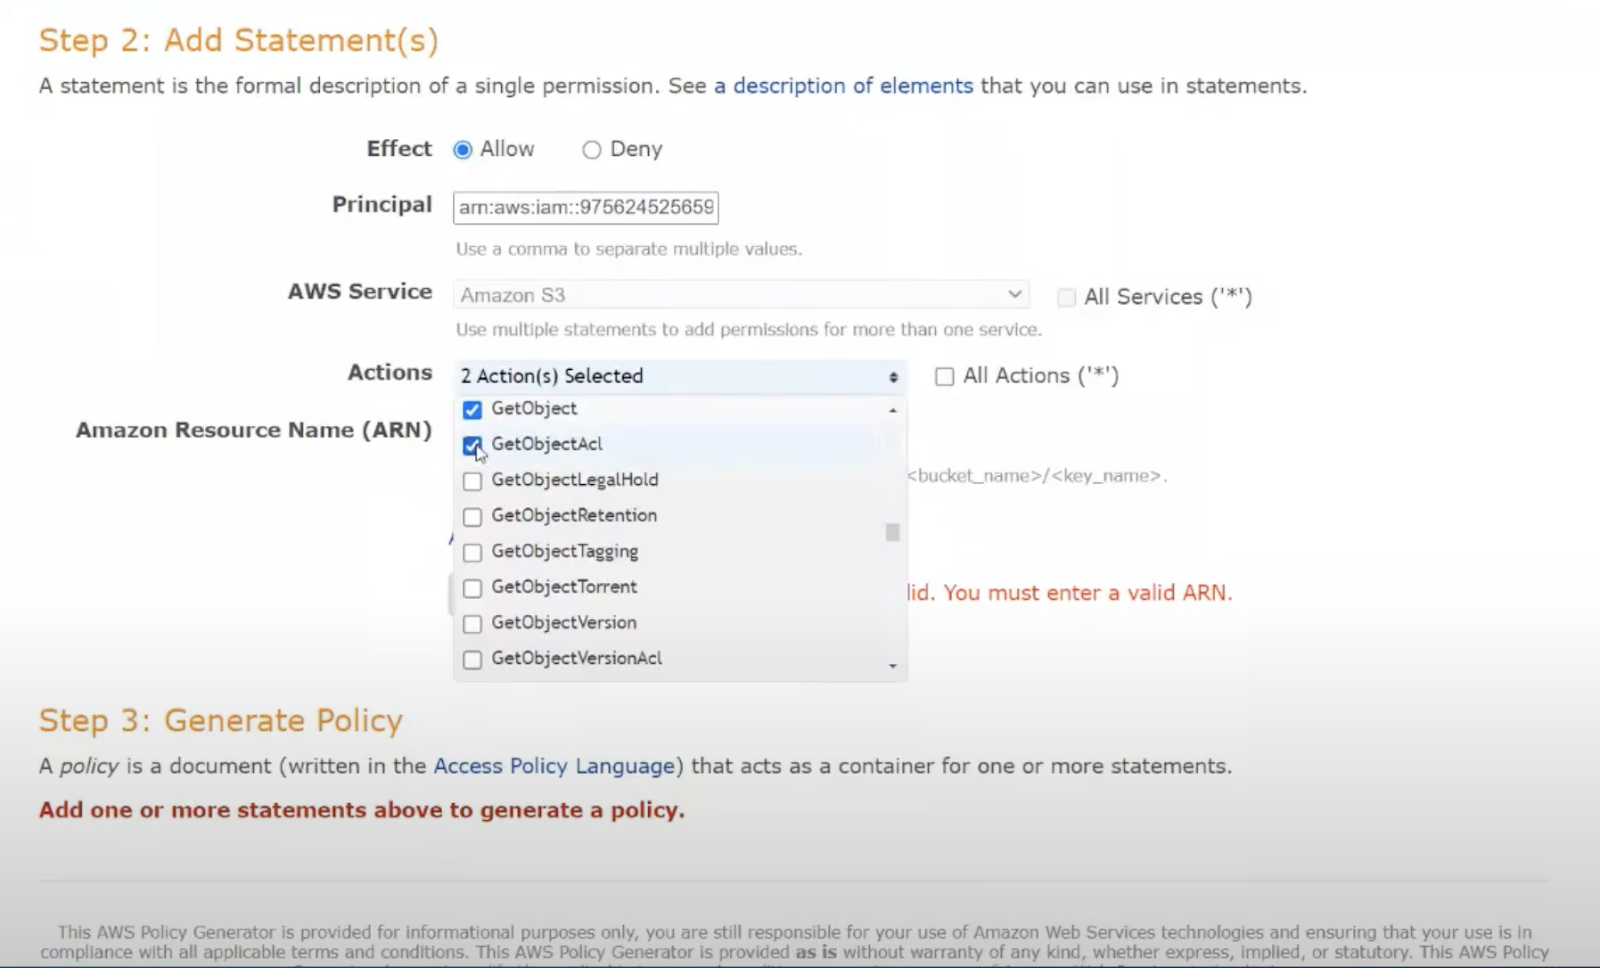
Inside the S3 Policy Generator, we want to generate an S3 bucket policy. We could definitely grant access to all objects or access for all users by specifying “*” here. We definitely don’t want to do that.
From IAM, we’ll copy a user’s ARN and paste it into the policy. Unfortunately, these policies can’t be created for groups or roles. We’ll also specify our S3 bucket name. Then we’ll select all the permissions we need:
s3:GetObject
s3:GetObjectAcl
s3:PutObject
s3:PutObjectAcl
s3:ListBucket
In this case, we want to be able to add content to the bucket, update the content, read the list of files, and read a file, but we don’t want to grant permission to delete objects in the bucket.
Let’s click Generate Policy, and copy the resulting JSON into place in the S3 configuration.
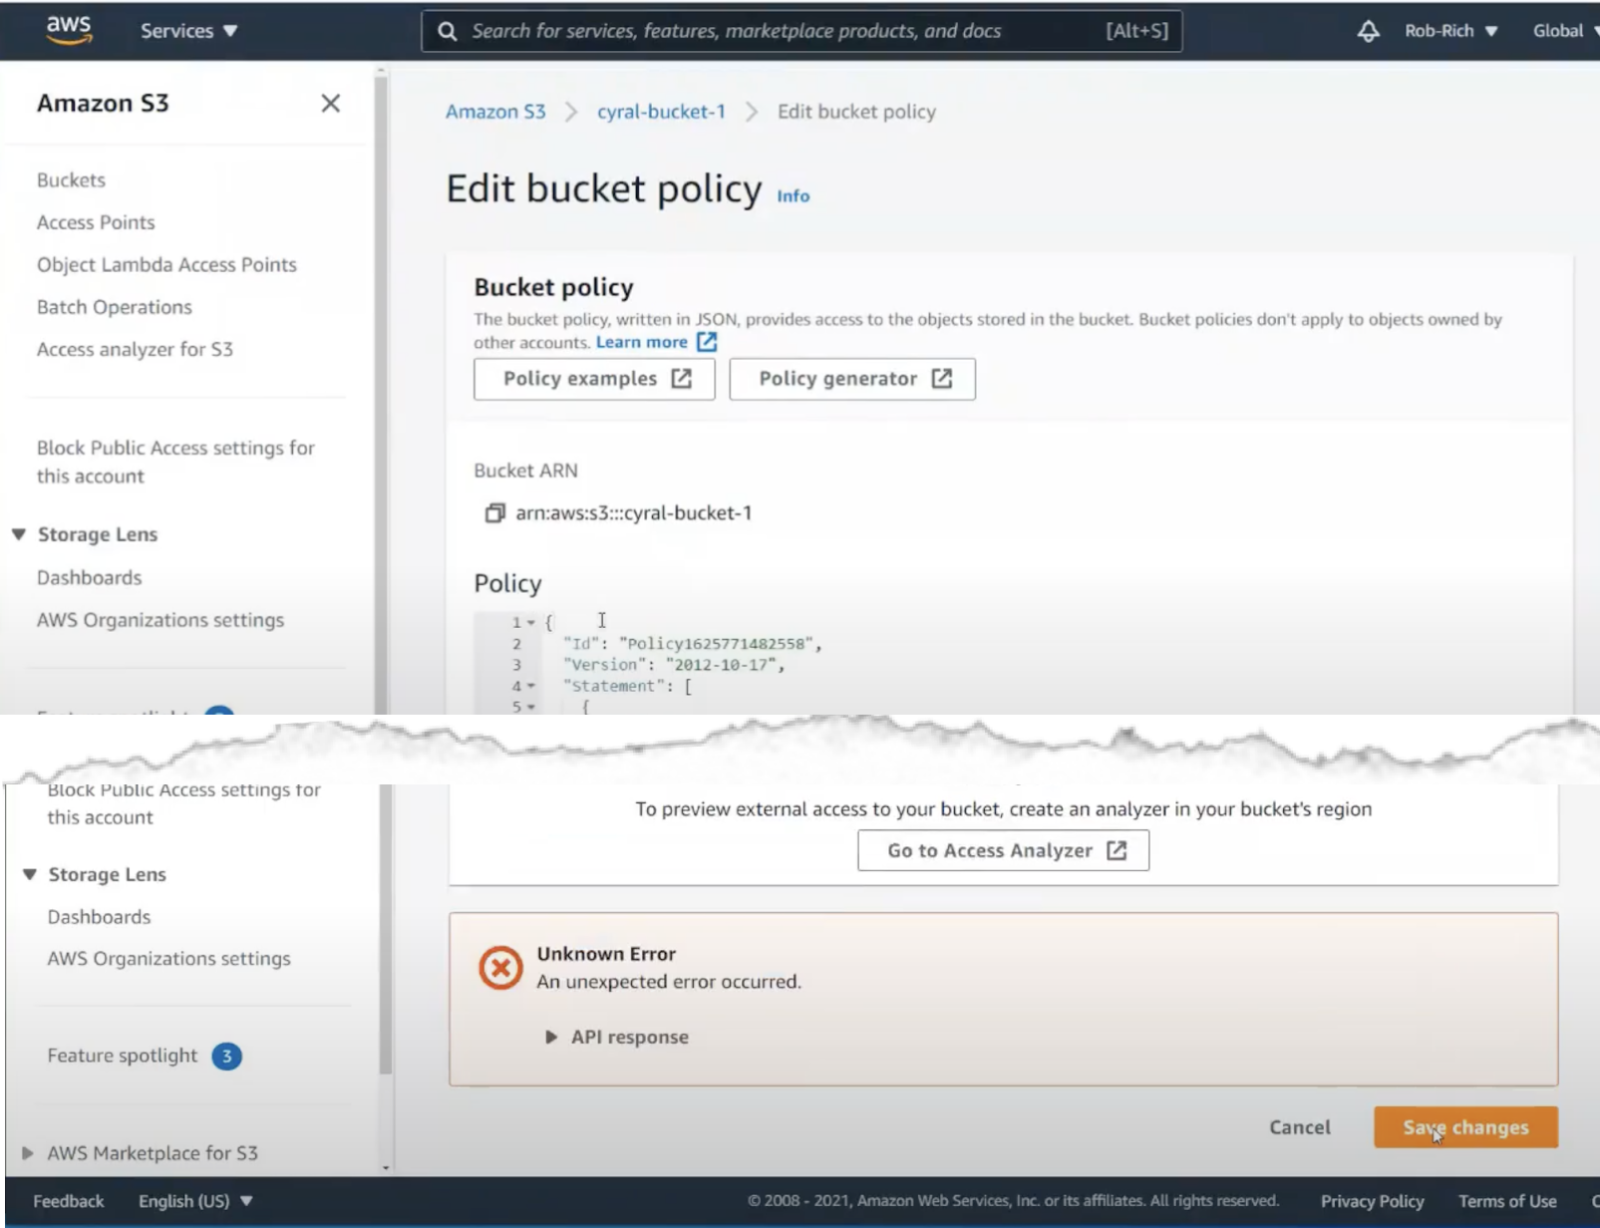
Now when we click save, we get an error. This error message isn’t very descriptive, so it’ll likely take a lot of searching to find the problem. It turns out that some of these permissions are specific to the bucket, and some reference bucket contents. E.g. some policy permissions must designate the bucket path as:
arn:aws:s3:::bucket_nameand some of the rules must designate it as:
arn:aws:s3:::bucket_name/*Note the trailing /*
Let’s fix up the policy, separating these into place, and we now have our completed policy:
{
    "Version": "2012-10-17",
    "Statement": [
        {
            "Effect": "Allow",
            "Principal": {
                "AWS": "arn:aws:iam::12345678:role/myrole"
            },
            "Action": [
                "s3:GetObject",
                "s3:GetObjectAcl",
                "s3:PutObject",
                "s3:PutObjectAcl"
            ],
            "Resource": "arn:aws:s3:::cyral-bucket-4/*"
        },
        {
            "Effect": "Allow",
            "Principal": {
                "AWS": "arn:aws:iam::12345678:role/myrole"
            },
            "Action": [
                "s3:ListBucket"
            ],
            "Resource": "arn:aws:s3:::cyral-bucket-4"
        }
    ]
}
Now when we click save, the policy is accepted, and the bucket is now secured.
Assuming a Role to Use a Secured S3 Bucket
Now that we have our bucket secured, we need to assume the role that grants us access to the bucket. To do this, we not only need to authenticate our terminal to AWS IAM, but we also need to switch into the correct role for the task at hand. This is quite a few steps, but we can do it.
Open a terminal, and let’s start interacting with the S3 bucket we just created. After downloading and installing the AWS CLI, the next step is to login to AWS:
aws configureOnce logged in, we’ll switch to the applicable role:
aws sts assume-role --role-arn "arn:aws:iam::12345678:role/native"
--role-session-name AWSCLISession
This is one long command, so make sure to copy it carefully. In this case, we’re using the role named “native”. There’s a lot going on in this command, and unfortunately, we’ll need to exactly type this command every time we want to access files in S3.
This command returns JSON that contains the environment variables we’ll need to set. Copy each secret, and export these environment variables:
export AWS_ACCESS_KEY_ID=...
export AWS_SECRET_ACCESS_KEY=...
export AWS_SESSION_TOKEN=...
It’s easy to forget to clear these variables after we’re done with the task. This is at best awkward if we then try to accomplish a different task that requires a different role. It opens up a security hole if we later lose control of the terminal session without clearing these secrets.
With the variables assigned, we can now begin the tasks:
aws s3 ls s3://cyral-bucket-2
aws s3 cp owl.jpeg s3://cyral-bucket-2/owl.jpeg
aws s3 ls s3://cyral-bucket-2
aws s3 cp s3://cyral-bucket-2/owl.jpeg download.jpeg
aws s3 rm s3://cyral-bucket-2/owl.jpeg
With these commands we list the bucket contents, then upload a file, list the bucket again, download the file, and then attempt to delete the file. The upload, list, and download work just fine. But our policy blocks deleting files, so this operation correctly fails.
aws rm s3://cyral-bucket-2/owl.jpeg

delete failed: s3://cyral-bucket-2/owl.jpeg An error occurred (AccessDenied) when calling the DeleteObject operation: Access Denied
In this error message, we don’t have a lot of detail. In the logs, we also don’t have much detail. This action was blocked. At best, all we have is the IAM role we assumed on the way in. We’ve lost the context of which user was attempting this task.
S3 Configuration Review
As we saw, it was much easier to configure an S3 bucket insecurely than to secure the bucket to a particular user or role. There are a lot of shiny options that look like they’d work but actually don’t. Even the policy editor created an invalid policy that required tuning. And we didn’t configure these buckets very consistently. Only one of the buckets we created actually had the security policy in place.
When using the bucket, we needed to know a lot. We needed to know the subscription id and role we wanted to assume. Once we executed the command to assume the role, we had to then set a bunch of environment variables. It’s easy to forget to clear these, leading to accidental disclosures.
Now, what if our primary user directory isn’t in AWS IAM, but rather in G-Suite or in Okta or in Active Directory? This often requires copying and pasting user and role details between systems, meticulously assigning the users back to their correct roles, double- and triple-checking as we go. This easily becomes really burdensome, and it’s really easy to miss either creating or worse deleting users, yielding even more maintenance burden.
We didn’t even discuss the awkward nature of AWS IAM configuration: getting users into roles & groups, creating user policies that allow them to assume the roles needed, and setting trust relationships between roles and services. There’s a lot that goes into IAM in AWS.
Sadly, S3’s built-in security controls aren’t as user-friendly or as comprehensive as we need.
Designing Policies
When we design roles and policies, we have two main choices. We can design policies for each use-case, and assign them to the applicable buckets, or we can create one holistic role that we can configure for all buckets. Each option has pros and cons. Let’s dive into each.
Let’s first consider the case where we design policies for each use case. On the up-side, we can tune each policy to exactly match the use-case, ensuring each role is only granted the exact permissions needed. On the downside, we must attach the policy to each applicable bucket. We saw previously how easy it was to misconfigure a bucket.
Next, let’s consider the case where we designed one policy that applied to all buckets. We need only define this policy once, and it applies automatically to all buckets. However, this policy must be the most permissive to allow people to get their work done. As soon as we’re blocking a legitimate task, the frustrated user will ask, “Can you just push the ‘turn off security’ button so I can get this done?” That’s hardly a well-architected security posture.
One policy for all is the easiest to apply, but the least secure. Many policies allow us to tune to specific use cases, but we need to apply them consistently.
Solving the Inconsistent Setup Problem
In our examples, we were clicking through the UI to create buckets. We saw how awkward the user experience was. We first need to create the bucket, then return to secure it. Click through the policy generator, edit the resulting JSON, and make sure to save it. How can we make this more predictable?
We could use tools to automate provisioning: Cloud Formation Templates, Terraform, Chef, Puppet, or Ansible could create reliable scripts for automating all the tasks. But these scripts easily get long and unwieldy as we enumerate all the necessary details. It can be difficult to keep this script up-to-date based on the evolution of the system and based on employee turnover.
S3 Access Logs
It’s difficult to trust S3 logs. Amazon documentation notes that “Server access log records are delivered on a best effort basis. Most requests for a bucket that is properly configured for logging result in a delivered log record. Most log records are delivered within a few hours of the time that they are recorded, but they can be delivered more frequently. … The completeness and timeliness of server logging is not guaranteed.” (emphasis added)
Let’s summarize. Amazon clearly states that S3 logs:
- Are delivered on a best-effort basis
- Will probably get delivered
- Likely will arrive within a few hours
- There is no SLA for log delivery
If we’re trying to use these logs to block data exfiltration attempts or other attacks on our S3 data, we’re almost certainly going to lose. The data is lost, and the attacker is already gone by the time the logs arrive. At best, logs delivered this way will help us prepare for the post-mortem. We can’t do very much to actively block any attempts at our data.
User Syncing
As users come online, we’ll need to add them to needful roles. Equally important, as users leave, we need to ensure their credentials are removed from all systems. As we begin the awkward conversation, we’ll probably lock them out of their Active Directory account, but I bet we’ll probably forget to also lock them out of the Amazon account. Even with these actions, the user may still have environment variables from assumed roles kicking around in a terminal giving them access to the S3 buckets.
The Ideal Scenario
Let’s take a look at our ideal scenario. What do we want from this mechanism? What is our best-case scenario for securing data in S3?
The characteristics in an ideal system include:
- Federated identity
- Consistent and reliable access logs
- Block unusual activity before it happens
- Automation to configure and use these credentials
These characteristics identify a great security posture. A user authenticates with a federated identity, avoiding the need to synchronize users between systems. They are able to access the necessary data in S3 to match their roles and claims as designated by SSO. If the user’s account is disabled, they automatically lose access to the data. We can capture this user authentication data together with their activity to make real-time decisions and block suspicious activity before it happens.
Adding Cyral
Cyral enables:
- Federated access control
- Consolidated policies and monitoring
- Real-time attack response
With Cyral, we’re able to model our users, roles, and permissions where they already live. We can leverage these credentials via SSO into our data stores like S3 buckets. As we model our data and enumerate sensitive S3 buckets and paths, we can block suspicious activity in real-time.
In this example, our users are in Azure Active Directory (AAD), but we could easily use G-Suite, Okta, ForgeRock, Auth0, AWS IAM, or other identity providers. We’ll also secure data in S3, though we could also secure data in other data stores like SQL Server, PostgreSQL, Oracle, and others. The logs flowing out of Cyral contain both the user identity details and the data store query in one place, and we can send them to Splunk, SumoLogic, Elastic, or others. In this case, we’ll send the logs to AWS CloudWatch.
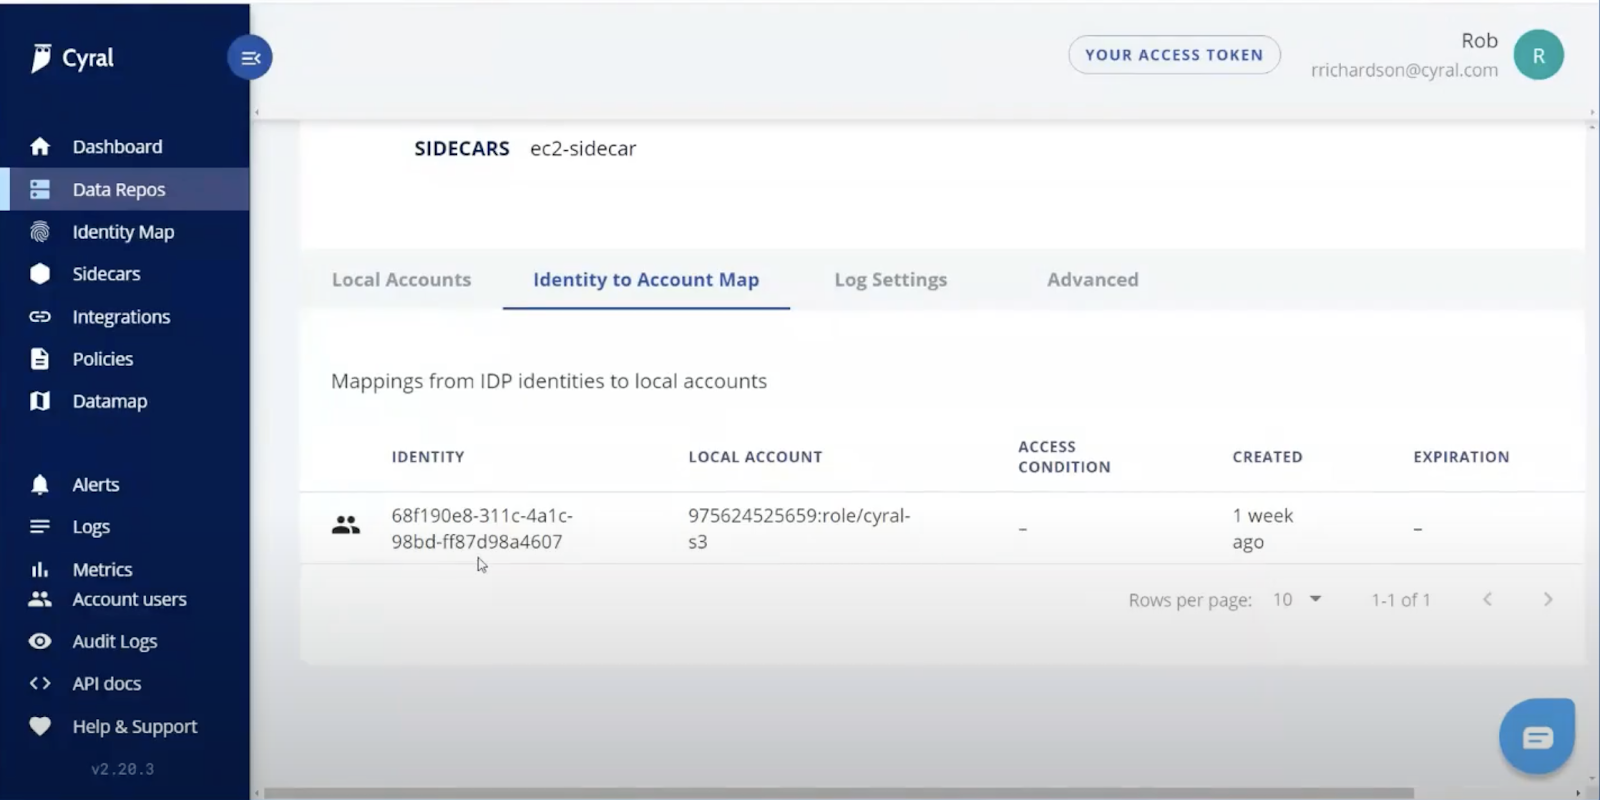
Here we have a Cyral proxy setup to connect AAD to S3. The Cyral sidecar connects the Azure Active Directory group on the left with the AWS IAM role on the right. Any user in the AAD group can authenticate into the S3 bucket. No user syncing is necessary.
After downloading gimme_db_token, we’re ready to authenticate to the data store. From a terminal, type:
gimme_db_token s3 --address your_company.cyral.com --profile sidecarAs we execute this command, it launches a browser. It first redirects to our SSO provider. If you’re not yet logged into Azure, it’ll prompt you to login. Next, we land on the Cyral page, noting the token is copied. Back in the terminal, the command has finished, the sidecar profile is updated in ~/.aws/credentials, and we’re now authenticated.
With the token retrieved, we can now accomplish our tasks:
aws s3 cp owl.jpeg s3://cyral-bucket-2/owl.jpeg --profile sidecar
aws s3 ls s3://cyral-bucket-2 --profile sidecar
aws s3 cp s3://cyral-bucket-2/owl.jpeg download.jpeg --profile sidecar
aws s3 rm s3://cyral-bucket-2/owl.jpeg --profile sidecar
Let’s enumerate these commands. We replace the file, list the bucket contents, download the file, and then attempt to delete the file. The upload, list, and download work just fine. But the Cyral policy blocks deleting files, so this operation correctly fails.
Note in this error message how it lists not only the role in S3 but also the AAD user.
aws s3 rm s3://cyral-bucket-2/owl.jpeg --profile sidecar

delete failed: s3://cyral-bucket-2/owl.jpeg An error occurred (Forbidden) when calling the DeleteObject operation: Request blocked as user [[email protected]] does not have permission to access the required resource
Cyral Policy
The policy that blocked this behavior isn’t in S3, rather it’s in Cyral. The beauty here is this policy can work universally across all data stores.
SENSITIVE:
  - repo: postgres
    attributes:
      - cyraldb.customer.email
  - repo: S3
    attributes:
      - cyral-bucket-2
This data map identifies the type of data in various data stores. In this case, we’ve titled it SENSITIVE and enumerated the S3 bucket and prefix that contains this sensitive data. We could create similar data maps identifying tables and columns in PostgreSQL or MongoDB that include PII, PKI, HIPAA data, and so forth.
data:
  - SENSITIVE
rules:
  - identities:
      groups:
        - 68f190e8-311c-...
    reads:
      - data:
          - SENSITIVE
        rows: 5
        severity: medium
    updates:
      - data:
          - SENSITIVE
        rows: 5
        severity: medium
Flipping over to the policy, we’ve identified the group in AAD, and the actions they can take on each type of data. Here we identify that the AAD group 68f190e8-311c- can read, create, and update SENSITIVE data but because delete isn’t specified, they’re not allowed to delete data.
With this policy in place, we’ve mapped Azure Active Directory users to AWS resources without duplicating users between systems. As users are removed from AAD, they’re automatically removed from AWS access because their SSO token is now invalid.
The data map allows us to identify those portions of the system that need extra care, and with a policy, we can grant access to data by type across all data stores. We can very specifically and granularly model user access across clouds and data stores.
Cyral Logs
Let’s look at the logs we generated as we proxied through Cyral to S3. In this case, we’ve logged to AWS CloudWatch.
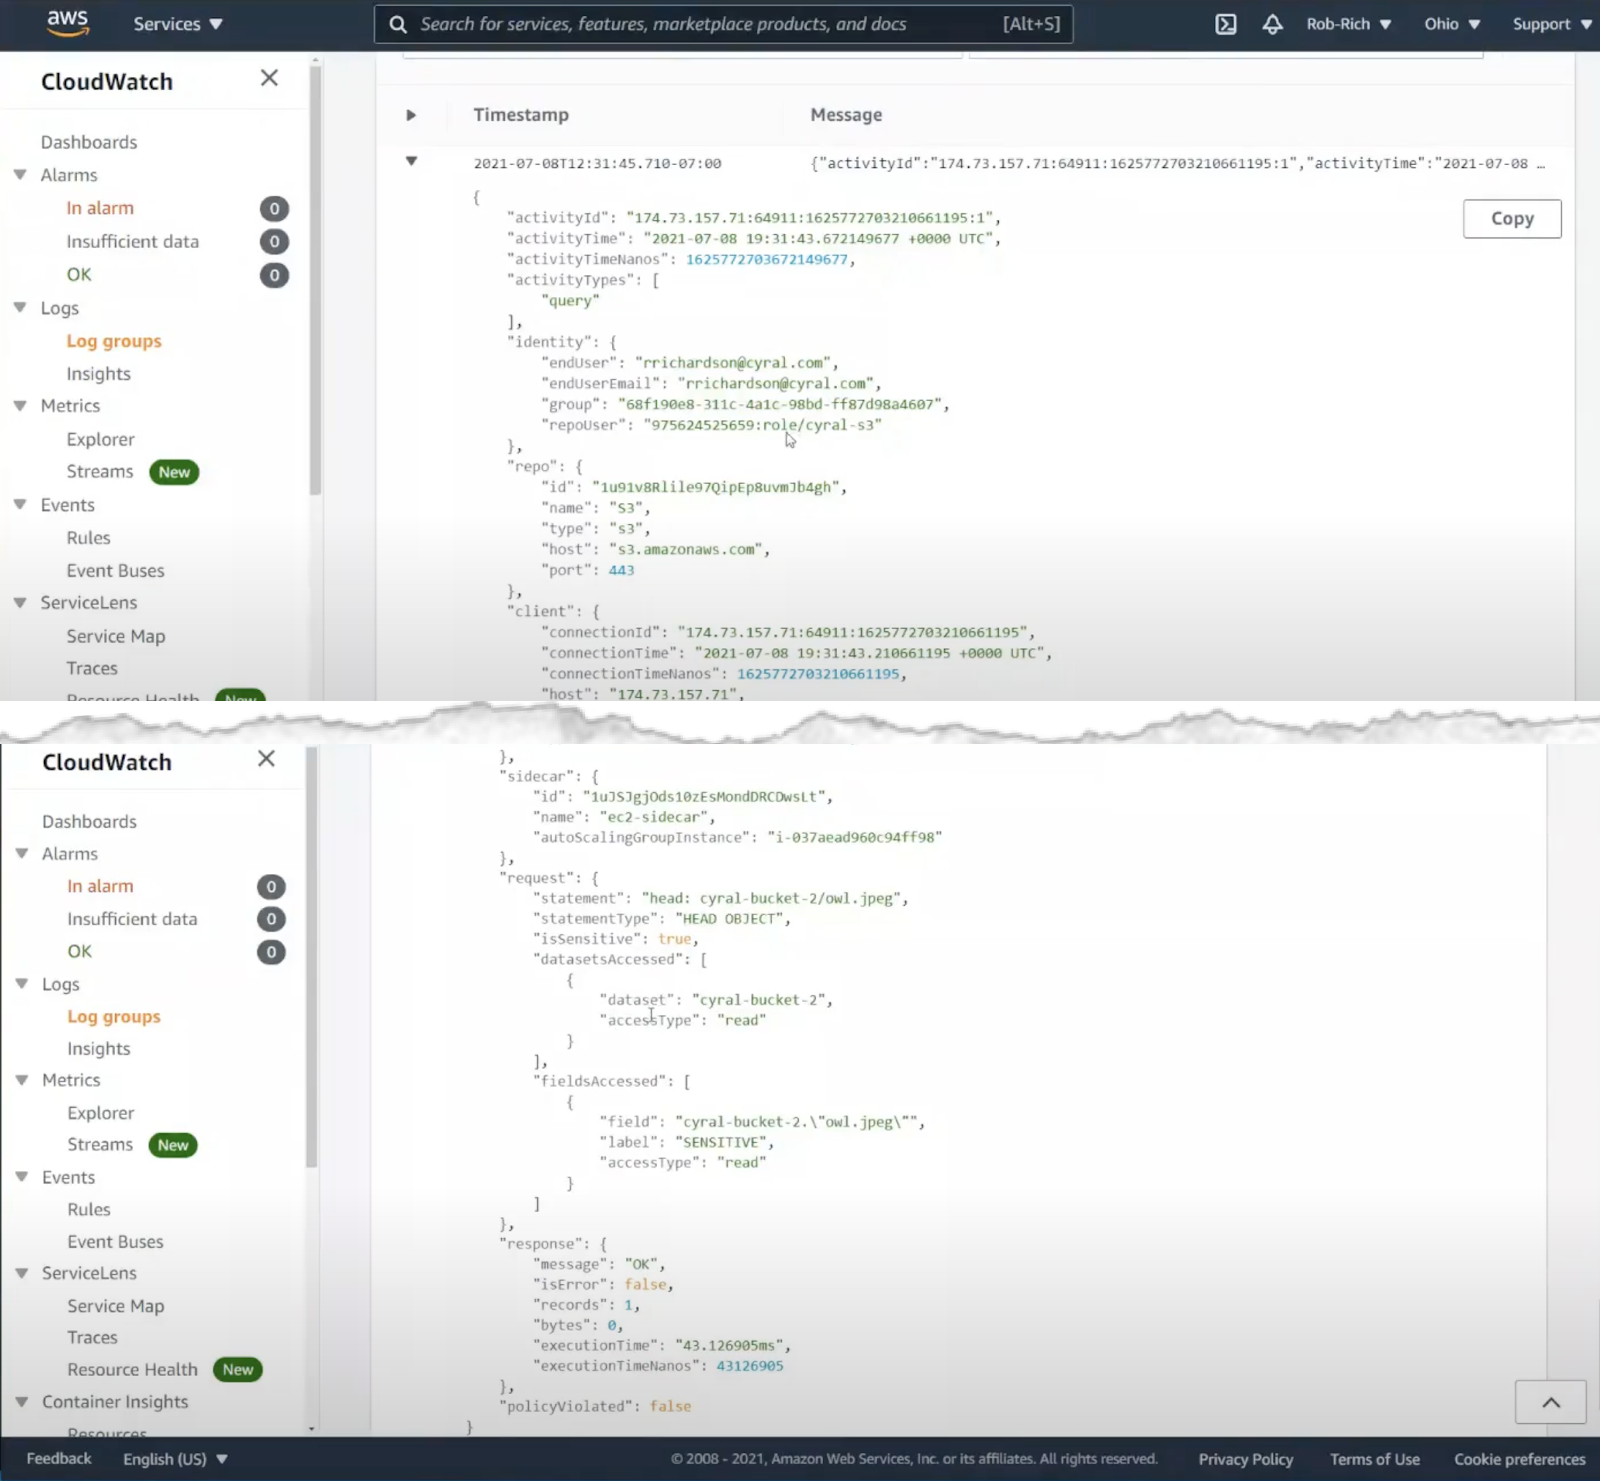
Let’s look at the log for listing the S3 bucket contents. This action succeeded. In the logs, we can see the user and group inside Azure Active Directory, and we can see the AWS IAM role used to authenticate to S3. We can also see the specific query we ran, date/time of the action, and we can see that the action was allowed.
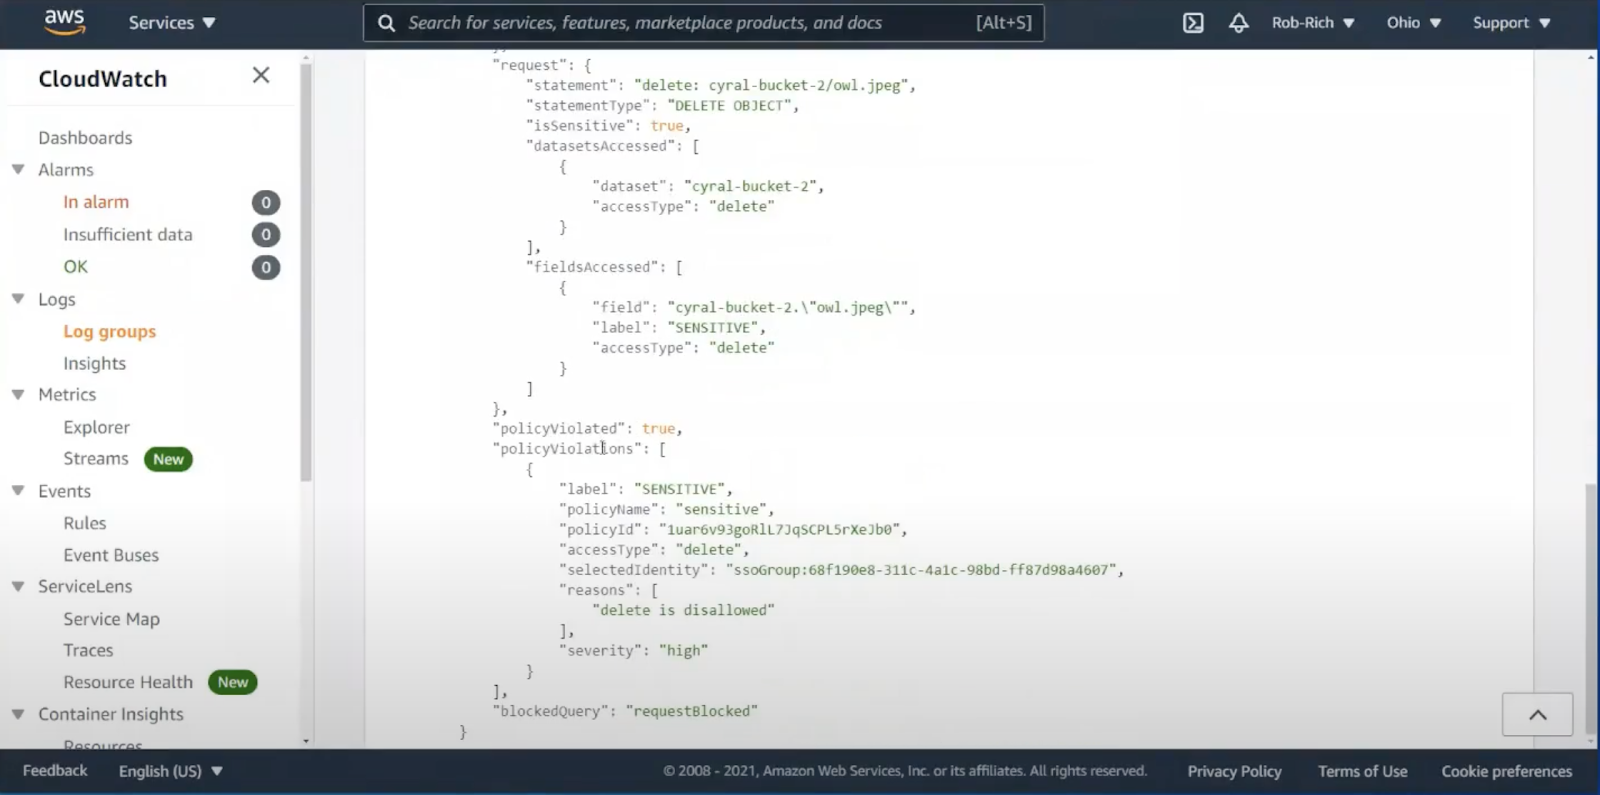
In this CloudFormation log, we look at the blocked delete request. We also see the user and group from Azure Active Directory, the AWS IAM role, the delete query, and we can see the action was blocked. We also see the policy name that was violated: we attempted to delete data marked as SENSITIVE.
Conclusion: The Cyral Difference
Cyral provides really elegant mechanisms for securing cloud-native data. We saw users from Azure Active Directory authenticating to AWS resources. We saw attribute-based policies that allowed or blocked access to these resources. We saw the logs that show the user & group from the SSO system, and the role used to authenticate to the data store. We saw how the delete request was blocked without any manual intervention. When a policy is violated, the action is immediately terminated, ensuring data isn’t exfiltrated.
Cyral is the cloud-native data security platform providing:
- Real-time attack response
- Consolidated policies & monitoring
- Federated, temporal authentication
Cyral is a great system for being able to stop the leaky S3 buckets.
This blog was based off of a recent Security Boulevard webinar. To see the demonstrations in action, check out the on-demand webinar here.
The post How to Simplify Access to S3 and Stop Spillage appeared first on Cyral.
*** This is a Security Bloggers Network syndicated blog from Blog – Cyral authored by Rob Richardson. Read the original post at: https://cyral.com/blog/how-to-simplify-access-to-s3-and-stop-spillage/
