

How to set up Git branch protection rules
There’s probably not a developer alive who is not familiar with Git. It is, after all, the most popular software versioning system out there. Git is awesome, truly. What it is not, however, is secure by design. It’s built for collaboration rather than code privacy and protection.
Branches are the important part of a collaborative work using Git. They allow for seamless collaboration between developers by providing a copy of the source code for each developer to work on. Once the development is done, then the changes in the branches can be merged into the main branch.
This introduces a risk of code commits which can affect the quality and security of the code in the main branches. Moreover, the code committed may contain hardcoded API keys, passwords or other code secrets. Though usually placed there for testing purposes and forgotten, these code secrets can find their way into public repositories. Which, in turn, can turn into a data breach event.
To avoid such risks, you can and should employ Git branch protection. Before we go over the steps of setting up branch protection on GitHub, GitLab and Bitbucket. Let’s quickly review what Git Branch Protections is, and why you should not delay its implementation on your repositories.
What Is Git Branch Protection?
Git branch protection rules are a powerful configuration option that enables repository administrators to enforce security policies. This helps protect the git branches from unexpected code commits or deletion by any unauthorized person(s) / user group(s).
Since it is such a critical feature for code quality and security, all Git hosting services support it.
Why You Need To Employ Branch Protection Rules Now
Implementing Git branch protection sooner rather than later will save you many future headaches. Instead of waiting for something unpleasant to happen to your repositories? Consider what may happen and take the steps needed to prevent it.
Developers with write access may delete important branches or delete the commit history by force pushing incompatible changes. Moreover, code pushed may be untested, may include code secrets and start a snowball effect of a security nightmare.
To avoid all this, you can protect the branches by using the branch protection rules. This will allow you to:
- Avoid unnecessary code commits to the branch
- Enforce code reviews before merging the code to the branch
- Maintain a healthy codebase without affecting collaboration
- Maintain a commit history (by disallowing force pushes)
- Prevent code secrets from leaking into your public repositories
In this tutorial, you’ll learn how to protect the branches in GitHub, GitLab, and Bitbucket.
How To Set Up Git Branch Protection Rules In Github
Github repository branches can be protected by setting up branch protection rules. This feature is available for public repositories with Github Free and Github Free for Organizations. Whereas it’s available for both public and private repositories with GitHub Pro, GitHub Team, GitHub Enterprise Cloud, and GitHub Enterprise Server.
Note that branch protection you enable via UI also applies to the commits that are done using the GitHub command line interface.
Step 1: Navigate to your repository homepage at Github.
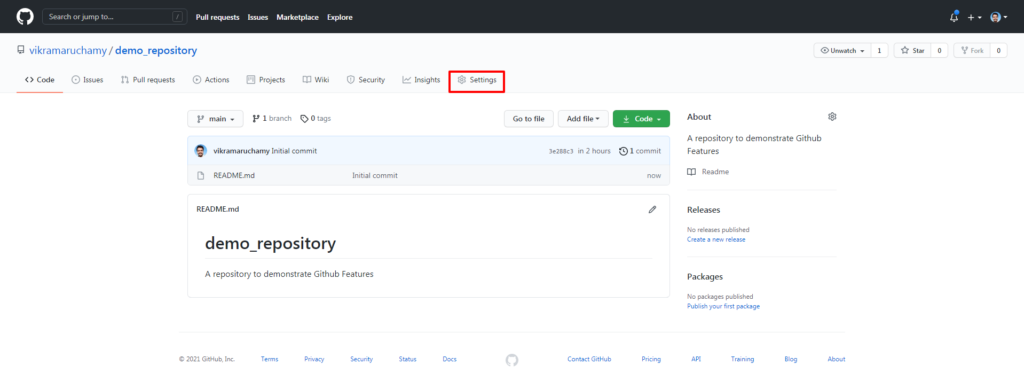
Then click on the Settings Option. You’ll be taken to the repository settings page as shown below. Click on the branches to set the branch protection rules.
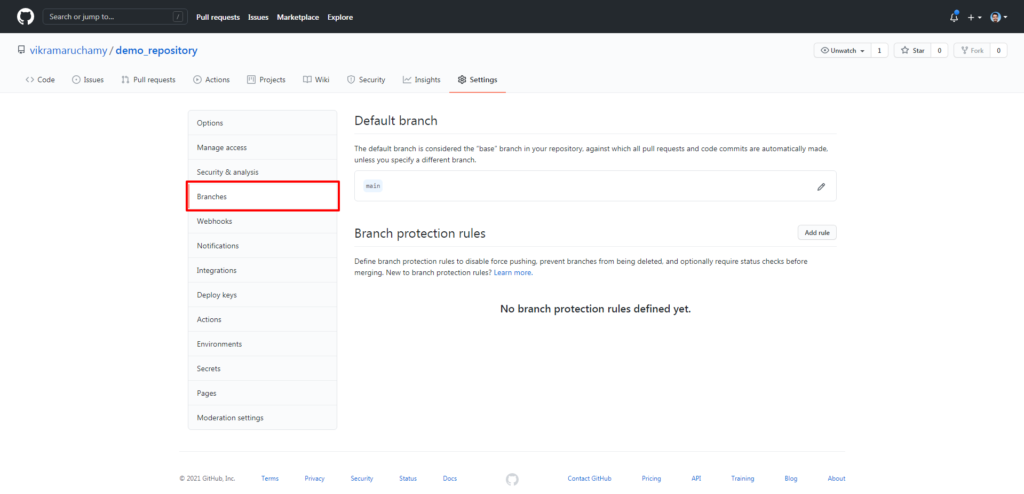
You’ll see the branches page where you can set the default branch for your repository and also add the branch protection rules.
Note: In Github, branch protection rules can only be added for the public repositories for free. For private repositories, you need to have a Pro or Teams Plan.
Step 2: Click on the Add Rule option as shown below.
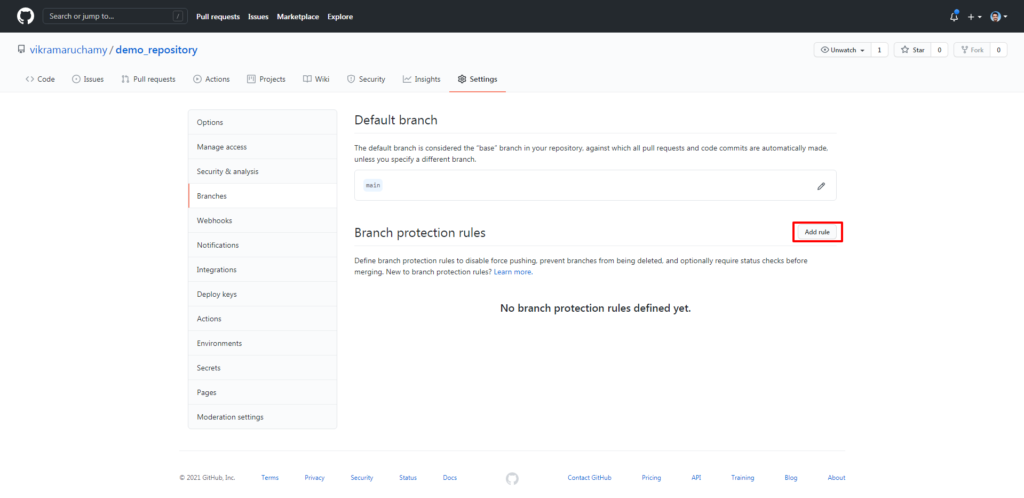
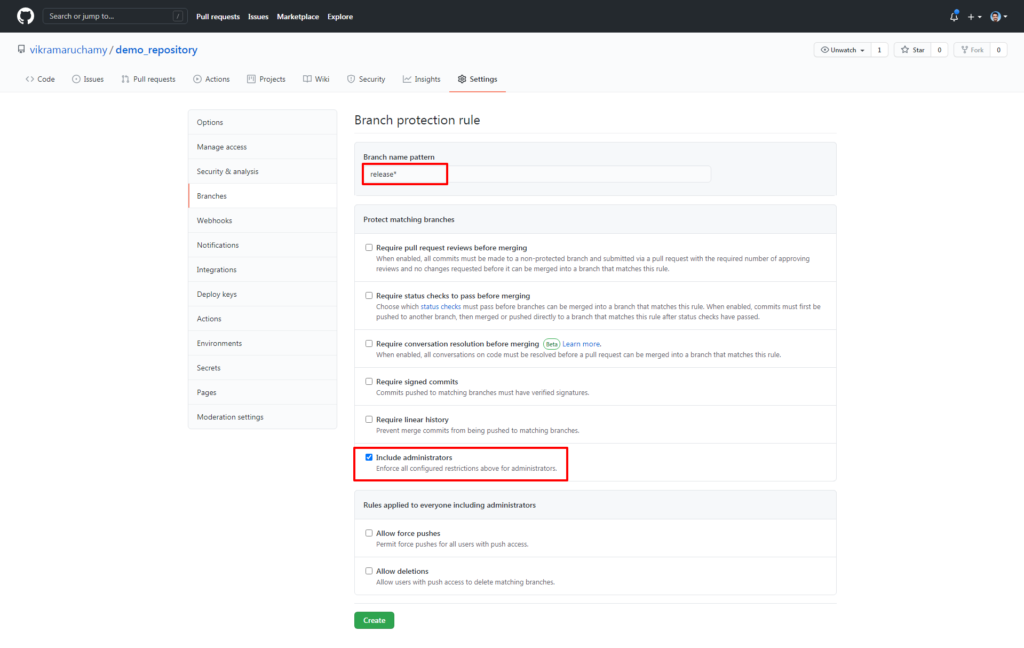
You’ll be taken to the Branch Protection Rule Page.
Step 3: Add the branch name you want to protect in the Branch Name field
It also supports wildcard options. For example, if you want to protect branches that start with Release, then you can use the name Release*.
Step 4: Add the protection rules to your branch
Next, you’ll add the branch protection rules. There are 6 options available:
1. Require pull request reviews before merging
2. Require status checks to pass before merging
3. Require conversation resolution before merging
4. Require signed commits
5. Require linear history
6. Include administrators
Now, let’s look at these options in detail and understand how to use them.
Require pull request reviews before merging
It’s a best practice to review the code before committing. This helps protect the branches from having buggy code or to avoid committing any sensitive information like passwords and API keys to the release branches.
Once you enable this option, you’ll see three sub options become visible.
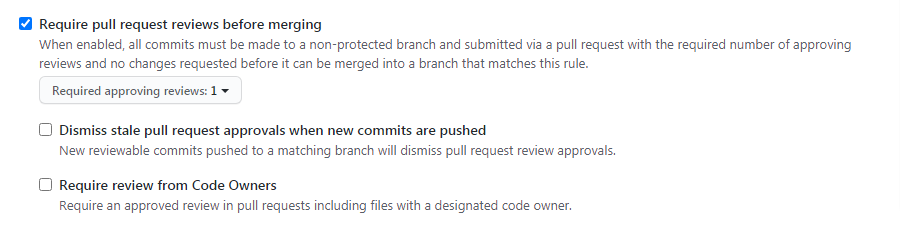
Required Approving Reviews: To select the number of reviews to be done before committing the code to the protected branch. 1 is selected by default. You can increase the number as you want.
Dismiss stale pull request approvals when new commits are pushed: Stale pull requests are pull requests which are inactive for a period of time. Enable this option, if you would like to dismiss the stale pull requests approvals when a new commit is pushed.
1. Require review from Code Owners
Each file can have defined owners. If you would like to get the file reviews only from those specific code owners, enable this option. If not, any administrator review will be accepted.
These reviews will ensure the code is properly reviewed and validated.
2. Require status checks to pass before merging
Each commit will have a status defined for it. Namely, error, failure, pending, success.
Enable this option, if you want the status checks to be in success state before merging the commits into the protected branches.
3. Require conversation resolution before merging
Enable this option if all the conversation must be resolved before merging.
4. Require signed commits
Enable this option, if you want verified signatures on the commits pushed to this branch.
5. Require linear history
Enable this option, if you want to prevent commits from being pushed from the matching branches. To learn more about linear history, refer to this link.
6. Include administrators
The branch protection rules created in this section applies only to the team members and it doesn’t apply to the repository administrators.
Repository administrators are also humans and to err is human. Hence, it’s recommended to review the changes also from the administrators to have a third eye view on the changes.
Enable this option to include the protection rules also to the administrators.
Next, there is a section that is applicable to everybody including the administrators.
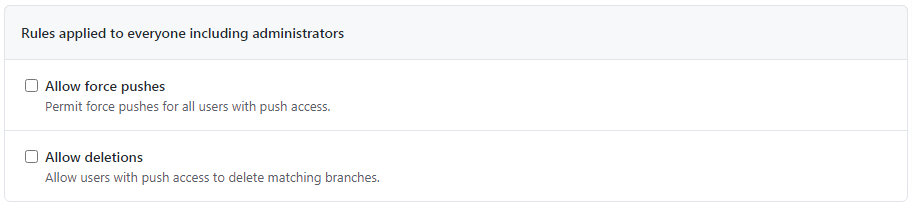
- Allow force pushes
Enable this option, if you want to allow those who have write permission to the repository to Force push the changes to the protected branch.
- Allow deletions
Enable this option, if you want to allow those who have write permission to the repository to have the delete privileges for the protected branch. By default, the protected branches cannot be deleted by those who have write permissions.
Step 5: Click Create to generate the branch protection rule.
You’re all done and your branches starting with name release are protected by the rules you have selected.
This is how you can protect your branches in the GitHub repositories.
Next, you’ll learn about setting the protection rules in GitLab.
How To Set Up Git Branch Protection Rules In GitLab
GitLab repository branches can be protected by setting up the branch permissions. It is available in all tiers (free, premium and ultimate).
Step 1: Navigate to your repository homepage
On the left side bar, click the Settings -> Repository option to open the repository settings page.
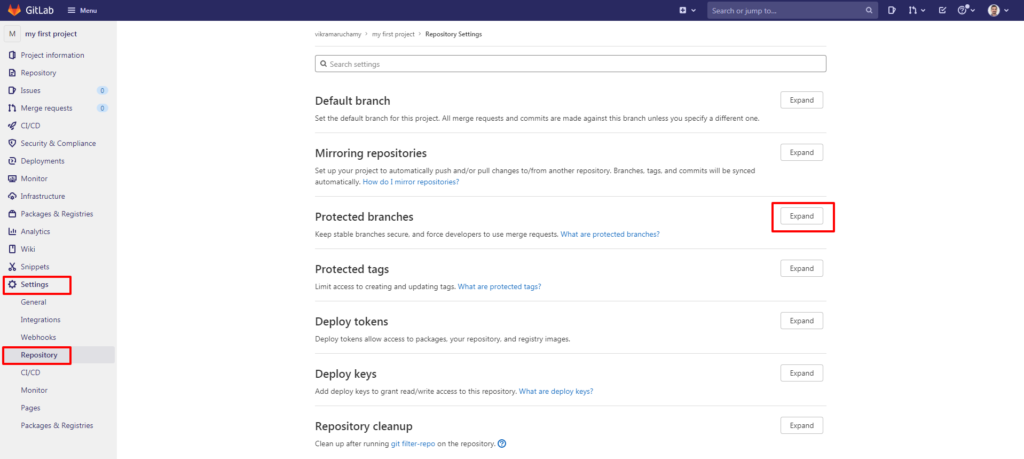
You’ll be taken to the repository settings home page.
Step 2: Click on the Expand option available near Protected Branches options to configure the settings for your “protected branches”
Now, you’ll see the options to protect the branch.
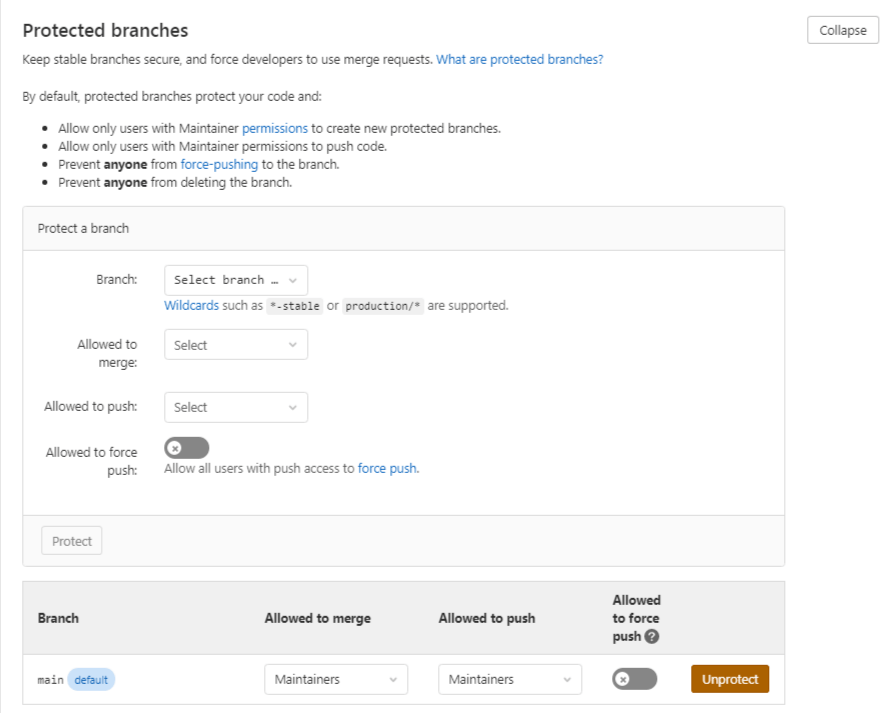
- Branch Name – Name of the branch to be protected. It’s Wildcard supported. For Example, To protect the branch that has a name starting with Release, you can use Release*.
- Allowed To Merge – You can select the role that is allowed to merge the code in the protected branch. Options are,
- Maintainers – To allow only repository maintainers to merge the code into this branch. Developers will not be able to merge the code into this branch.
- Developers + Maintainers – To allow both developers and maintainers to merge the code.
- No one – No one, including maintainers, will be able to merge the code into this branch. This option is useful when you want to preserve the code of each version you release into the production. In other words, it’s like snapshotting the code of the release version.
- Allowed To Push – You can select the role that is allowed to push the commits in the protected branch. Options are,
- Maintainers – To allow only repository maintainers to push the commits into this branch. Developers will not be able to push the commits into this branch.
- Developers + Maintainers – To allow both developers and maintainers to push the commits into this branch.
- No one – No one, including maintainers, will be able to push the commits into this branch. This option is useful when you want to finalize or freeze the code to start with the integration testing.
- Allowed to Force Push – To allow force push for the roles which have the push access. Force push is replacing the remote history with local history.
Step 3: Click Protect
Now your branch is protected and it will be added to the protected branch section as shown below.

In future, if you would like to unprotect this branch, you can just click Unprotect.
This is how you can set up Git Branch protection rules in GitLab.
How To Set Up Git Branch Permissions In Bitbucket
Bitbucket repository branches can be protected by setting up the branch permissions. It is available for all the plans (Free, Standard, and Premium).
Step 1: Navigate to your repository homepage
On the left sidebar, click Repository Settings and then select Branch Permissions in the workflow section as shown below.
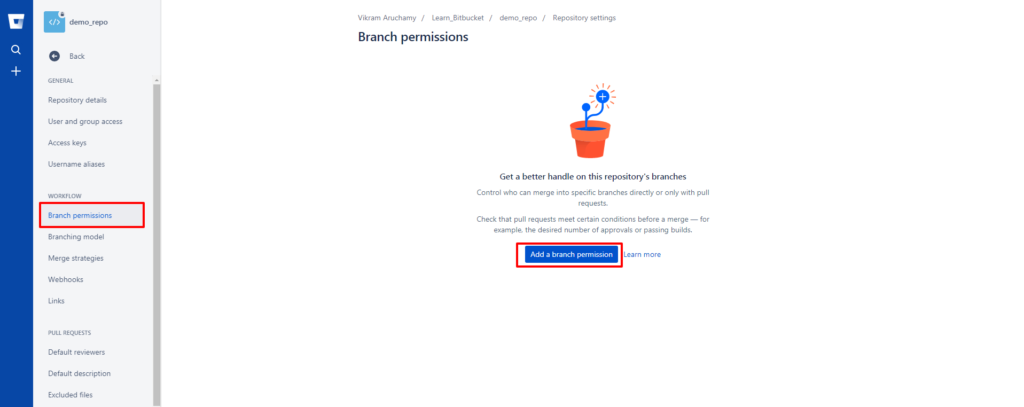
Step 2: Add a branch permission
If this is the first time you are setting branch permission, you’ll see the Add a branch permission option as highlighted above. Click that to add new branch permission settings.
You’ll see a dialog with options to protect the branch as shown below.
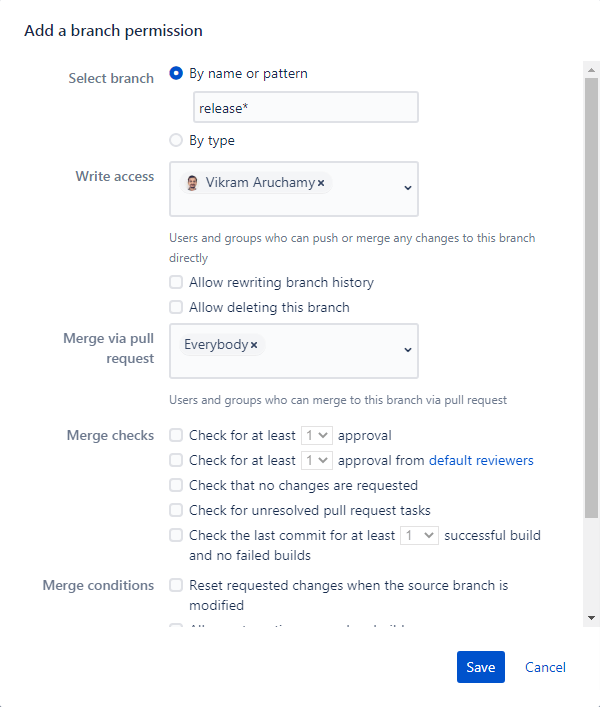
Select Branch – Name of the branch to be protected. It’s Wildcard supported. For example, To protect the branch that has a name starting with Release, you can use Release*.
You can also select based on branch type. Available types are Development, Hotfix, Release, Feature, Bugfix.
- Write Access – You can add a specific user(s) or a user group(s) to whom you want to provide write access to this branch. This will allow the users to Push or Merge the changes to this branch.
- Merge Via Pull Request – You can add a specific user(s) or a user group(s) to whom you want to allow merge via Pull Request.
- Merge Checks – You can add checks to be done before merging the change into the branch. For example, Approval, Unresolved pull requests etc.
- Merge Conditions – You can specify custom conditions to be validated before merging the code. For example, to allow automatic code merge when the build is passed.
Step 3 – Save your branch permission
Click save and you’re done.
Conclusion
To summarize, you’ve learnt how to protect the branches from unexpected code commits or branch deletion which will break the software builds. You’ve learnt how branch protection is different in different source code management systems GitHub, Gitlab and BitBucket.
Git branches must be protected to avoid the unnecessary/buggy code commits or accidental file deletions. Also, commit history must be preserved in order to keep track of the changes throughout the software development life cycle. So that, if you run into an issue at a later point of time, you can understand the importance of each commit and why it was done. To preserve the commit history branch protection becomes imperative by restricting Force Pushes.
In addition to this, by enforcing the code reviews using the branch protection, you can prevent committing the secure data such as API keys and passwords from being committed to the repository.
All the above points will be taken care when you protect the branches using the branch protection rules and you can do it by following the steps demonstrated in this tutorial for different source code management systems GitHub, GitLab and BitBucket.
The post How to set up Git branch protection rules appeared first on Spectral.
*** This is a Security Bloggers Network syndicated blog from Security boulevard – Spectral authored by Eyal Katz. Read the original post at: https://spectralops.io/blog/how-to-set-up-git-branch-protection-rules/
