

How to Audit and Test for Sudo’s CVE-2021-3156 with LogRhythm
TL/DR
Qualys has reported that Sudo, before 1.9.4p2, has a heap-based buffer overflow vulnerability that allows privileged escalation to root via “sudoedit -s” and a command-line argument that ends with a single backslash character. Detecting a successful exploit of the critical vulnerability, CVE-2021-3156, is very difficult and will greatly depend on your audit capabilities. Detecting this type of malicious activity is greatly improved by using software designed to perform detailed process monitoring — such as LogRhythm SysMon agent. With a configured LogRhythm SysMon agent and our out-of-the-box UEBA AI Engine rule, “Compromise: Unusual Auth then Unusual Process,” an analyst would have been able to detect the attempted exploit of this vulnerability even prior to the details becoming public knowledge. I was able to successfully run and detect a working exploit by Rajvardhan Agarwal r4j0x00. In most environments, “Sudoedit” should be used rarely, and analysts should consider searching for the historical use of “Sudoedit” in their environment to find any indicators of possible compromise.
CVE-2021-3156: Heap-Based Buffer Overflow in Sudo
On January 26th, 2021, Qualys released a blog discussing their finding of CVE-2021-3156: Heap-Based Buffer Overflow in Sudo (Baron Samedit). This vulnerability affects a wide range of Unix distros, including Mac. I welcome you to peruse the references provided throughout this blog to further your education on this vulnerability and learn ways to test the exploit as I did. In this journey, I will demonstrate that even with additional audit policies in place, detecting the actual exploit is very difficult and will likely require additional process monitoring software like LogRhythm SysMon for Linux. In this test, I was able to successfully detect the exploit through our AI Engine rule named “Compromise: Unusual Auth then Unusual Process”, which is part of LogRhythm’s out-of-the-box UEBA content module. The testing was focused solely on the known tests with references in this blog, and Ubuntu 18.04.3 LTS.
Getting Ready to Test: Building and Configuring the Test VM
I choose to build a quick test infrastructure on my workstation using Hyper-V. Here is how I went about building the test VMs using Hyper-V “Quick Create” function and selecting the Ubuntu 18.04.3 LTS image.
Creating the Ubuntu 18 Instance: Hyper-V
- Select “Quick Create”.
- Select “Ubuntu 18.04.3 LTS”.
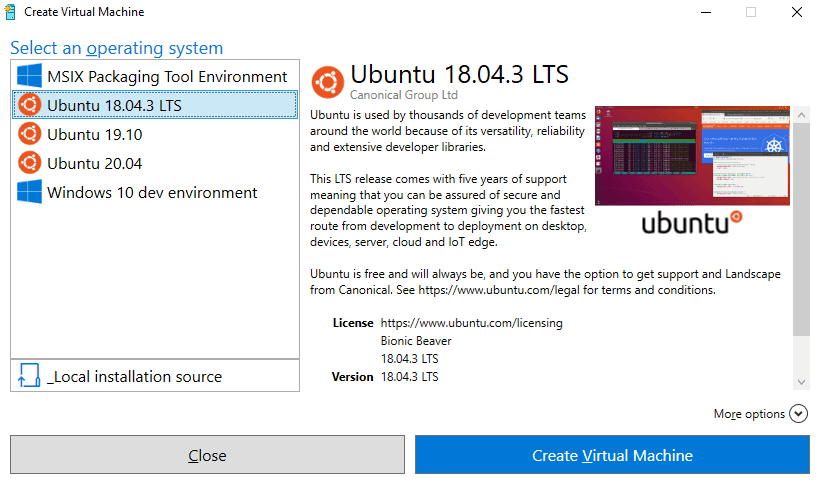
Figure 1: Hyper-V Quick Create: Ubuntu 18.04.3 LTS
- Under “More options”, feel free to change the name of the VM.
- Click on “Create Virtual Machine”.
- Once done, you’ll see a screen like this:

Figure 2: Hyper-V Quick Create completed
- Click on Edit settings, and modify the number of processors from six (or however many you may have listed) to two.
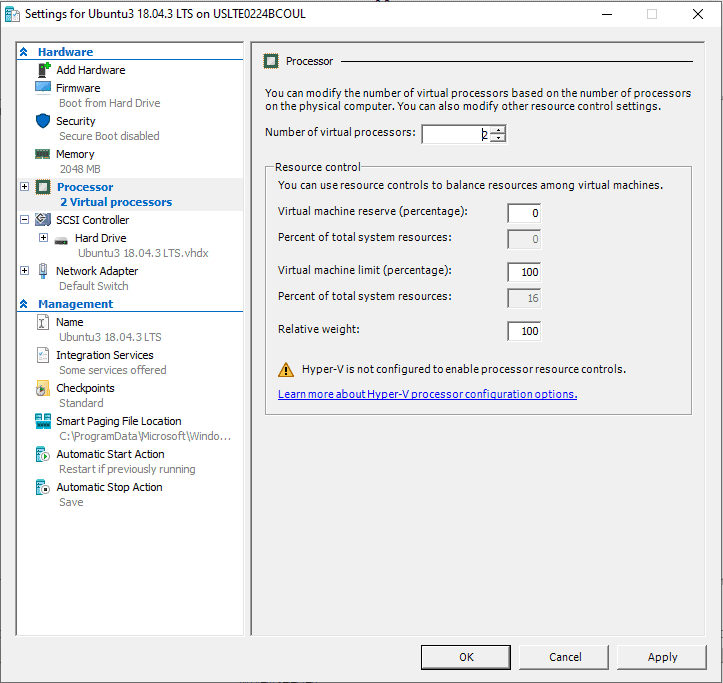
Figure 3: Change the number of processors to 2 in the Hyper-V VM settings
- Click “OK” when done modifying settings.
- Click on “Connect”.
- Click on “Start” to start the VM.
Figure 4: Hyper-V VM ready to be turned on and connected to
- Walk through the first-time setup screens:

Figure 5: Ubuntu first time boot configuration screens
Configure Ubuntu
Disable Auto Updates
- In Terminal and as root, enter the following command: nano /etc/apt/apt.conf.d/20auto-upgrades
- Change both values from 1 (enabled) to 0 (disabled).
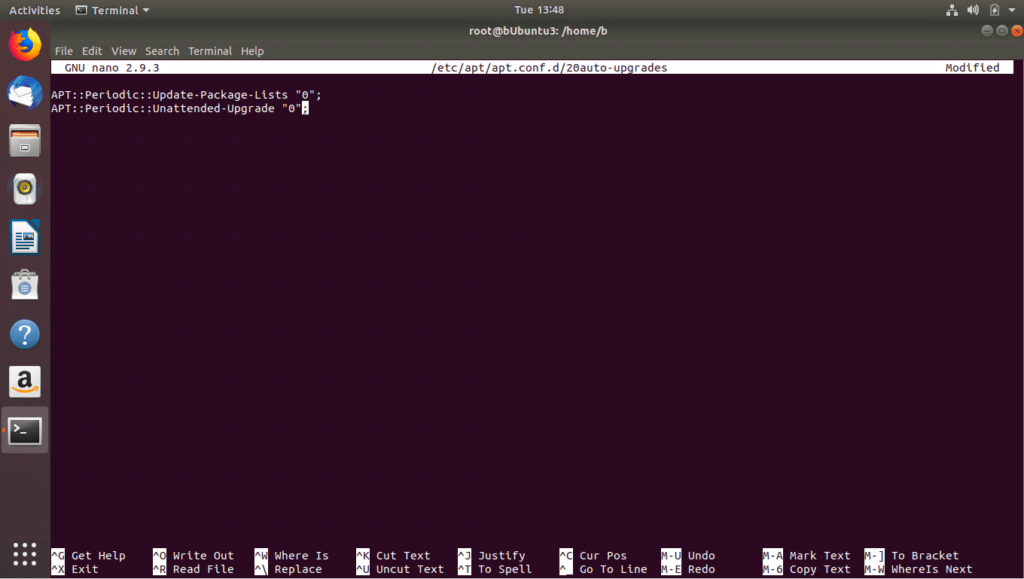
Figure 6: Disable updates for testing purposes in Ubuntu
Configure Syslog
- Edit /etc/rsyslog.conf.
- Change the permissions to “adm” and enter the Syslog Server information. The “adm” group has access to most of the log files in /var/log.
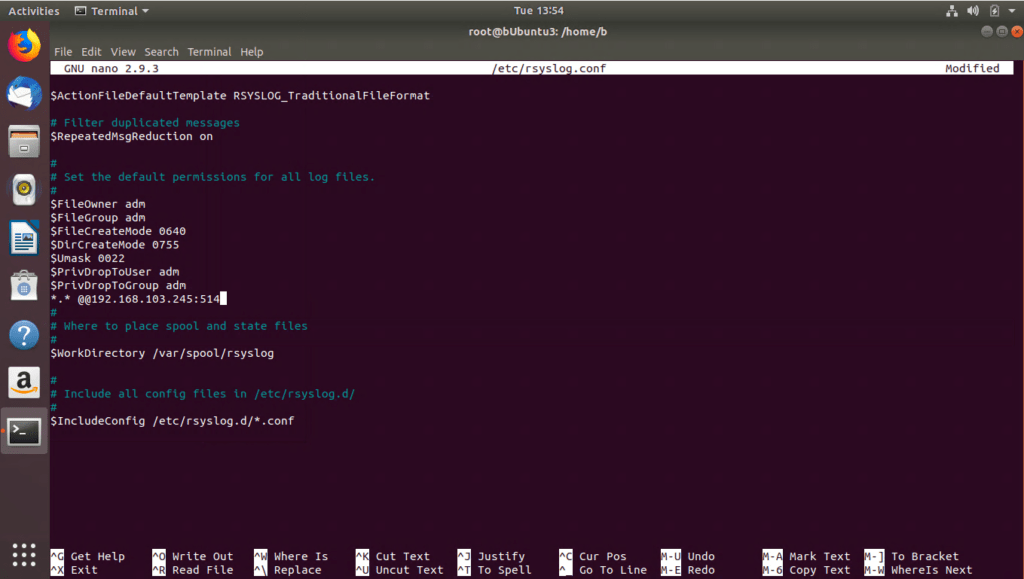
Figure 7: Configure rsyslog.conf in Ubuntu
- Although you could restart services at this point, I just rebooted, so I recommend doing the same.
Configure LogRhythm Syslog Acceptance
Note: Configuring a Syslog listener is not covered in this blog. Please refer to LogRhythm documentation on how to configure a Syslog listener in your environment.
- In Deployment Manager, select the “Log Sources” tab and you should see your new Syslog log source ready.
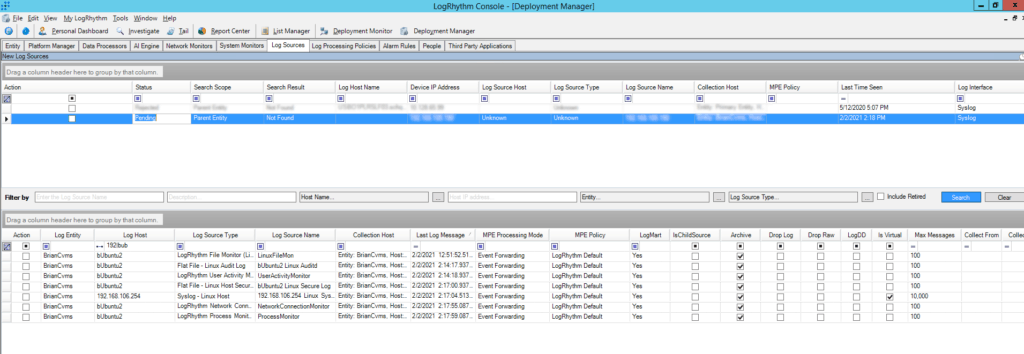
Figure 8: LogRhythm Deployment Manager: Log Sources: New Log Sources: New Syslog Log Source ready to be configured in LogRhythm
- Resolve Log Source Host.
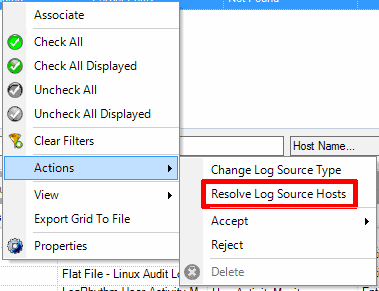
Figure 9: Resolve Log Source for pending new log source

Figure 10: Message displayed after successfully resolving new log source host
- Change Log Source Type to Syslog – Linux Host.

Figure 11: Set the log source type for the new log source
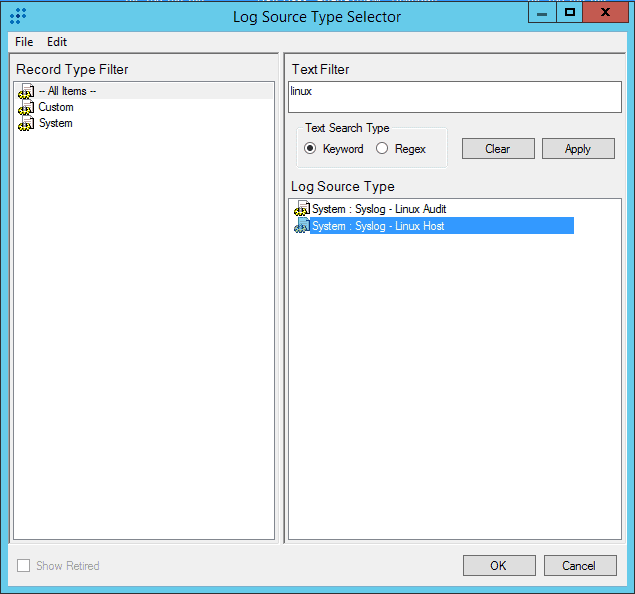
Figure 12: Selecting System Syslog – Linux Host

Figure 13: Message confirming the log source type has been successfully applied
- Select “Accept” and “Customize”.
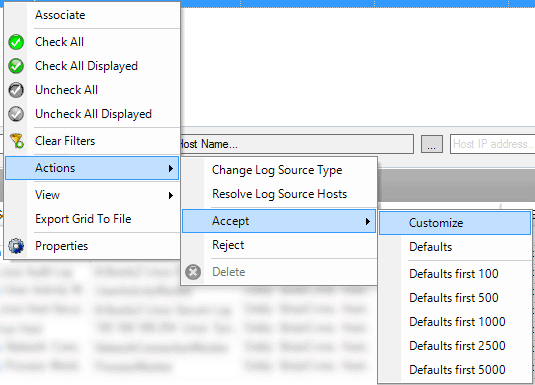
Figure 14: Customize the log source
- Select which Entity to place the system in if different than the Syslog Receiver.
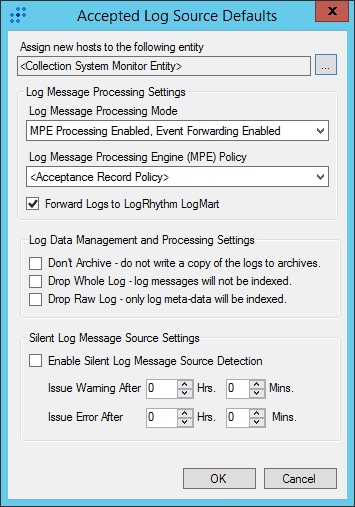
Figure 15. Customize log source options
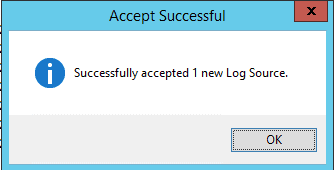
Figure 16: Message indicating the log source has been successfully accepted
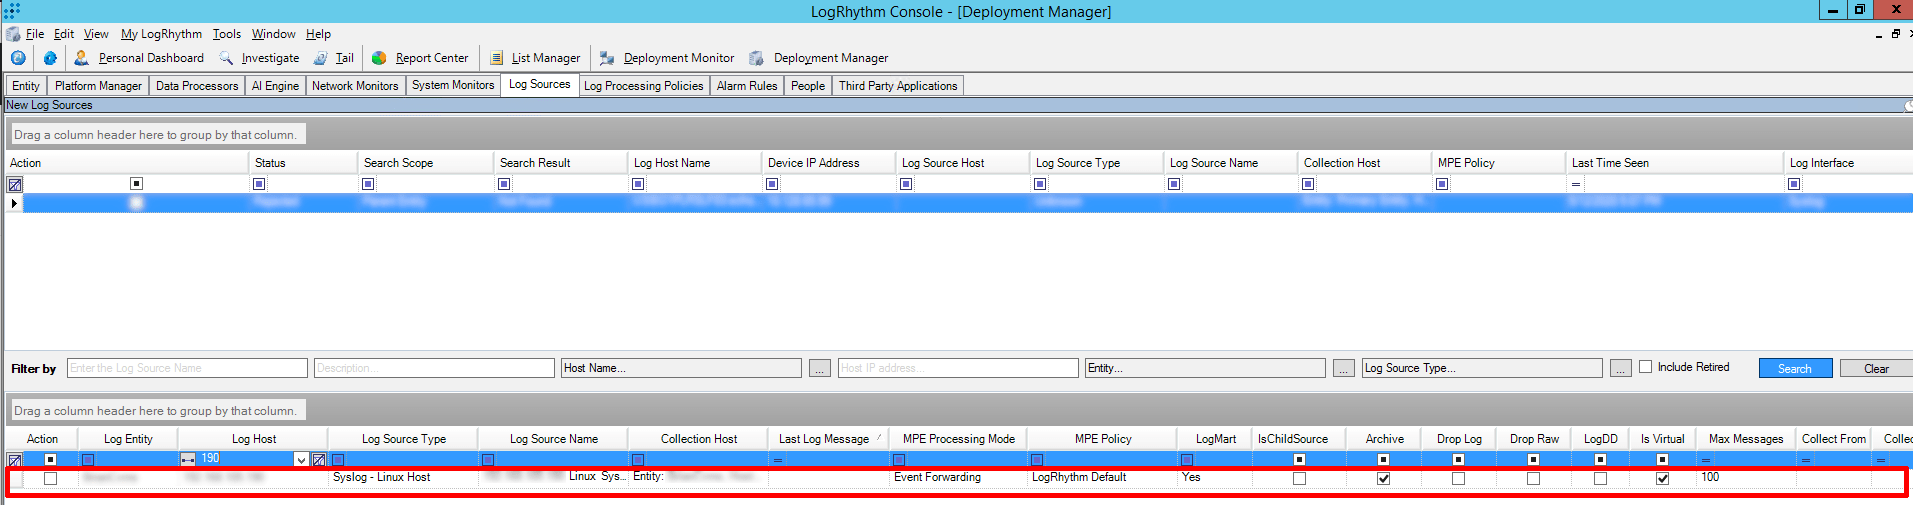
Figure 17: View after successfully adding the log source in the LogRhythm Console
Configure AuditD in Ubuntu
- Install AuditD:
- sudo apt-get update
- sudo apt-get install auditd audispd-plugins -y
- cd /etc/audit/rules.d/
- In this next step, we’re using an AuditD config provided by someone that has taken the time to compile a rules config based on the DISA.
- STIG stands for “Security Technical Information Guide”
- wget
- Again, I can restart services, or reboot. I’m choosing to reboot 😊
- You can verify the rules have been loaded by performing:
- Sudo auditctl -l
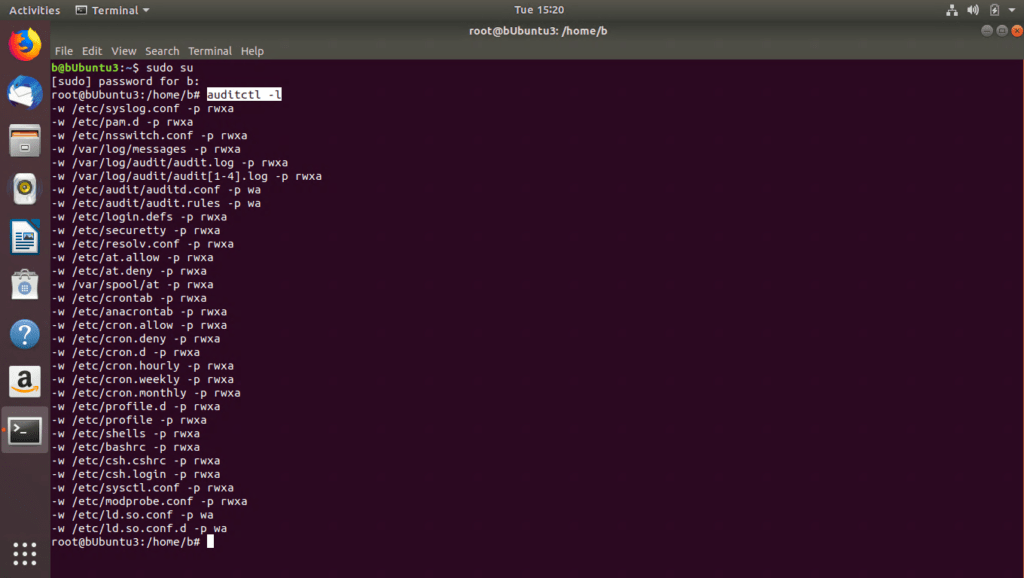
Figure 18: AuditD active rules in Ubuntu
Forward AuditD to Syslog
- Enable Syslog Forwarding
- sudo sed -i ‘s/^active.*/active = yes/g’ /etc/audisp/plugins.d/syslog.conf
- sudo service auditctl reload
- Now forward these events remotely. Create a file named “/etc/rsyslog.d/40-audispd.conf” with the content below.
if $programname == ‘audispd’ or $syslogtag == ‘audispd’ then {
# action(type=”omfile” file=”/var/log/audispd.log”)
action(type=”omfwd” Target=”xxx.xxx.xxx.xxx” Port=”514″ Protocol=”tcp”)
stop
}
- Restart rsyslog
- service rsyslog restart
Install LogRhythm Agent
Create 2nd Identity for the same system by installing a 2nd NIC for use by LR Agent
- In the Hyper-V windows, select “File” and “Settings”.
- Add hardware and network adapter.
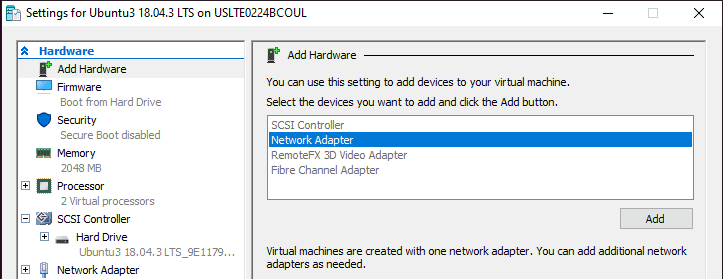
Figure 19: Add new network adapter in Hyper-V VM settings
- Change to Default Switch.
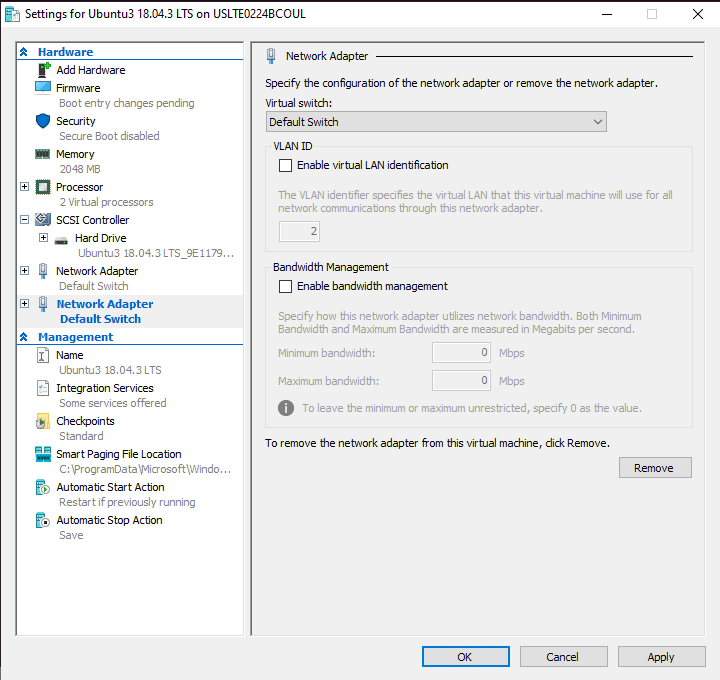
Figure 20: Hyper-V VM network settings switch configuration
- And click on “OK” to complete.
- You can get a list of your network devices and index by typing:
- ip link show
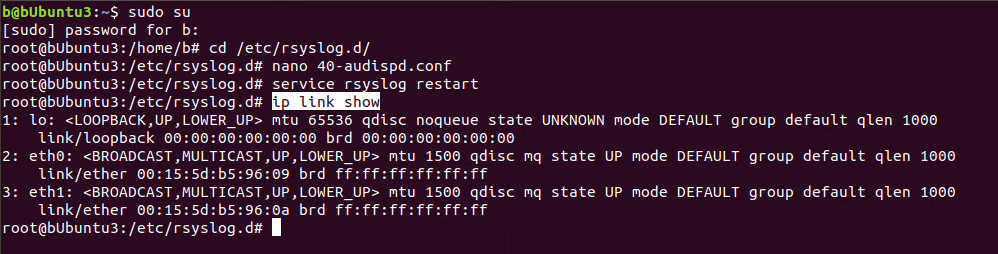
Figure 21: Getting a list of network adapters in Ubuntu
- Note: Our new NIC is #3.
- ip link show
Install OpenSSH
- I will need to SCP the LogRhythm SysMon agent to our Ubuntu system. First, I need to install Open SSH on our Ubuntu instance.
- Sudo apt-get install openssh-server -y
Install LogRhythm SysMon Agent
- Start SSH.
- Service SSH start
- SCP the LogRhythm SysMon agent to /tmp/.
- Your experience will vary depending on the agent’s name, etc.
- scp ‘.\Ubuntu18 64-Bit.zip’ b@:/tmp/
- If you copied over a ZIP archive, you will need to unzip it first.
- Example: unzip Ubuntu18\ 64-Bit.zip
- Change to the new directory and install the LogRhythm SysMon agent based on steps found here.
- Continue with installation instructions including updating the SCSM config.
Configure System Monitor
- In the LogRhythm Console, System Monitors tab, you should see your new log source. Place a checkmark next to it and perform the following actions:
- Right Click and select Actions > Accept
- On the General Tab, change as needed, and be sure to select your Data Processor.
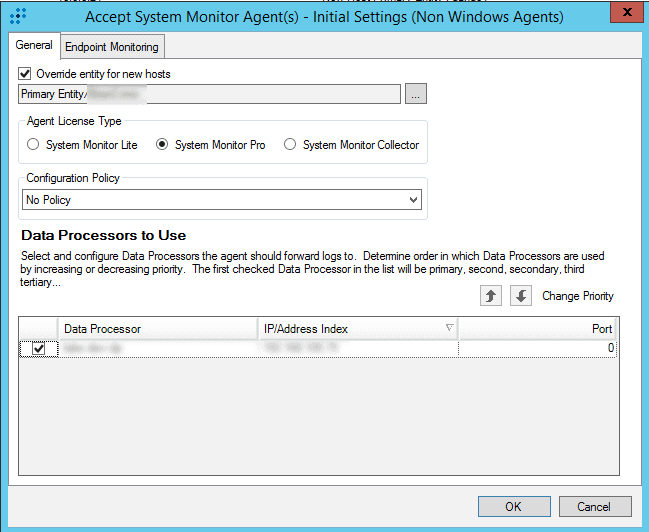
Figure 22: Accept System Monitor Agent in general settings
- Select the Endpoint Monitoring Tab and configure the following:
- Select the Process Monitor Tab and enable it.
- Select the Network Connection Monitor and enable all.
- Select the User Activity Monitor and enable all (that you can).
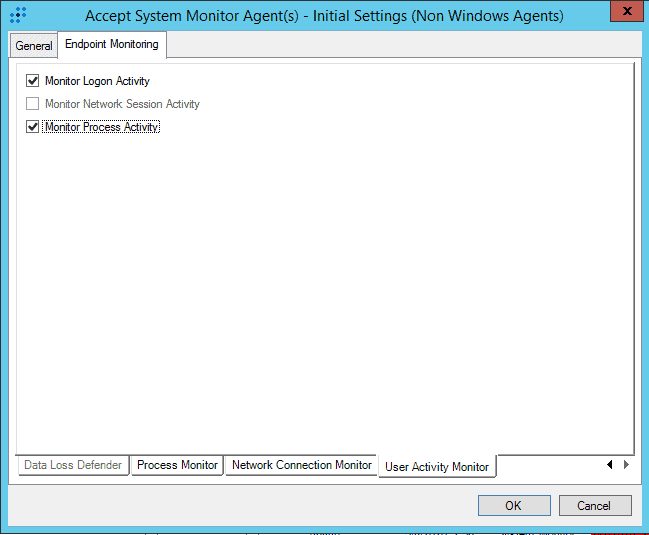
- Go back through the other tabs again, and also enable User Activity Monitor (UAM) where applicable. The option wasn’t available until you enabled UAM.
- Click OK once completed.
Configure LogRhythm Sysmon Agent Flat File Collection
- In the LogRhythm Console, Deployment Manager, open the system monitor you wish to configure in the System Monitor tab.
- Right-click in the empty area of the Log Message Sources Collected by this Agent and configure two new log sources.
- Log Message Source Type: Flat File – Linux Host Secure Log
- Configure the rest as appropriate.
- On the Flat File Settings:
- File Path (verify on your deployment): /var/log/syslog.
- Date Parsing Format (verify on your deployment): Linux Host Secure Log ( ::
).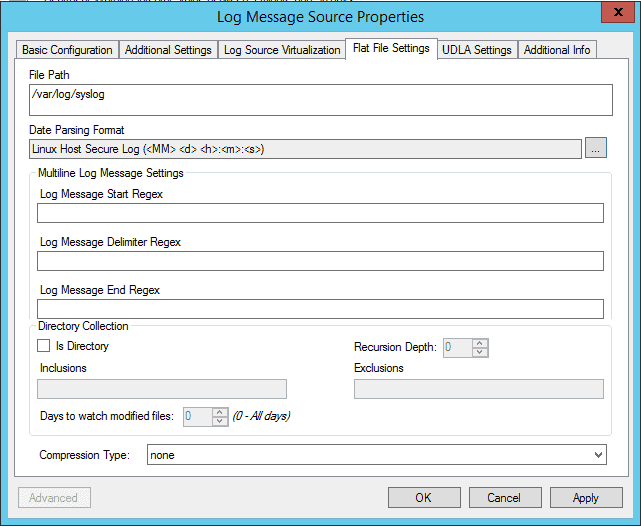
Figure 24: Log Message Source Properties: Linux Host Secure Log
- Click OK.
- New Log Message Source Type: Flat File – Linux Audit Log.
- Configure the rest as appropriate.
- On the Flat File Settings:
- File Path (verify on your deployment): /var/log/audit/audit.log.
- Date Parsing Format (verify on your deployment): Linux Audit Log (Epoch time) (msg=audit\().
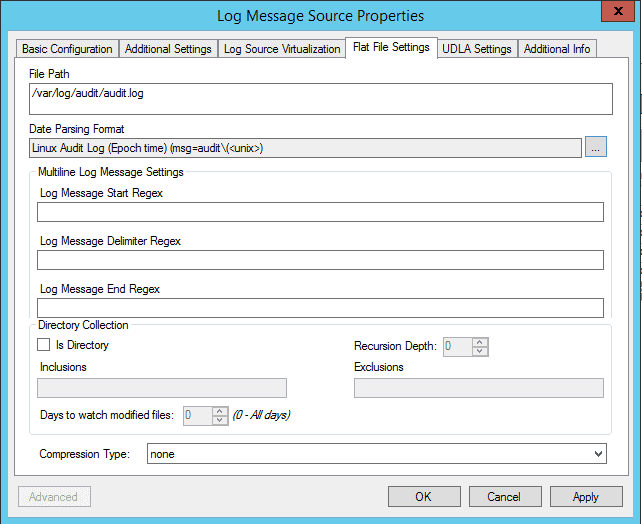
Figure 25: Message Source Properties: Linux Audit Log
- Click OK.
- Click OK when done adding additional log sources.
- Verify logs are being collected by looking at the Last Log Message time for the log sources in the Log Sources tab.

Figure 26: Verify Last Log Message for log sources added
Testing CVE-2021-3156
Now that I have the test environment fully configured, I can go ahead with the test to detect if Sudo is in fact vulnerable. I’ll take a look at what logs are generated both by the LogRhythm Process Monitor and by the native Linux host logging.
-
- Demonstrate whether sudo is vulnerable:
- From: https://github.com/lockedbyte/CVE-Exploits/tree/master/CVE-2021-3156
- Command: sudoedit -s ‘\’ $(python3 -c ‘print(“A”*1000)’)
- Output should be:
- Unpatched:
- malloc(): invalid size (unsorted) Aborted
- Patched:
- usage: sudoedit [-AknS] [-r role] [-t type] [-C num] [-g group] [-h host] [-p prompt] [-T timeout] [-u user] file …
- Unpatched:
- Demonstrate whether sudo is vulnerable:
-
- Detection of sudoedit:
- No AIE rule was triggered in this test. We could write a detection rule for sudoedit since it should be used rarely, but in this case we will instead perform a threat hunt on “sudoedit”.
- Using the WebUI, perform a search going back at least 1 month. The use of “sudoedit” should be very rare and of interest when it’s used in your environment.
- Perform a LogMessage search sudoedit.
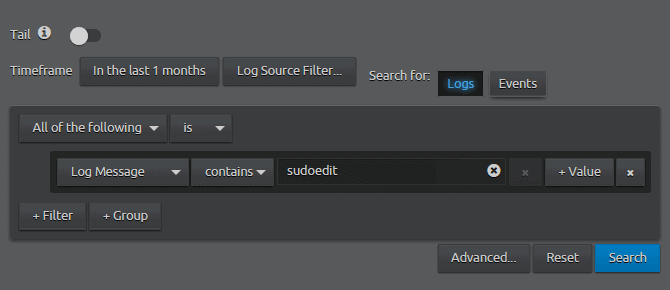
Figure 27: WebUI Search Log Message contains sudoedit
- In the test environment, the search returns results from multiple sources, including process monitoring, error logging, and general operations, providing multiple insights into the activity.
- LogRhythm Process Monitor (Linux) captures this attempt.
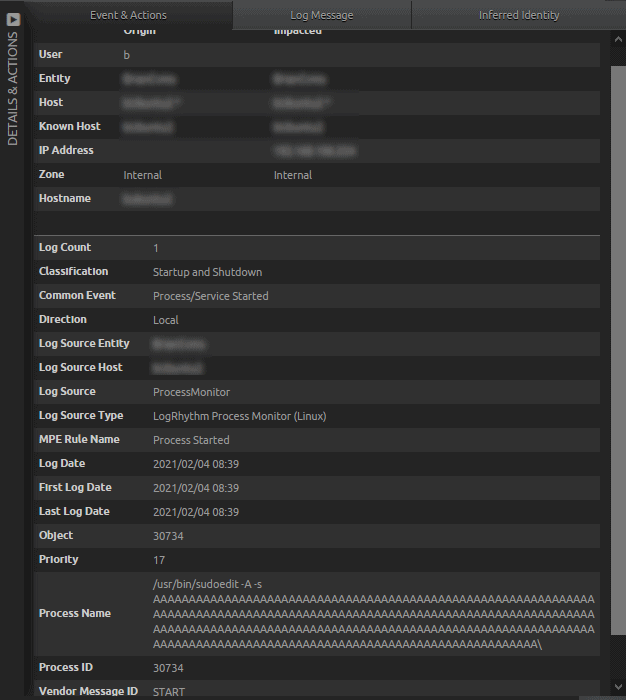
Figure 28: LogRhythm Process Monitor (Linux) observed sudoedit activity
- Linux Auditd captures the segmentation fault generated by the unpatched Sudo version.
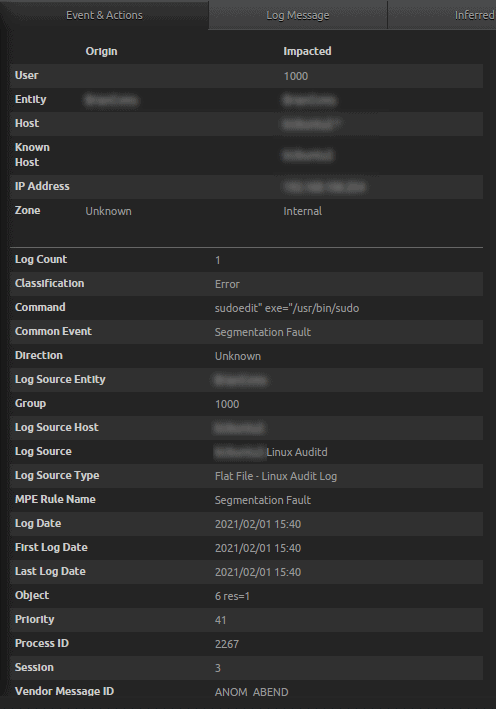
Figure 29: Flat File – Linux Audit Log captured the activity of sudoedit and Classification of Error
- Note the ID contained in the “Group” field above is that of the user group attempting the exploit.
- Raw Log: type=ANOM_ABEND msg=audit(1612219207.128:591): auid=1000 uid=1000 gid=1000 ses=3 pid=2267 comm=”sudoedit” exe=”/usr/bin/sudo” sig=6 res=1
- Linux Auditd captures the segmentation fault generated by the unpatched Sudo version.
- Syslog – Linux Host captures General Operations and Error logs.
- Search for Classification: “Error”, Common Event: “Segmentation Fault”, and Process Name: “sudoedit”.
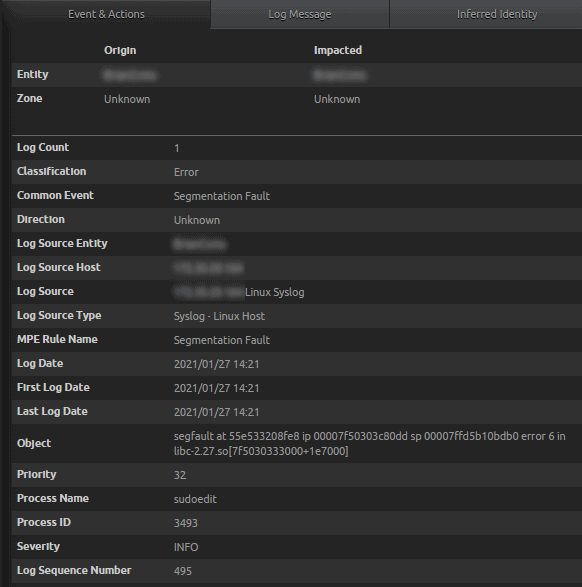
Figure 30: Syslog Linux Host captures a General Operations, and Error logs
- Search for Classification: “Error”, Common Event: “Segmentation Fault”, and Process Name: “sudoedit”.
- Detection of sudoedit:
Running the Exploit
I will now run the actual exploit and look at how the LogRhythm Process monitor captures the activity. Then I will show how the LogRhythm out-of-the-box detection rules pick up the unusual behavior enabling the analyst to be proactively alerted to the activity.
- Executing the Exploit:
- Exploit sample from: https://github.com/r4j0x00/exploits/tree/master/CVE-2021-3156_one_shot
- Run as normal user:
- Execute: ./exploit
- Results from running the exploit:
- On a patched system…
b@systemName:~/exploits/CVE-2021-3156/CVE-2021-3156_one_shot$ ./exploit
usage: sudoedit [-AknS] [-r role] [-t type] [-C num] [-g group] [-h host] [-p prompt] [-T timeout] [-u user] file …
- On an unpatched system…
- Execute: ./exploit
b@systemName:~/exploits/CVE-2021-3156/CVE-2021-3156_one_shot$ ./exploit
uid=0(root) gid=1000(b) groups=1000(b),4(adm),24(cdrom),27(sudo),30(dip),46(plugdev),116(lpadmin),127(sambashare)
To run a command as administrator (user “root”), use “sudo.
See “man sudo_root” for details.
root@systemName:/home/b/exploits/CVE-2021-3156_one_shot#
Searching for the Exploit Test
In our test, I am looking for the execution of the exploit where the log message contains “./exploit”. You may not know this information when starting your investigation with “sudoedit”, but you will likely come across the execution in your investigation. You can follow this example by using your known execution name to search for.
- Search for Log Message contains “Exploit”.
- First, bring back the log messages that match the execution name.

Figure 31: WebUI Search for Log Message contains exploit
- First, bring back the log messages that match the execution name.
- Use Lucene Filter on results: logMessage:*.\/exploit*
- In the results, you will want to filter the dashboard to show where something was executed by looking for “./” preceding the name.
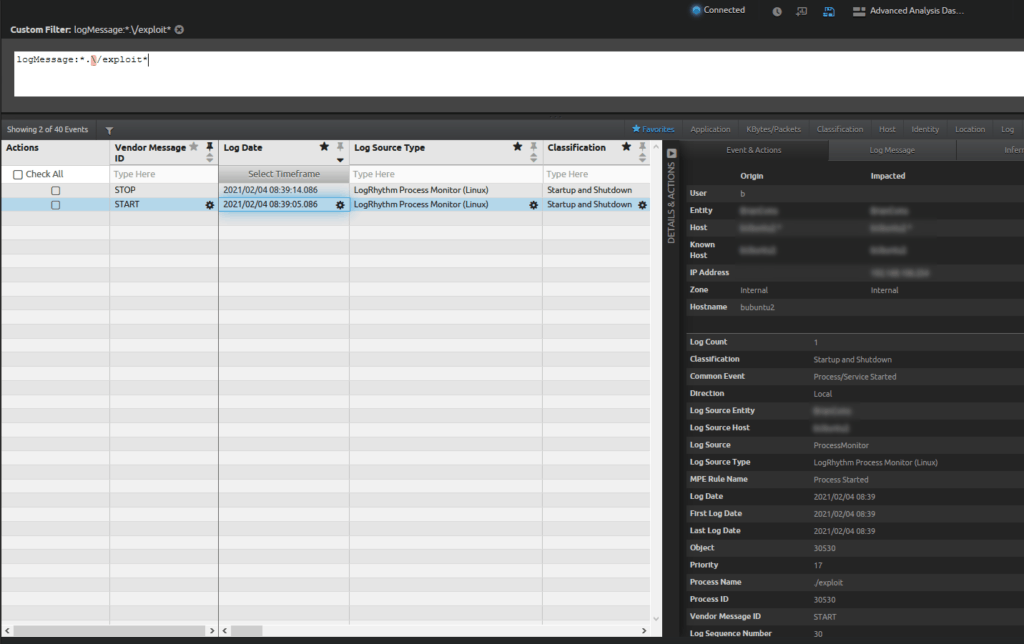
Figure 32: WebUI Lucene filter for logMessage:*.\/exploit*
- In the results, you will want to filter the dashboard to show where something was executed by looking for “./” preceding the name.
- Log Source Type LogRhythm Process Monitor (Linux) detects this activity.
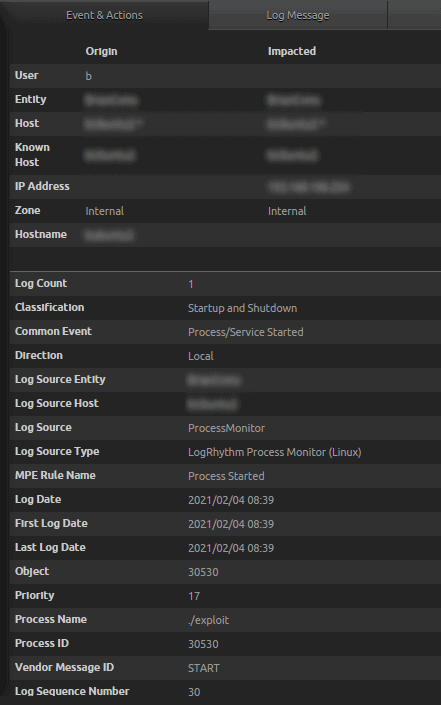
Figure 33: LogRhythm Process Monitor (Linux): Common Event Process/Service Started: Process Name ./exploit.
Detection of a Successful Exploit
This exploit can be detected by an analytics rule looking for Unusual Authentications followed by an unusual process. A rule for this purpose is provided in the LogRhythm UEBA module. Identification of a successful exploit will focus mostly around the user being “root”, and the process containing “sudoedit -s”. The output of the AIE rule “Compromise: Unusual Auth then Unusual Process” contains all the relevant information an analyst would need.
Details
The following are details that an analyst would likely see when performing an investigation starting with the AIE event “Compromise: Unusual Auth then Unusual Process”. There will likely be several logs returned in the drill down. In this example, only a couple of the drill down logs are shown for reference.
- AIE detection where the exploit was successful. Notice the user is “root”. AIE: Compromise: Unusual Auth then Unusual Process.

Figure 34: AIE rule in the UEBA module detected the successful exploit
- AIE Drilldown results in observations from LogRhythm User Activity Monitor (Linux), Syslog – Linux Host, and LogRhythm Process Monitor (Linux).
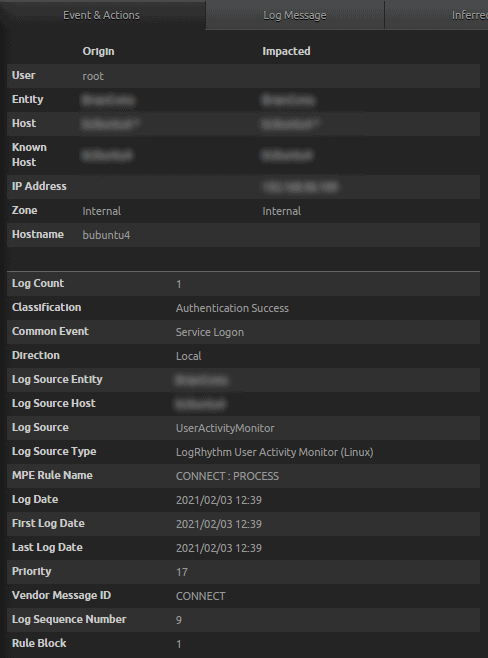
Figure 34: Classification Authentication Success for User Origin root
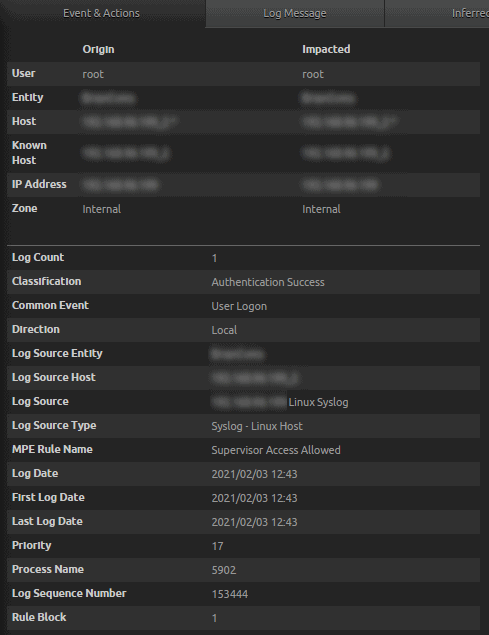
Figure 35: Syslog – Linux Host Classification Authentication Success for User Origin root
- Raw Log: 02 03 2021 12:43:00 xxx.xxx.xxx.xxx Feb 3 12:43:00 hostName su[5902]: Successful su for root by root.
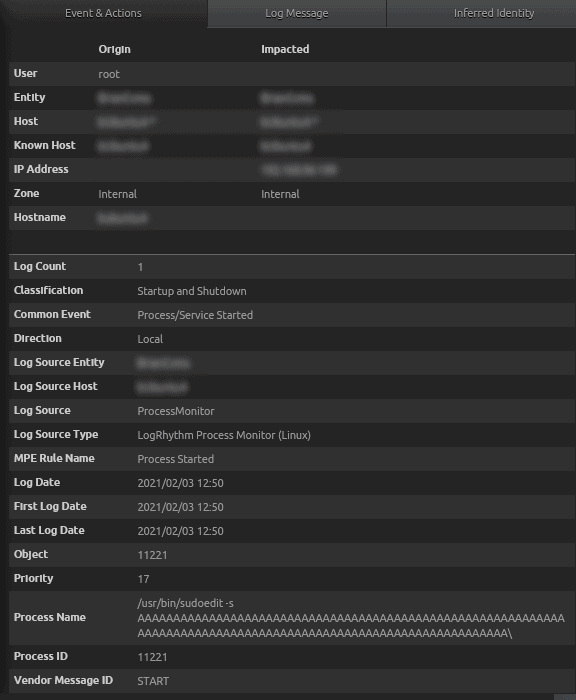
Figure 36: Process Name sudoedit followed by the -s (which is the vulnerability in Sudo), and the As (buffer overflow)
- AIE Drilldown results in observations from LogRhythm User Activity Monitor (Linux), Syslog – Linux Host, and LogRhythm Process Monitor (Linux).
- AIE Event detection where the exploit was not successful. Notice the user is not the root. Like before, the AIE event “Compromise: Unusual Auth then Unusual Process” has all the relevant information an analyst would need to determine that the exploit was not successful in this example.
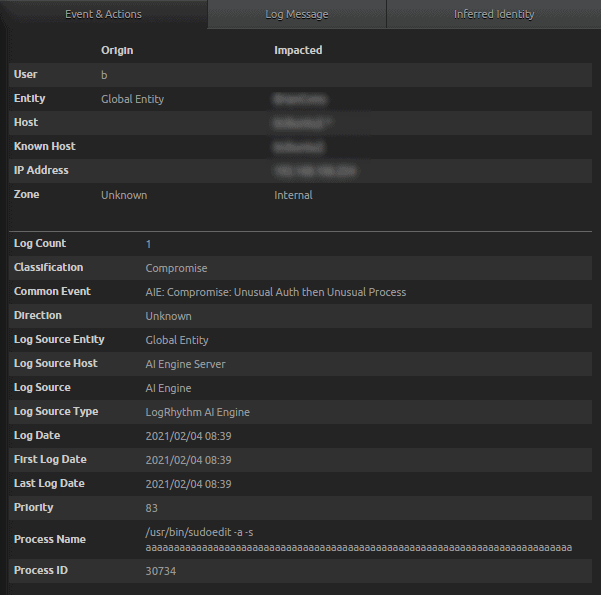
Figure 37: AIE Event detection where the exploit was not successful AIE drill down
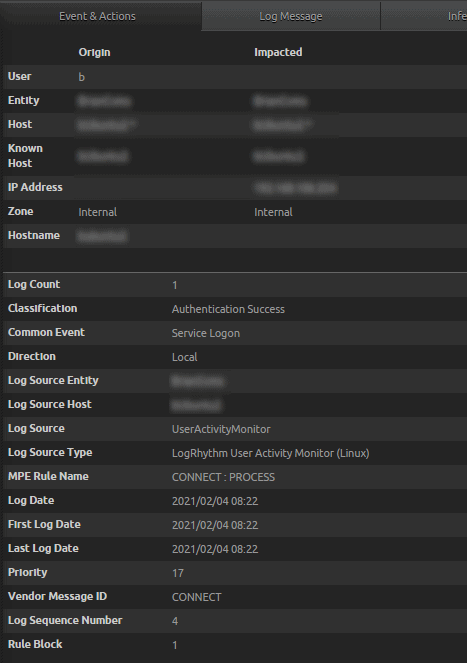
Figure 38: LogRhythm User Activity Monitor (Linux), Classification Authentication Success, Common Event Service Logon, User Origin b (not root)
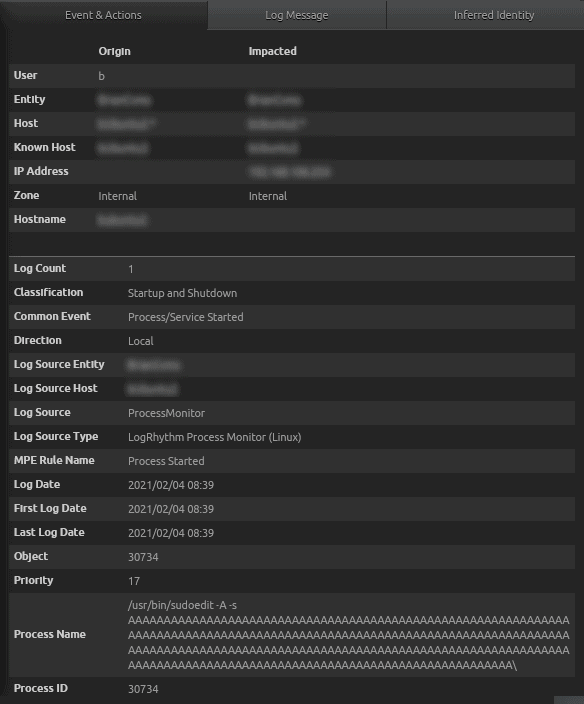
Figure 39: Process Name contains the exploit attempt at buffer overflow
Miscellaneous Commands
The following are some miscellaneous commands I issued on the test system to demonstrate the version of the OS, and whether or not Sudo was vulnerable. You can use these commands too on your test system.
- Demonstrate versions of the software
- lsb_release –a
Distributor ID: Ubuntu
Description: Ubuntu 18.04.3 LTS
Release: 18.04
Codename: bionic
- sudo –V
Sudo version 1.8.21p2
- Demonstrate user permissions (user in Sudoers has no effect on test outcome):
- Demonstrate normal user
- In Sudoers on systemName
- Demonstrate normal user
b@systemName:~$ sudo -l -U alice
[sudo] password for b:Matching Defaults entries for alice on systemName:
env_reset, mail_badpass, secure_path=/usr/local/sbin\:/usr/local/bin\:/usr/sbin\:/usr/bin\:/sbin\:/bin\:/snap/bin
User alice may run the following commands on systemName:
(ALL) ALL
b@systemName:~$ ^C
- Not in Sudoers on systemName
- b@systemName:/etc$ sudo -l -U alice
- [sudo] password for b:
- User alice is not allowed to run sudo on systemName.
Conclusion
Although this vulnerability has been around for around 10 years in many flavors of Unix, detection methodology remains the same. By looking for unusual processes and unusual authentication activity, an analyst is able to quickly spot when something isn’t right, and detect a potential attempt, or successful attempt at exploiting CVE-2021-3156.
The post How to Audit and Test for Sudo’s CVE-2021-3156 with LogRhythm appeared first on LogRhythm.
*** This is a Security Bloggers Network syndicated blog from LogRhythm authored by Angela Romero. Read the original post at: https://logrhythm.com/blog/how-to-audit-and-test-for-cve-2021-3156-exploits-with-logrhythm/
