

Using Python to Make API Calls to Your Acunetix Installation
In addition to several out-of-the-box integrations, Acunetix provides an API, which lets you integrate the scanner with any environment. The Acunetix API lets you use any of the scanner functions with no need to access the scanner UI. As an example, we will show you how to make calls to the Acunetix API using Python.
We shall discuss 2 options for making API calls using Python:
- Option 1: Using the Swagger Client for API Calls
- Option 2: Using Basic HTTP for API Calls
For the purposes of this article, we will also assume that you are working in a Windows 64-bit environment.
Option 1: Using the Swagger Client for API Calls
For this option, we will go through the steps necessary to make your first Acunetix API call using Python and the Swagger Client:
- Install Python
- Install JAVA JDK
- Install Git
- Install Swagger Codegen
- Generate the Acunetix API Library for Python
- Create a Python script to make API Calls
You can skip some of the first four steps if you already have the software installed.
Install Python
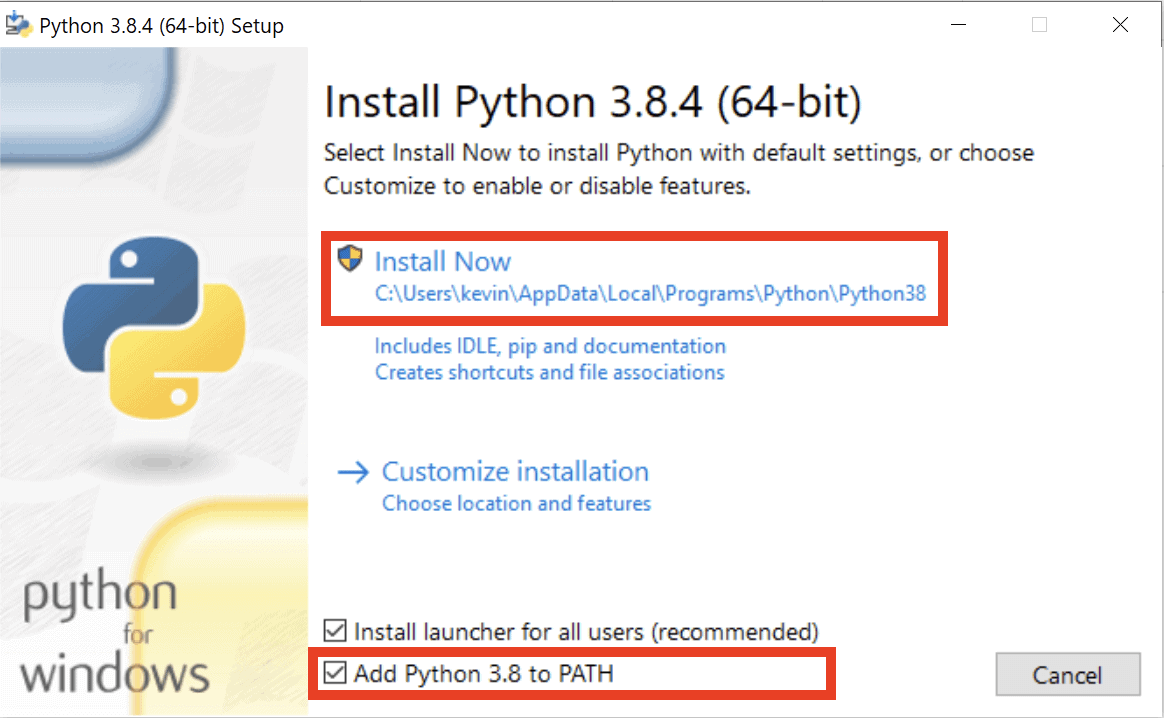
- Download the Windows 64-bit executable installer for Python 3.8.4 by clicking here or browse for a different release if preferred.
- Install Python by double clicking on the installer:
- Make sure you enable the Add Python to PATH checkbox.
- Click on the Install Now button.
- Click on the Close button when the installer is finished.
Install JAVA JDK
- Download the Windows 64-bit installer for JAVA SE JDK 8 by clicking here.
- Install JAVA JDK by double-clicking on the installer:
- There are no options that need to be configured in the installer, so you can simply accept all defaults and proceed to install.
- Click on the Close button when the installer is finished.
- From an administrator command prompt, run the following command to set the
JAVA_HOMEenvironment variable:setx JAVA_HOME -m "c:Program FilesJavajdk1.8.0_261"
Install Git
- Download the Windows 64-bit installer for Git 2.27.0 by clicking here or look for a different release.
- Install Git by double clicking on the installer:
- There are no options that need to be configured in the installer, so you can simply accept all defaults and proceed to install.
- Click on the Finish button when the installer is finished.
Install Swagger Codegen
- From a regular command prompt, move to the root folder, clone the swagger-codegen repository, and move into the repository folder:
cd c: git clone https://github.com/swagger-api/swagger-codegen.git cd c:swagger-codegen - Build the swagger-codegen tools:
- Run the following command from within the folder:
mvnw package - The result should be similar to the following when successfully completed:
[INFO] ------------------------------------------------------------------------
[INFO] Reactor Summary:
[INFO]
[INFO] swagger-codegen-project ............................ SUCCESS [ 43.643 s]
[INFO] swagger-codegen (core library) ..................... SUCCESS [03:28 min]
[INFO] swagger-codegen (executable) ....................... SUCCESS [ 27.892 s]
[INFO] swagger-codegen (maven-plugin) ..................... SUCCESS [ 56.018 s]
[INFO] swagger-generator .................................. SUCCESS [02:43 min]
[INFO] ------------------------------------------------------------------------
[INFO] BUILD SUCCESS
[INFO] ------------------------------------------------------------------------
[INFO] Total time: 08:30 min
[INFO] Finished at: 2020-07-17T16:06:07+01:00
[INFO] Final Memory: 62M/629M
[INFO] ------------------------------------------------------------------------
- Run the following command from within the folder:
Generate the Acunetix API Library for Python
- Create an acunetix subfolder for swagger-codegen:
md c:swagger-codegenacunetix cd c:swagger-codegenacunetix - Copy the swagger.yaml file provided by Acunetix into the c:swagger-codegenacunetix folder.
- Create a batch file using the following command:
notepad c:swagger-codegenacunetixpy-ax.bat - Insert the following into your py-ax.bat file:
set executable=.modulesswagger-codegen-clitargetswagger-codegen-cli.jar set params=generate -i acunetixswagger.yaml -l python -o acunetixpython -DpackageName=swagger_client java %JAVA_OPTS% -jar %executable% %params% - Exit Notepad saving the py-ax.bat file.
- Generate the library using the following commands:
cd c:swagger-codegen
acunetixpy-ax.bat
This will generate the library inside c:swagger-codegenacunetixpython.
- Install the library using the following commands:
cd c:swagger-codegenacunetixpython
pip install .
Create a Python Script to Make API Calls
Create Your Python Script
- Create your new script file:
notepad c:swagger-codegenacunetixapitest.py - Insert the following commands into your apitest.py file:
import swagger_client
from swagger_client.rest import ApiException
from pprint import pprint

api_config = swagger_client.Configuration()
api_config.ssl_ca_cert = 'C:ProgramDataAcunetixcertsca.cer'
api_config.host = 'https://localhost:3443/api/v1'
api_config.api_key['X-Auth'] = '1986abcd1986abcd1986abcd1986abcd1986abcd1986abcd1986abcd1986abcd'
api_client = swagger_client.ApiClient(configuration=api_config)
api_instance = swagger_client.TargetsApi(api_client=api_client)
print(api_instance)
try:
    # Targets
    # api_response = api_instance.get_targets(c=c, l=l, q=q, s=s)
    api_response = api_instance.get_targets()
    pprint(api_response)
except ApiException as e:
    print("Exception when calling TargetsApi->getTargets: %sn" % e)
Remember that you need to replace the API Key with the one from your own Acunetix installation.
- Run your API test script:
cd c:swagger-codegenacunetix
python apitest.py
View Results
Once successfully executed, the results of your script will resemble the following:
c:swagger-codegenacunetix>apitest.py

{'pagination': {'count': 3,
                'cursor_hash': '8f629dd49f910b9202eb0da5d51fdb6e',
                'cursors': [None],
                'sort': None},
 'targets': [{'continuous_mode': False,
              'last_scan_date': datetime.date(2020, 7, 10),
              'last_scan_id': 'ec27a320-2351-4b27-b6dd-34313dff9c1f',
              'last_scan_session_id': 'bb3ad61a-2615-47ac-bcfb-4cb269521746',
              'last_scan_session_status': 'completed',
              'links': None,
              'manual_intervention': False,
              'scan_authorization': None,
              'severity_counts': None,
              'target_id': 'e7260534-cfb7-4d30-bc18-a2ed0b0eead8',
              'threat': None,
              'verification': None},
             {'continuous_mode': False,
              'last_scan_date': None,
              'last_scan_id': None,
              'last_scan_session_id': None,
              'last_scan_session_status': None,
              'links': None,
              'manual_intervention': None,
              'scan_authorization': None,
              'severity_counts': None,
              'target_id': '94c1fa22-8f0c-471e-9737-c199e57ad1fa',
              'threat': None,
              'verification': 'demo'},
             {'continuous_mode': False,
              'last_scan_date': None,
              'last_scan_id': None,
              'last_scan_session_id': None,
              'last_scan_session_status': None,
              'links': None,
              'manual_intervention': None,
              'scan_authorization': None,
              'severity_counts': None,
              'target_id': 'a67df446-dda1-4715-91f5-471add517fea',
              'threat': None,
              'verification': None}]}

c:swagger-codegenacunetix>
Option 2: Using Basic HTTP for API Calls
Installing Python
Follow the instructions to install Python as described for Option 1 above.
Use a Python Script to Make API Calls
Install Python Prerequisite Packages
Install the Python requests package:
python -m pip install requests
Create Your Python Script
- Create your new script file:
md c:acunetixapi notepad c:acunetixapiapitest.py - Insert the following commands into your apitest.py file:
# importing libraries
import json, requests, urllib3

# api-endpoint
URL = "https://localhost:3443/api/v1/targets"

# defining a params dict for the parameters to be sent to the API
#PARAMS = {'c':'', 'l':'', 's':''}
PARAMS = {}

#defining the headers to send
headers = {'content-type': 'application/json', 'X-Auth':'1986abcd1986abcd1986abcd1986abcd1986abcd1986abcd1986abcd1986abcd'}

#create connection pool
pool = urllib3.PoolManager(cert_reqs='REQUIRED', assert_hostname='localhost',)

#send request
resp = pool.request('GET', URL, '', headers)

#decode response
data = json.loads(resp.data.decode('utf-8'))

#dump decoded response
print(data)
Remember that you need to replace the API Key with the one from your own Acunetix installation.
- Run your API test script:
c:acunetixapiapitest.py
View Results
Once successfully executed, the results of your script will resemble the following:
c:>acunetixapiapitest.py
{'targets': [{'address': 'https://mytesting.net', 'continuous_mode': False, 'criticality': 10, 'deleted_at': None, 'description': 'Test OAuth2 Site', 'last_scan_date': '2020-07-10T12:02:58.153112+00:00', 'last_scan_id': 'ec27a320-2351-4b27-b6dd-34313dff9c1f', 'last_scan_session_id': 'bb3ad61a-2615-47ac-bcfb-4cb269521746', 'last_scan_session_status': 'completed', 'manual_intervention': False, 'severity_counts': None, 'target_id': 'e7260534-cfb7-4d30-bc18-a2ed0b0eead8', 'threat': None, 'type': None, 'verification': None}, {'address': 'http://testphp.vulnweb.com', 'continuous_mode': False, 'criticality': 10, 'deleted_at': None, 'description': 'test2', 'last_scan_date': None, 'last_scan_id': None, 'last_scan_session_id': None, 'last_scan_session_status': None, 'manual_intervention': None, 'severity_counts': None, 'target_id': '94c1fa22-8f0c-471e-9737-c199e57ad1fa', 'threat': None, 'type': 'demo', 'verification': 'demo'}, {'address': 'https://mytesting.net', 'continuous_mode': False, 'criticality': 10, 'deleted_at': None, 'description': 'Testing LSR only', 'last_scan_date': None, 'last_scan_id': None, 'last_scan_session_id': None, 'last_scan_session_status': None, 'manual_intervention': None, 'severity_counts': None, 'target_id': 'a67df446-dda1-4715-91f5-471add517fea', 'threat': None, 'type': None, 'verification': None}], 'pagination': {'count': 3, 'cursor_hash': '8f629dd49f910b9202eb0da5d51fdb6e', 'cursors': [None], 'sort': None}}

c:>
Get the latest content on web security
in your inbox each week.
THE AUTHOR

Technical Writer
Kevin Attard Compagno is a Technical Writer working for Acunetix. A technical writer, translator, and general IT buff for over 30 years, Kevin used to run Technical Support teams and create training documents and other material for in-house technical staff.


*** This is a Security Bloggers Network syndicated blog from Web Security Blog – Acunetix authored by Kevin Attard Compagno. Read the original post at: http://feedproxy.google.com/~r/acunetixwebapplicationsecurityblog/~3/1LZpQmwg4KY/
