

Solo Studio for Video Lectures

I’ve been recording video lectures for a Coursera specialization in cloud computing. The first of the four courses is available right now. I’ve been asked to describe how I do this, so here we go. The nearby image shows how the videos appear: I’m on the right, talking, and we have animated diagrams or bullets displayed on the left (here’s a version of the video).
There are three pieces of magic here:
- I use presentation software to capture my narration. Then I save it as a video. I use Apple’s Keynote to do this but MS PowerPoint probably works as well.
- I run a second camera during my narration to capture my talking head. I record in front of a “green screen” so I can eliminate the background. I found an oval fold-up green screen that works fine (but back-ordered for the lockdown).
- I use video editing software to synchronize the audio and video streams, eliminate the green background, and output the result. I searched briefly for free or low-cost software but found nothing to satisfy me. I’m using Apple’s Final Cut Pro X (FCPX), which I discuss further in a separate post.
Presentation Prep

The nearby image shows how I work with the presentation software. “Wide screen” is the modern standard for video, so my slides use wide screen format. I leave the right-hand side blank so I can insert my talking head later. Keynote measures the screen as being about 26½ inches wide; I limit the left-hand graphics to the 14 inch mark, more or less.
I script my videos in detail, mostly to keep in sync with automated diagrams. Each CLICK starts another animation, and CLICK-NEXT indicates the end of the slide.
A few years ago I produced a series of videos on cryptography for cybersecurity (the Cryptosmith series). The videos consist of animated diagrams with off-camera narration. I produced them entirely with Keynote, and I assume PowerPoint supports a similar process. The software let me click through the presentation and recorded my narration.
The Cryptosmith series also taught me about good sound quality. It took some arranging to eliminate the audible “click” that advanced my slide animation. The presentation software yields beautifully sharp videos, and it’s disappointing to combine them with poor audio. This is especially important for international audiences. Some computers or laptops may have adequate microphones built in, but try them out before you commit to using them. I use an external mic.
Recording the Talking Head

The nearby diagram shows how I set up a video recording session.
- The presentation software displays the current slide and its narration.
- A separate video camera captures the image of me in front of the green screen as I narrate.
- A decent microphone collects the audio somewhere.

The good old-fashioned clapper board is actually a useful thing. You need a distinctive mark in both the audio and video when synchronizing multiple video streams. At first I just relied on clapping my hands. A hand clap wasn’t as clean-looking on the audio track. It’s also essential to have a marker at the start of the video saying what the video really is. I’ll import a half-dozen green screen images from my video camera and then need to sort out which clip is which. Write notes on the clapper board to keep track of which video, scene, take, etc. I also use the marked-up clapper as the first slide in each presentation.
Apple’s FCPX has a “multicam” synchronization feature that makes the clap sound a little less important. I select 2 or more videos and tell FCPX they are the same scene shot with multiple cameras. It then uses the audio tracks to synchronize them.
Merging the Talking Head
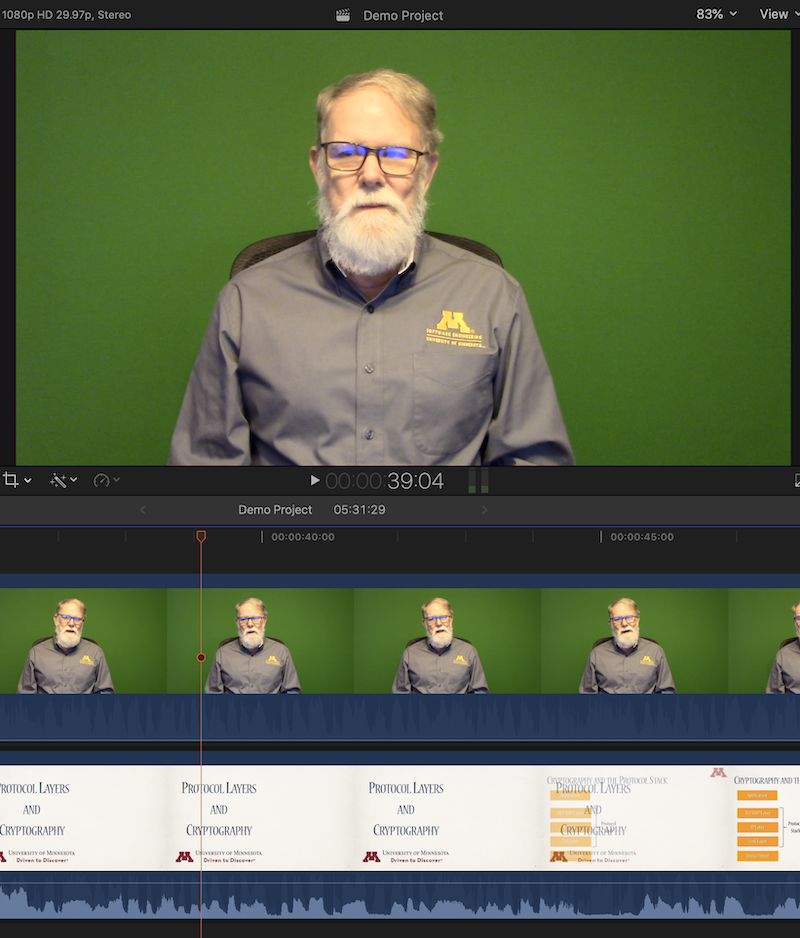
This is a simple example of chroma key or green screen video. Some time back in the prehistoric era of video, someone figured out how to make parts of a video feed transparent, and then superimpose the video atop another feed. Today we do it right on a video file.
In Green Screen step 1, we put the two video streams in the video editor time line, shown at the bottom of the image. The lowest row of images come from the presentation video. The next row of video comes from the talking head video feed. The image at top shows the two combined with the green screen still showing.

In Green Screen step two, we activate the “key” to make the green background disappear. Try to keep the screen flat, clean, and free of larger dust bunnies. Editing software can be forgiving about the precise green color and about green screen lighting. There are usually settings to make sure the screen disappears, and you don’t.
In any case, do not wear any green when recording on green screen, even on St. Patrick’s Day. The disappearing body yields an interesting effect for Halloween, but works poorly in lectures. Even green details will be rendered transparent.

In step 2, we simply overlapped one video stream atop the other. Step 3 moves the talking head out of the way of the presentation’s text and images. This probably requires a higher-end video editor, since it must crop and scale the video image. To maintain a little consistency, I always scale the image by 70%. If the image is too large, it occasionally covers part of the presentation graphics. I made it smaller in a few cases.
Below is a draft version of the final video. The latest is posted to Coursera.
*** This is a Security Bloggers Network syndicated blog from Cryptosmith authored by cryptosmith. Read the original post at: https://cryptosmith.com/2020/05/15/solo-studio-for-video-lectures/
