

CyRC analysis: CVE-2020-7958 biometric data extraction in Android devices
We dig into the inner workings of trustlets, how different components work together to provide a Trusted Execution Environment, and how to attack them.

Written in coordination with Artem Gonchar and Travis Biehn
Mobile Trusted Execution Environments (ARM TrustZone) are growing in use—for mobile payments, device integrity, mobile device management, and any problem that requires a trusted client. As part of CyRC research into the security of applied use of Trusted Execution Environments, we identified an information disclosure bug exposing the enrolled fingerprints of OnePlus 7 Pro Advanced users (see our vulnerability advisory for CVE-2020-7958). There are familiar and unfamiliar software components that work together to provide fingerprint recognition on TrustZone. Our analysis will show how those elements work together and how to attack them.
Brief history of fingerprint authentication on Android
Before Android 6
Before Android 6, there was no standard for implementing fingerprint authentication. Security researchers were quick to find ways to extract fingerprint images and tamper with the enrolled reference fingerprints that devices were keeping for authentication checks. For example, this famous Black Hat talk describes how fingerprint authentication mechanisms were insecurely implemented by major Android smartphone manufacturers at the time. These implementations jeopardized the personal biometric data and, therefore, could harm millions of users.
After Android 6
Starting with Android 6, Google stepped in and defined a set of requirements for fingerprint authentication in its Compatibility Definition Document, which has grown since then and now includes a broader group of biometric sensors.
The standardized approach was to perform all sensitive operations involving biometric materials in the Trusted Execution Environment (TEE). According to this specification, communication with the fingerprint hardware (sensor) is meant to be done only by a CPU running in Secure mode, which would guarantee that the sensor cannot be accessed from the Android OS (the Rich Execution Environment, REE) itself, even on a rooted device.
How can something be secure on a rooted device?
When you “root” an Android device, typically it means unlocking the bootloader and making modifications to one or more partitions in the flash memory. These modifications then allow you to escalate your privileges to “root” at runtime. However, “unlocking the bootloader” is not an entirely precise term. Booting an Android device loosely follows the ARM trusted firmware model, which consists of a handful of boot stages. Even though the phrase itself could be applied to any bootloader stage on any system, “unlocking the bootloader” on Android usually refers to the very last stage of the boot process, where the Secure World of the device checks the Android OS image before booting it. The TEE is booted before this stage.
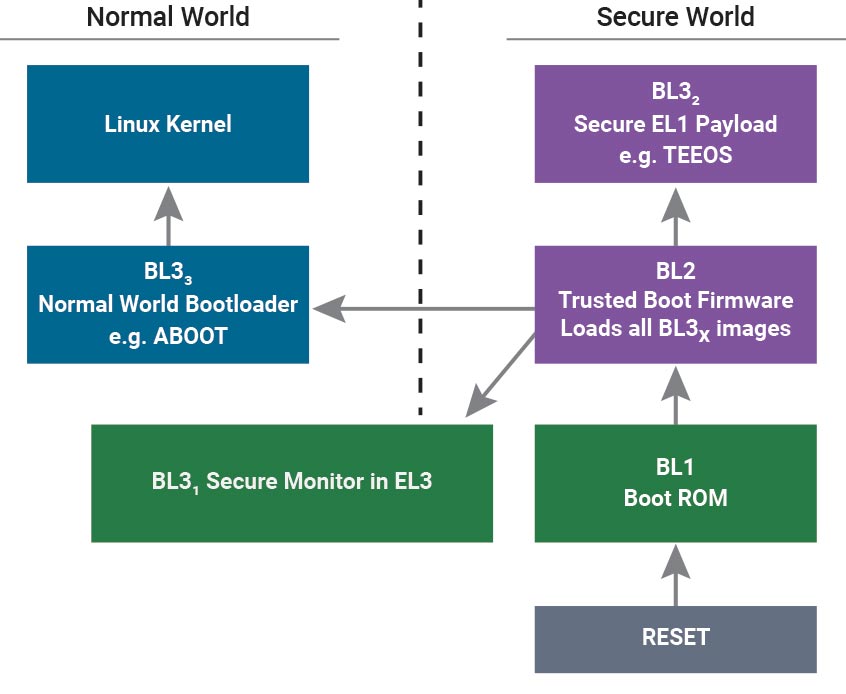
The security boundary lies in the ARM CPUs, which can run at different Exception Levels (ELs) and in different security states. It is an extension of the same mechanism that separates kernel space from user space. The TEE runs at a level and security state that is more privileged than the kernel of the Android OS. The TEE memory is not accessible by REE, and all communication happens via Secure Monitor Calls from the Android OS kernel.
Unlocking the late-stage bootloader that launches the Android OS does not imply unlocking the early-stage bootloader that launches the TEE. This keeps the TEE secure even when the Android OS is compromised through “rooting,” a fact used by content protection solutions (DRMs), mobile payment systems, biometric authentication, and hardware-backed crypto APIs.
In their CDD, Google specifies what data to protect with the TEE and what actions to carry out in the TEE when it comes to biometric authentication. It is the TEE that is meant to keep your fingerprints safe, regardless of whether you have “rooted” your device.
A word on breaking the TEE
Of course, there is always room for bugs in the implementation. In the past, people have found ways to achieve arbitrary code execution in the TEE through memory corruption bugs. Similarly, people have found ways to achieve arbitrary code execution in the kernel on locked devices. Of course, vendors tend to release security updates for such bugs promptly. To get an idea of how promptly, and how important this is to vendors, check out the writeup for the Bad Binder vulnerability by Google Project Zero.
The more code you have, the more bugs you are going to have. One of the benefits of the TEE is that there is less code running at that privilege level than, say, at the Android OS kernel level. This reduces the attack surface and makes it a little bit easier to secure.
Case study: OnePlus 7 Pro
OnePlus 7 Pro runs Qualcomm Secure Execution Environment (QSEE), a TEE operating system by Qualcomm, the manufacturer of the chipset that powers the device. This device contains several components responsible for fingerprint authentication in both the REE and the TEE. There are multiple layers of abstraction glue involved in this:
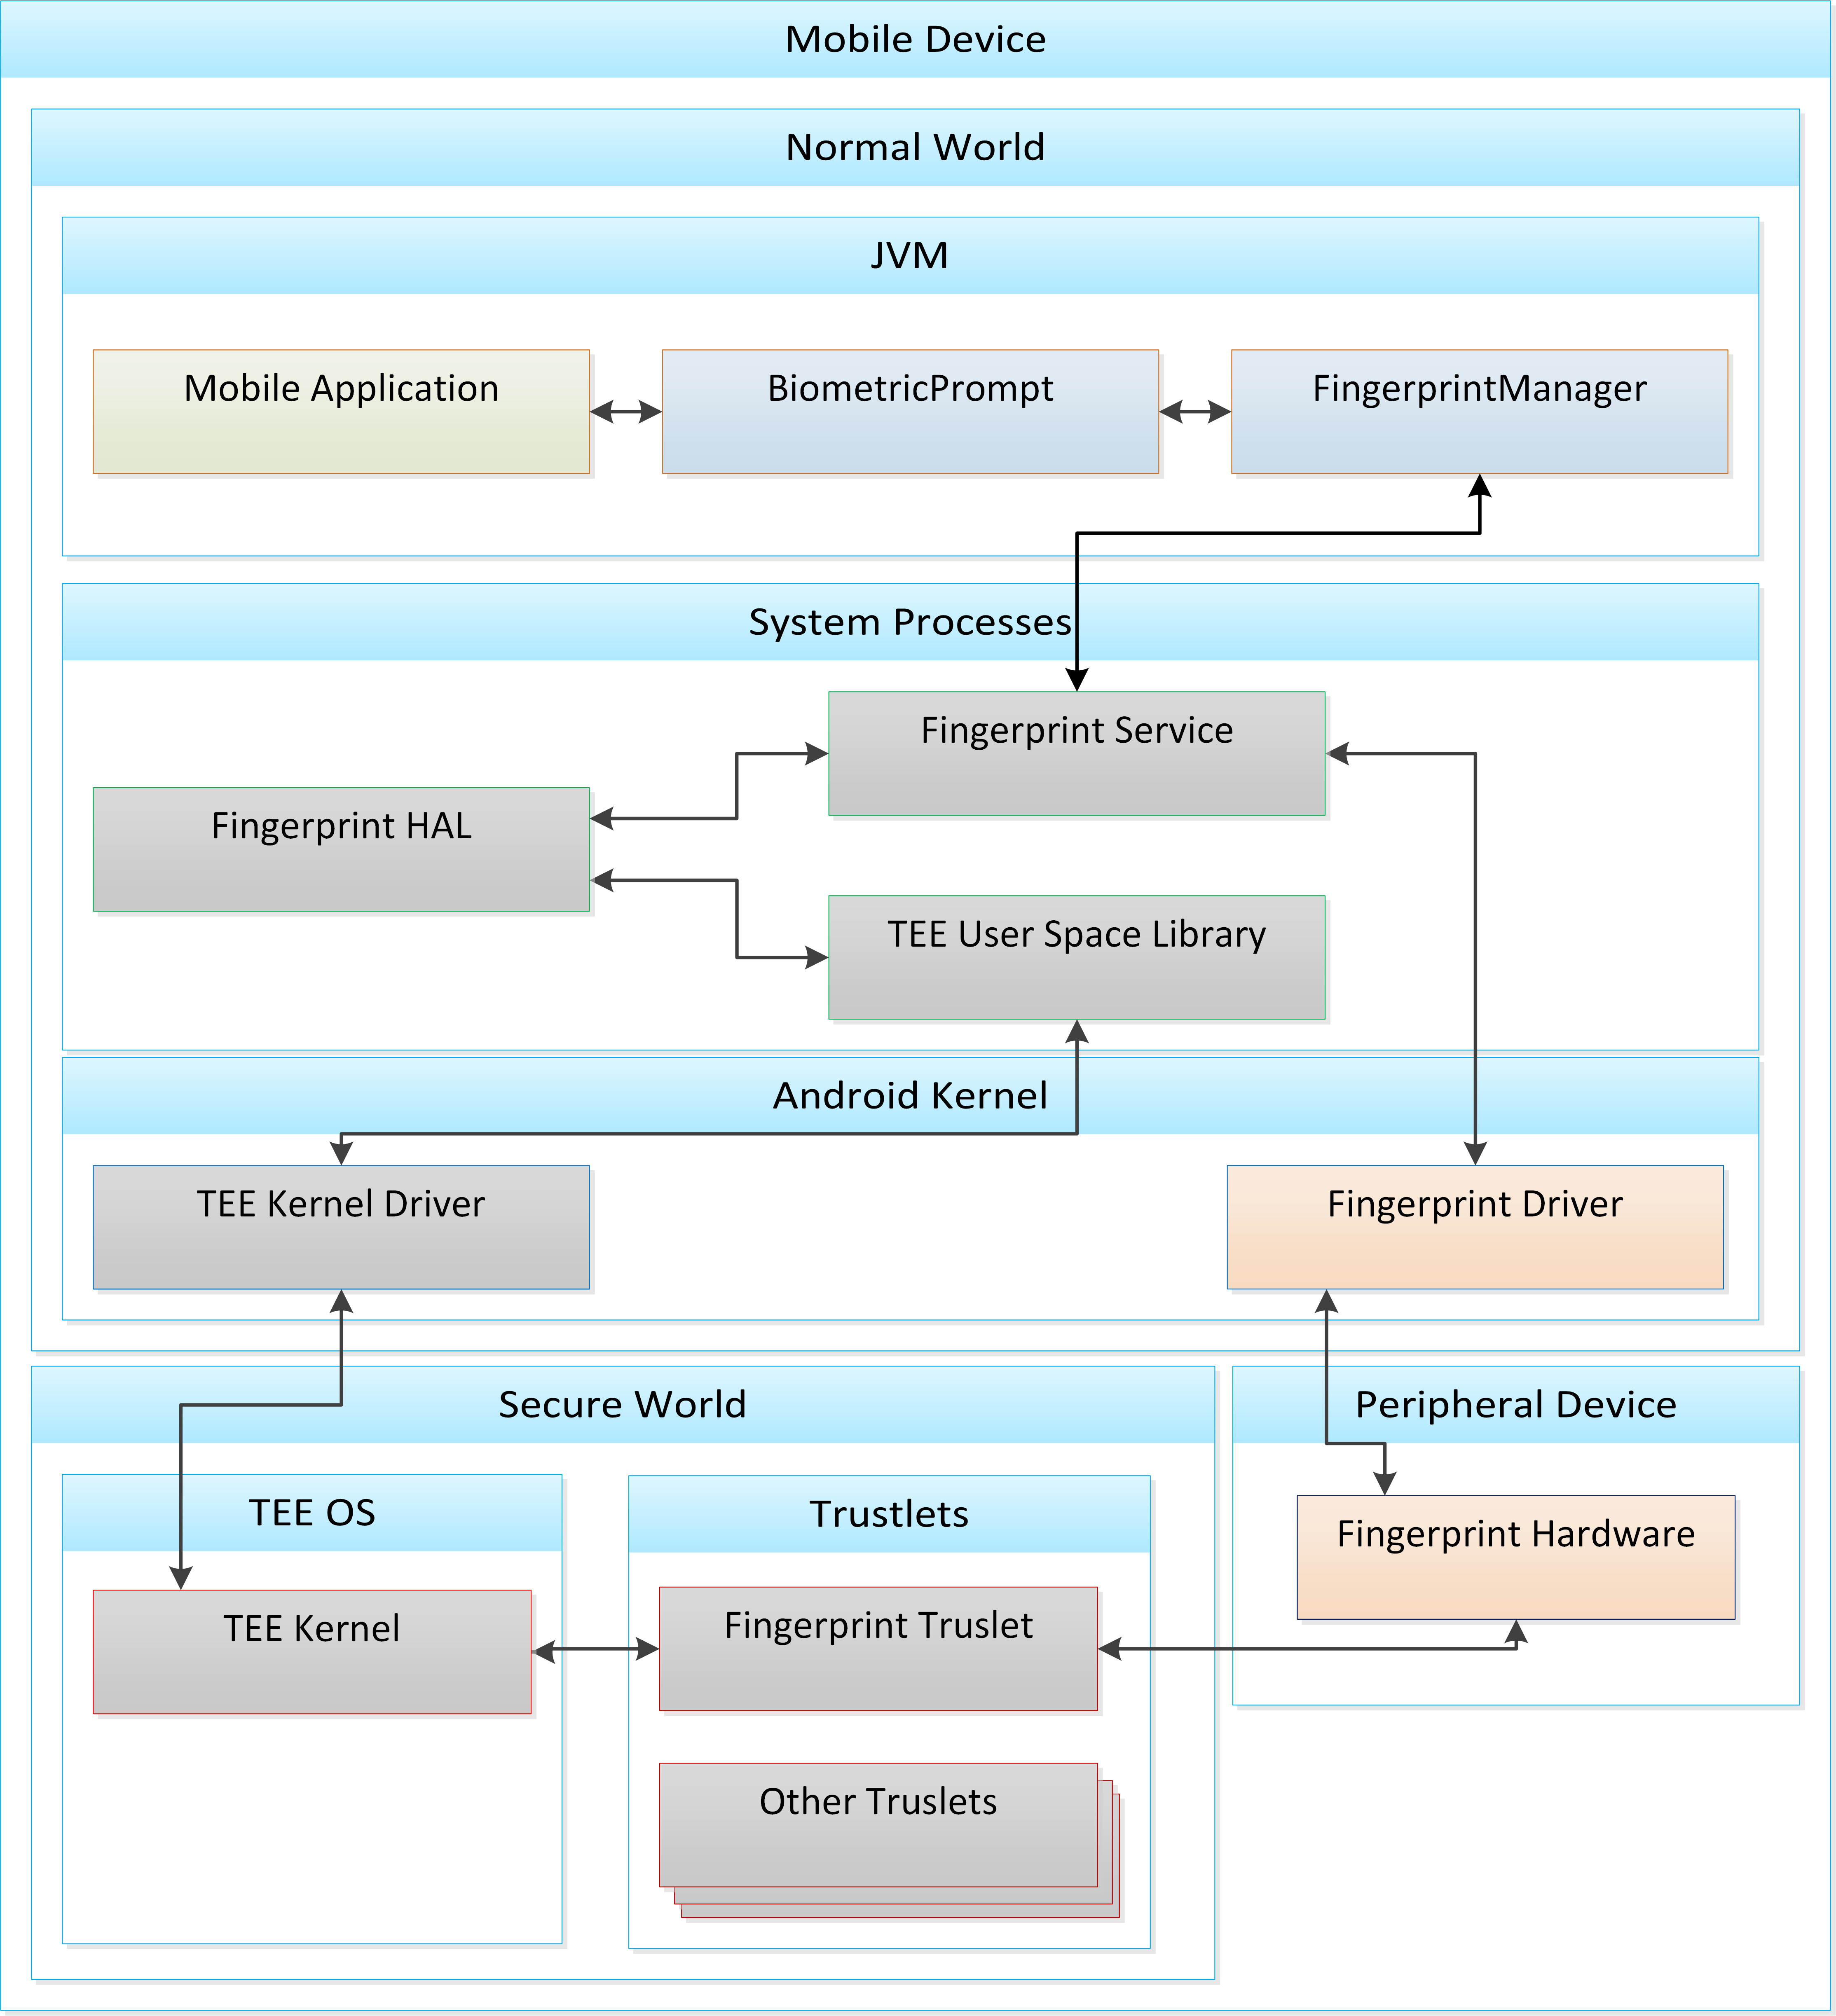
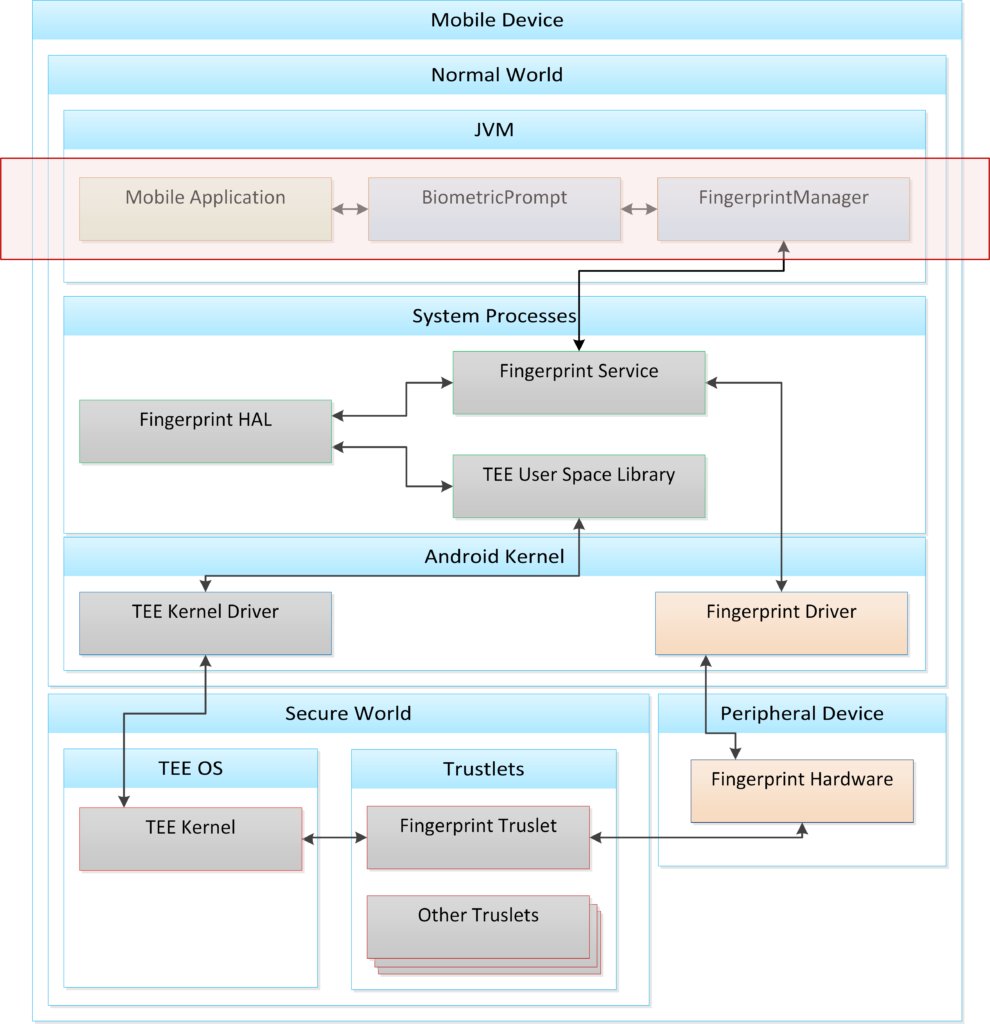
On a non-rooted device, you would only be able to access the biometric authentication APIs exposed by the Android framework:
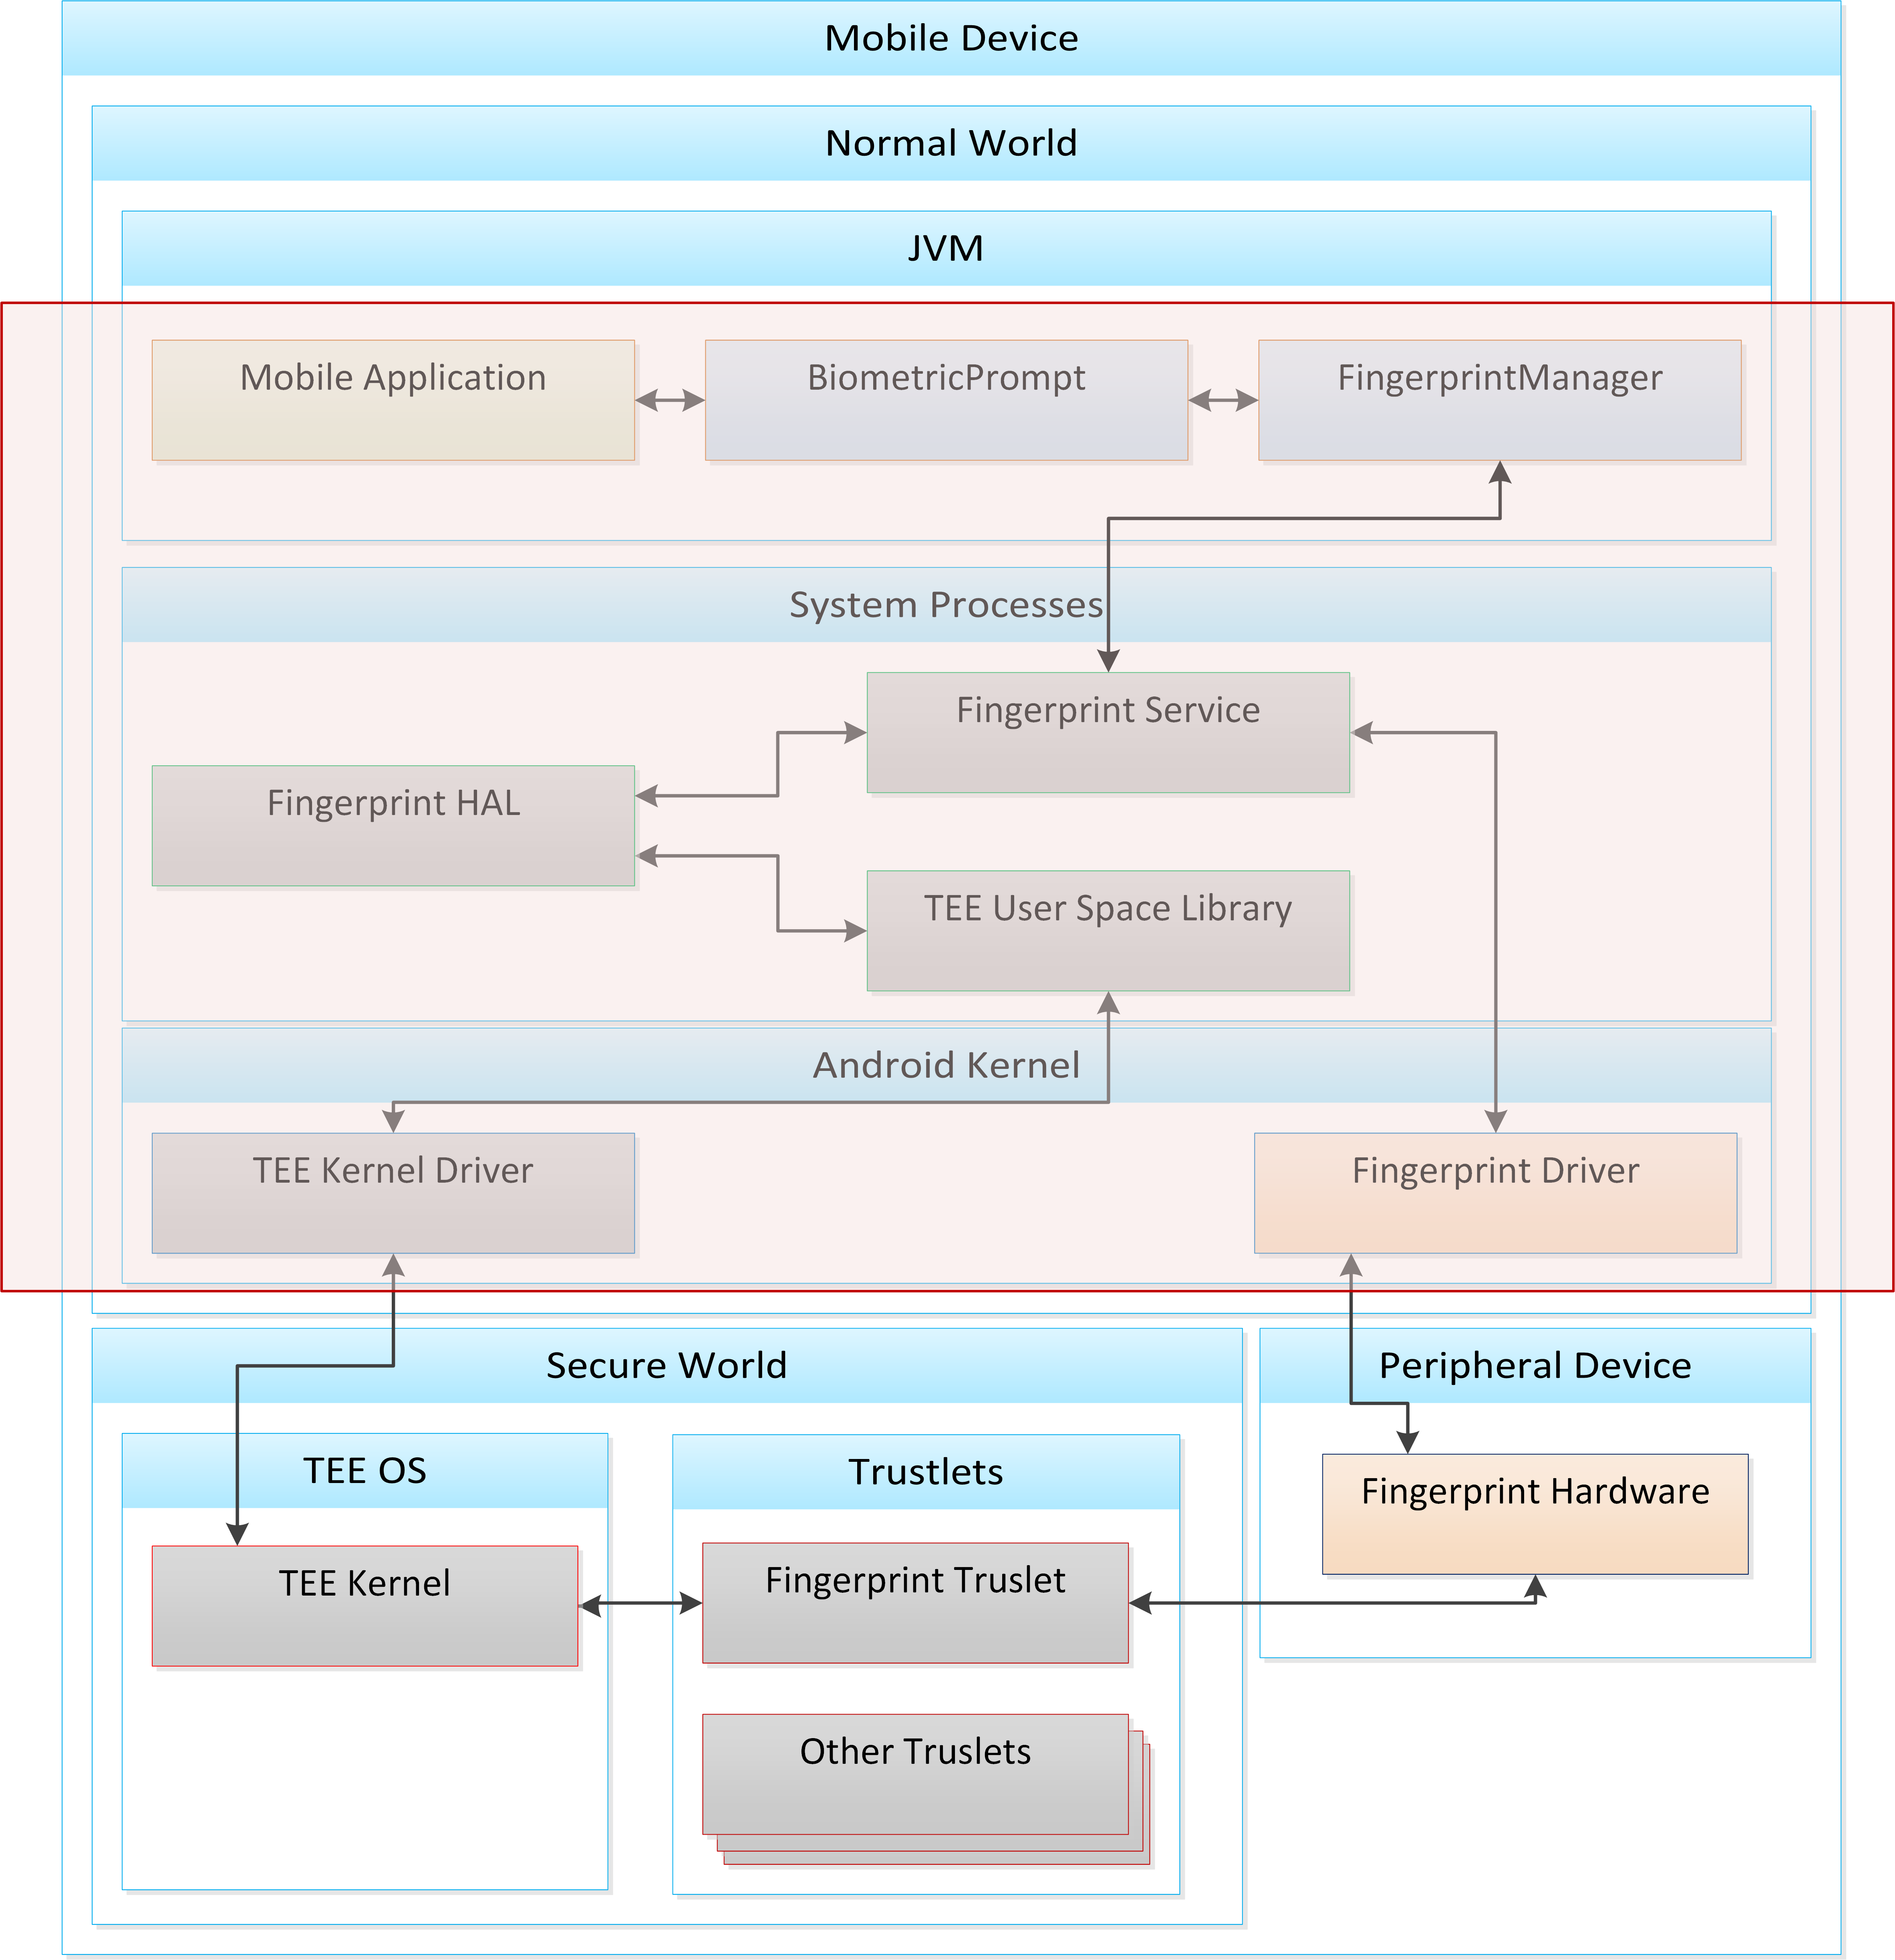
However, on a rooted device, you can start your attack from anywhere in the REE:
You could go ahead and invoke any functionality already present in libgf_ud_hal library. Our reverse engineering efforts discovered that REE fingerprint libraries contain many more features beyond what is needed to support the high-level Android framework APIs. This is a standard practice, as in most cases removing this functionality does not make any difference and the overhead of ring-fencing production code in these libraries carries no additional benefit.
Alternatively, you could invoke the raw transport that sets up a shared memory buffer and passes your input to the TEE. This function typically lives in libQSEEComAPI or the TEE-specific equivalent in the case of other TEEs.
The difference is that in the former case, the functions in libgf_ud_hal library will have filled out the buffer with a proprietary structure specific to the command you want to invoke, and it would have made the call to the raw transport. In the latter case, you need to know what to put in that buffer and how to structure it so that the TEE routes it correctly and the trustlet can understand it.
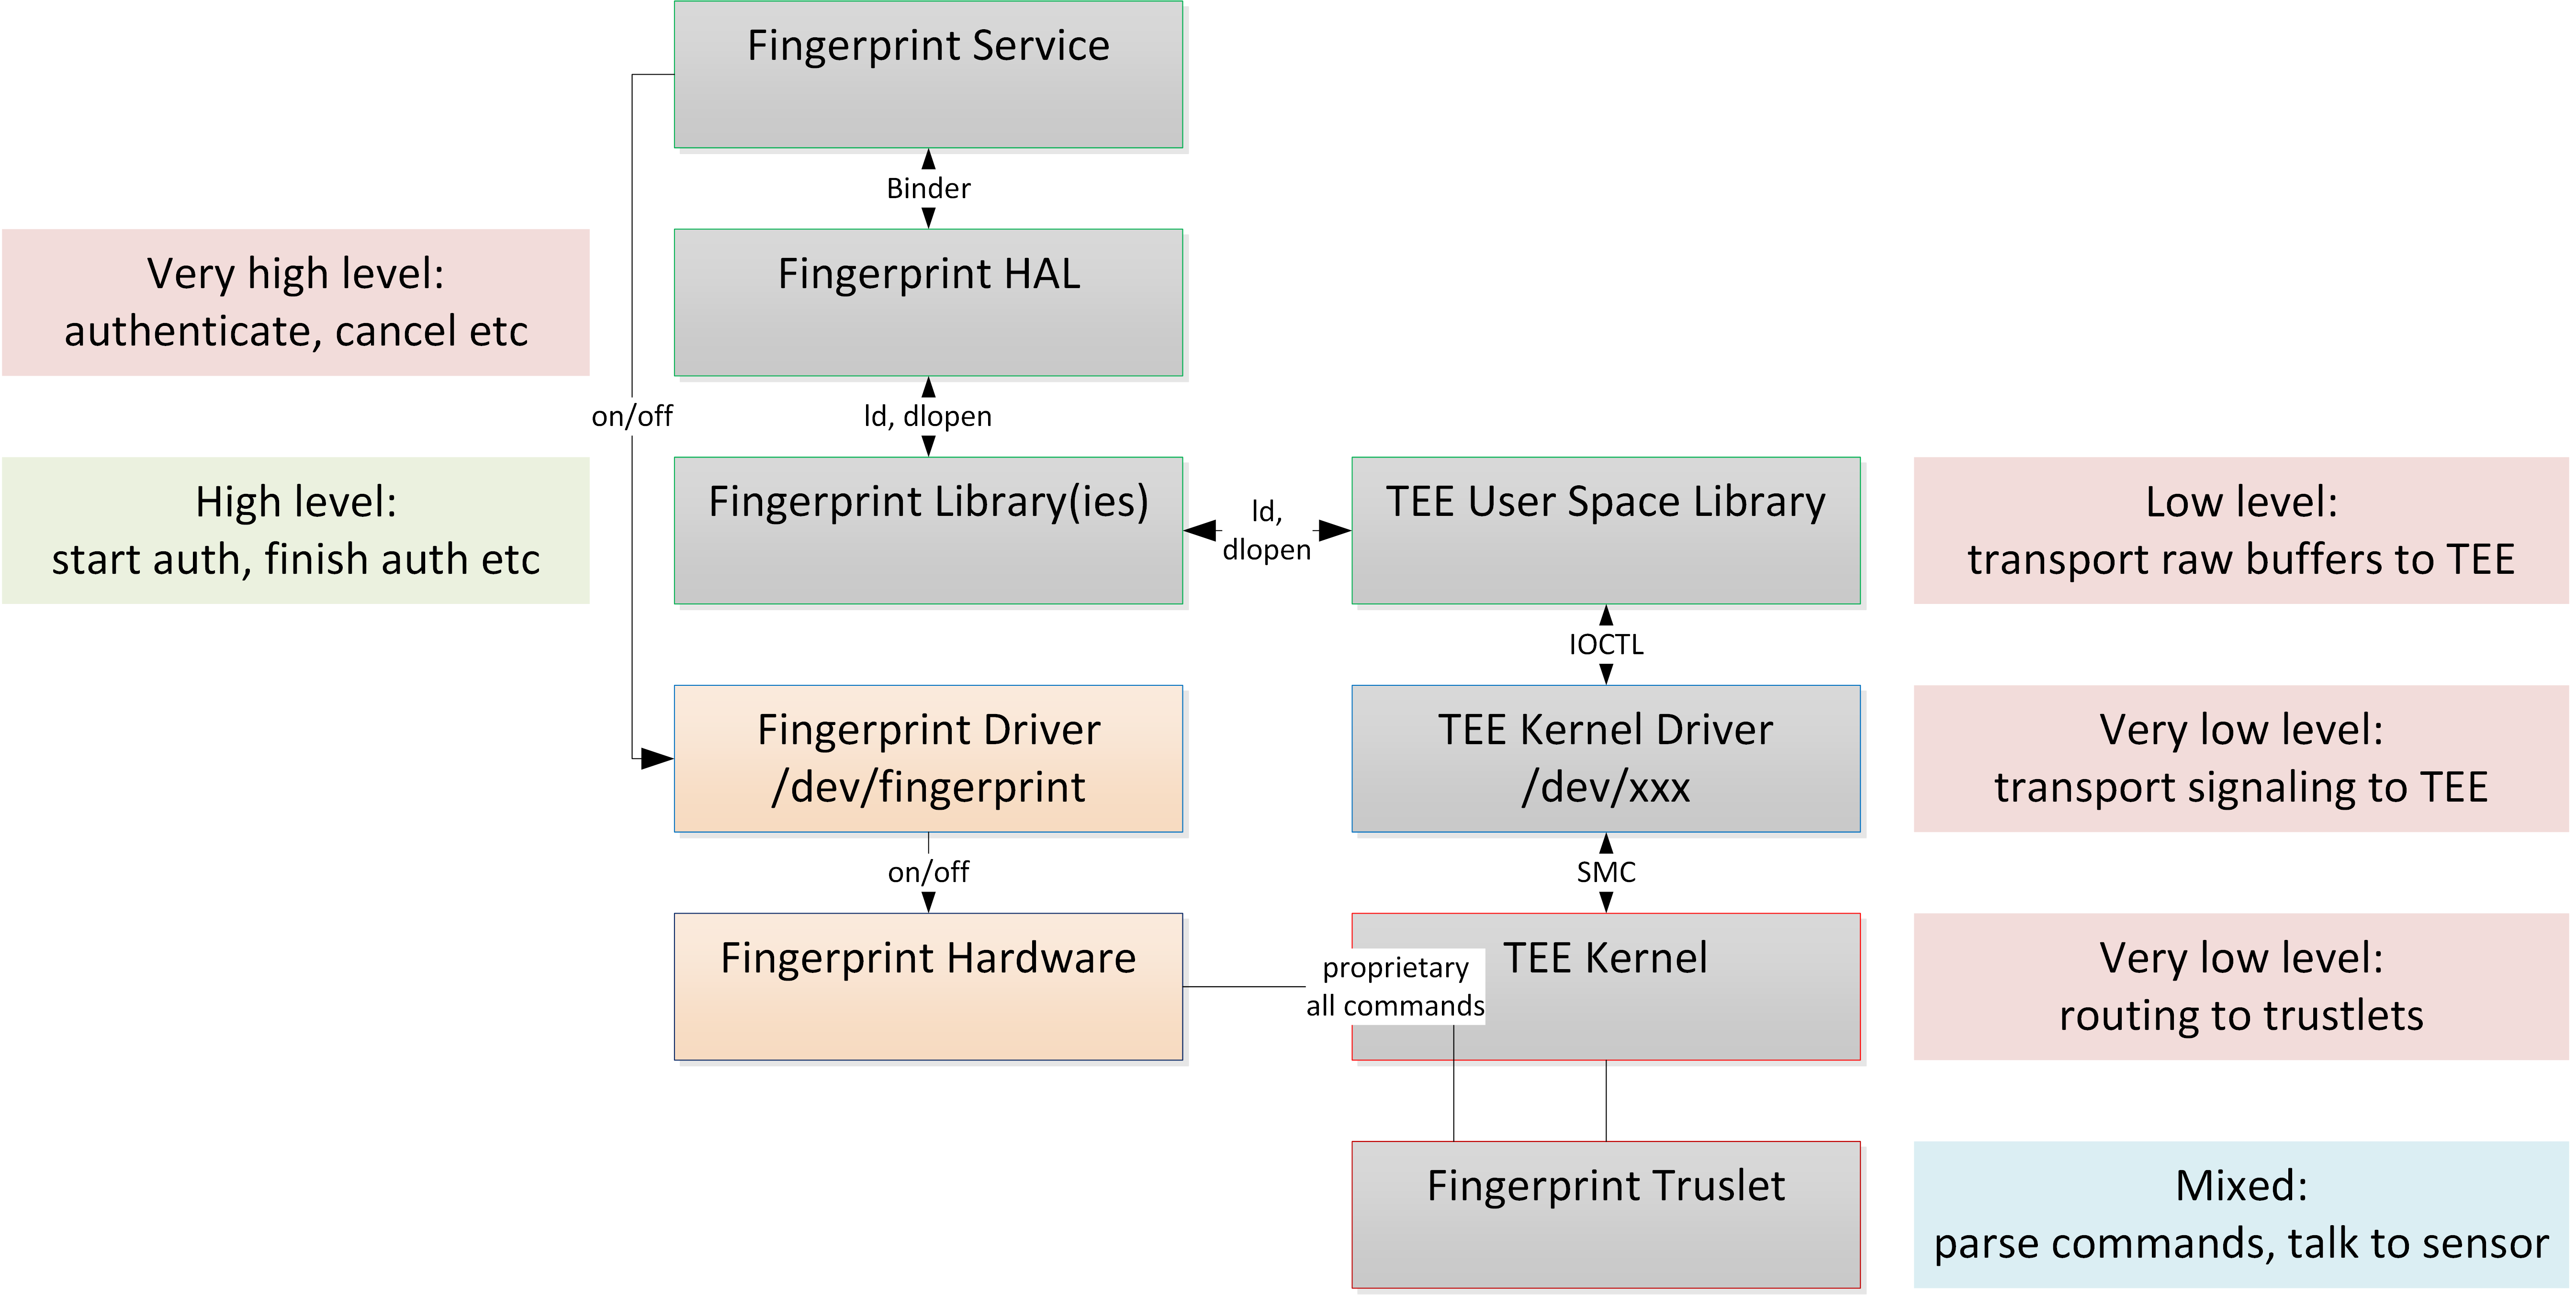
From here, the buffer traverses through a long chain of calls in the Android OS kernel, the Secure Monitor in EL3, the TEE OS in S-EL1, and ultimately lands in the trustlet in S-EL0.
Once this buffer reaches the trustlet, it lands in a “routing” function (the command handler). This function examines the first few bytes of the buffer to find out what functionality of the trustlet needs to be executed. This is where things start to get very interesting.
In theory, the only functionality that is necessary in a production device running a production firmware image is the feature set that the fingerprint HAL will use: enroll a fingerprint, validate a fingerprint, unenroll a fingerprint, and just a few others. Oftentimes, debug or factory testing logic is left in production builds of the trustlet.
The presence of debug code in production builds can typically give attackers a slight advantage. In a trustlet, the presence of debug code can often expose functionality that undermines the secure-client-computation guarantees it is supposed to provide.
Many REE applications employ libraries to talk to trustlet components. We often find that debug calls are stripped from the REE libraries, but the functionality is still present in the trustlet. Our job is just to reverse engineer the trustlet and construct a useful buffer to invoke the functionality.
Think of it this way: If you remove a link to privileged functionality from a web app, but not the API endpoint, the functionality can still be reached by attackers. If you remove the API endpoint, but not the link, the functionality will not be available. It is the API endpoint where the access control should be implemented. In this case, code in libgf_ud_hal is the web app front end, and code in the trustlet is the equivalent of an API endpoint. libQSEEComAPI in this case is the transport (i.e., HTTP client library).
Trustlet developers need to ensure that their production trustlet builds do not expose any sensitive functionality to the REE.
For example, consider the following debug code that we found in a trustlet. It lets you dump data from the sensor and return it to the REE:
__int64 __fastcall gf_sz_dump_capture_data(unsigned __int8 **buf_out, _DWORD *buf_sz_out)
{
  // [COLLAPSED LOCAL DECLARATIONS. PRESS KEYPAD CTRL-"+" TO EXPAND]
  ret = 1004;
  if ( !buf_out || !buf_sz_out )
    goto LABEL_6;
  buf = cpl_malloc(43020LL, 0LL);
  if ( !buf )
  {
    // … error handling
    return ret;
  }
  gf_sz_fill_bmpdata(buf, 1);
  *buf_out = buf;
  ret = 0;
  *buf_sz_out = 2634620;
  return ret;
}
This function receives a pointer to a structure, creates a buffer, calls another function to fill the buffer with raw data from the sensor, and writes a pointer to this buffer into the structure that it received.
Production builds should ensure that this type of debug code cannot be reached by removing it. You can achieve this by wrapping the command handler in an #ifdef and make it return an error code when building a production trustlet.
Alternatively, you can do what OnePlus did with the 7 Pro and just make this code unreachable in the “routing” component. We will dive deeper into this in the next section.
CVE-2020-7958
The issue we found on the OnePlus 7 Pro was that similar functionality was available through the factory testing command handler.
Logic in the REE
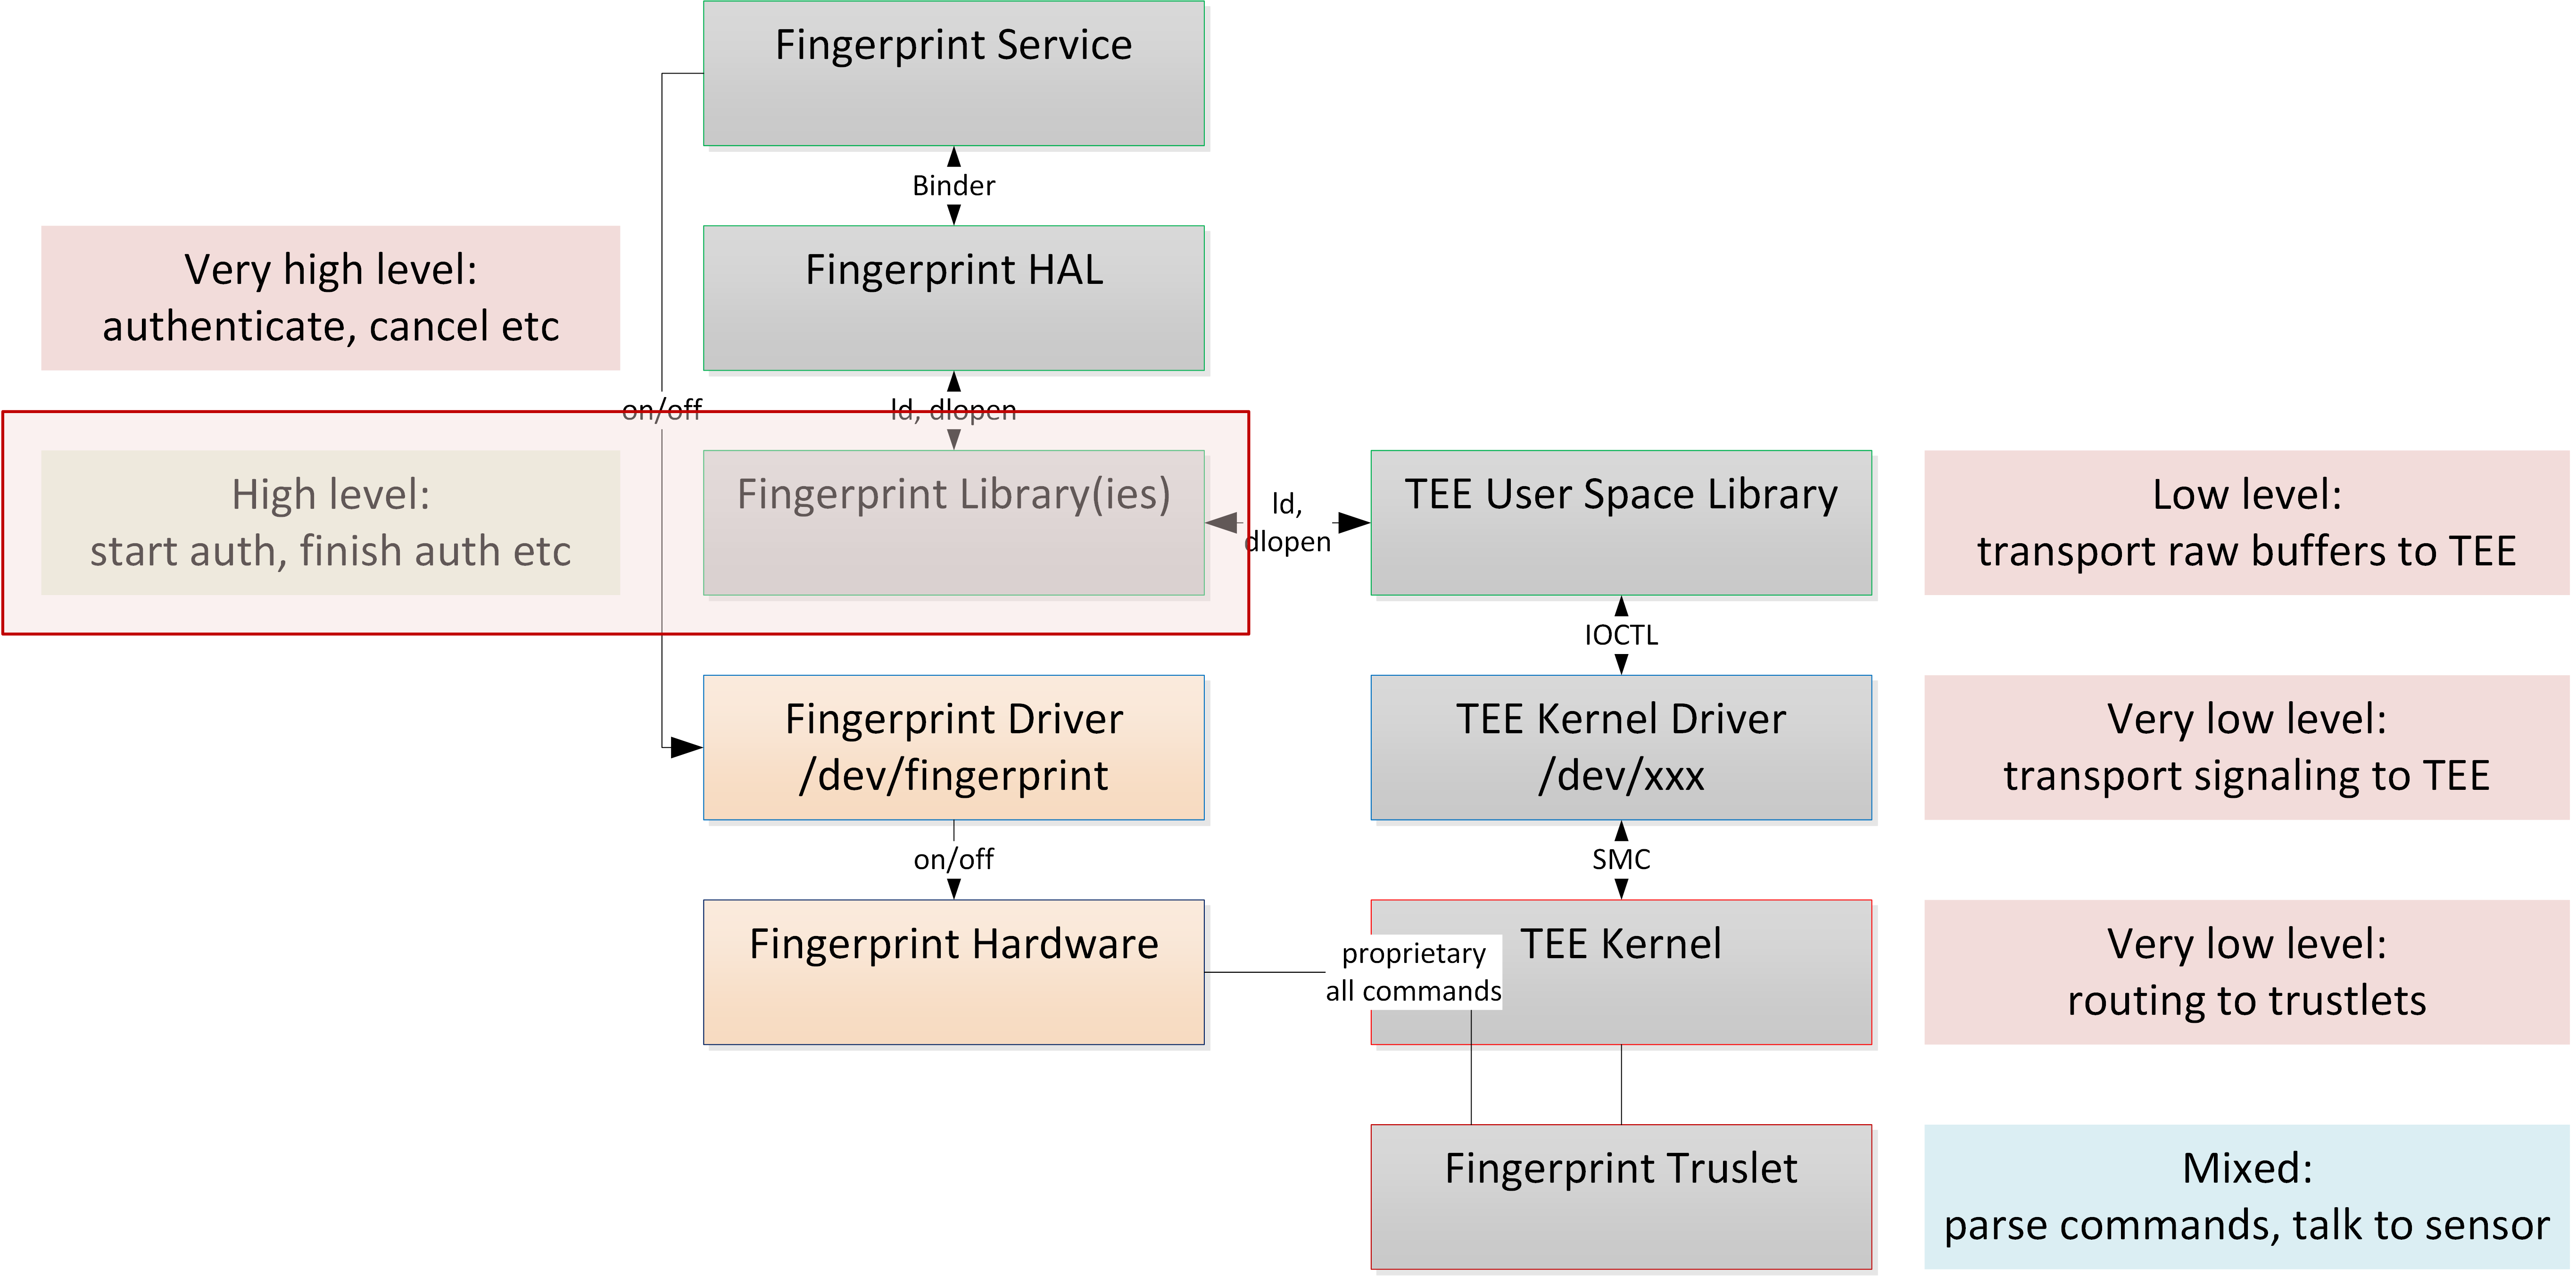
The REE part of the fingerprint subsystem is contained in the libgf_ud_hal.so shared object. This shared object file can be obtained in a number of ways:
- It can be found on a rooted device, under the
/vendor/lib64/ - A software build (firmware) can be downloaded, for example, from the vendor’s software upgrade page. The contents of
/vendor/lib64/directory can be found in theimgpartition. This partition image can be mounted as a regular ext2 filesystem data image.
This is where it fits on the components ladder:
The libgf_ud_hal.so shared object contains a method called goodix::SZCustomizedProductTest::factoryCaptureImage(). Our reverse engineering efforts have resulted in the following deconstructed pseudocode*:
* Note that we spent the bulk of our reverse engineering effort turning meaningless v1, v2, and v3+X’s into readable code. This is true for all code samples in this post.
__int64 __fastcall goodix::SZCustomizedProductTest::factoryCaptureImage(goodix::SZCustomizedProductTest *this, GF_SZ_TEST_RAWDATA *raw_data_out, unsigned __int16 ae_expo_start_time, unsigned __int8 uchar, unsigned __int16 ushort2)
{
  goodix::command::FactoryCaptureImage *Command; // x0 MAPDST
  unsigned int rv; // w21
  const char *errfmt; // x0

  if ( raw_data_out )
  {
    Command = malloc(0x1502Cu);
    if ( Command )
    {
      memset(Command, 0, sizeof(goodix::command::FactoryCaptureImage));
      Command->ae_expo_start_time = ae_expo_start_time;
      Command->field_1C = uchar;
      Command->field_1E = ushort2;
      Command->Parent.target = 1003;
      Command->Parent.cmd_id = 17;
      rv = goodix::HalBase::invokeCommand(&this->HalBase, &Command->Parent, 0x1502C);
      if ( !rv )
      {
        memcpy(raw_data_out, &Command->captureImageResponseBuffer, sizeof(GF_SZ_TEST_RAWDATA));
        free(Command);
        return rv;
      }
      free(Command);
    }
    else
    {
      __android_log_print(6, "[GF_HAL][SZCustomizedProductTest]", "[%s] out of memory, cmd", "factoryCaptureImage");
      rv = 1001;
    }
  }
  else
  {
    __android_log_print(6, "[GF_HAL][SZCustomizedProductTest]", "[%s] param is erro", "factoryCaptureImage");
    rv = 1004;
  }
  errfmt = gf_strerror(rv);
  __android_log_print(
    6,
    "[GF_HAL][SZCustomizedProductTest]",
    "[%s] exit. err=%s, errno=%d",
    "factoryCaptureImage",
    errfmt,
    rv);
  return rv;
}
This function accepts a buffer (raw_data_out), which will receive the image from the fingerprint sensor. This buffer should be at least 86024 bytes in size to accommodate the output image—the size of GF_SZ_TEST_RAWDATA structure, which we reverse engineered on the trustlet side.
Other arguments, such as exposure time (ae_expo_start_time), are passed to this function and are included in the resulting TEE command.
The TEE command is a structure that differs per command but, importantly, contains the following routing information:
- Target ID (
target), which is set to 1003. The trustlet will use this to route the command to the correct module that handles commands with this target ID. - Command ID (
cmd_id), which is 17. This parameter routes the command to a specific branch in the module inside the trustlet.
Note that at this point, we are not talking to the TEE yet. We are a couple of layers of abstraction away, and we are talking in fingerprint sensor concepts. We suspect that this library may be part of an SDK provided by the sensor vendor and that device vendors, such as OnePlus, apply minimal changes and reconfigurations specific to the hardware sensor that they are using.
Once the command structure is prepared, the goodix::HalBase::invokeCommand() function is used to communicate with a Qualcomm-supplied TEE communication library, libQSEEComAPI.so.
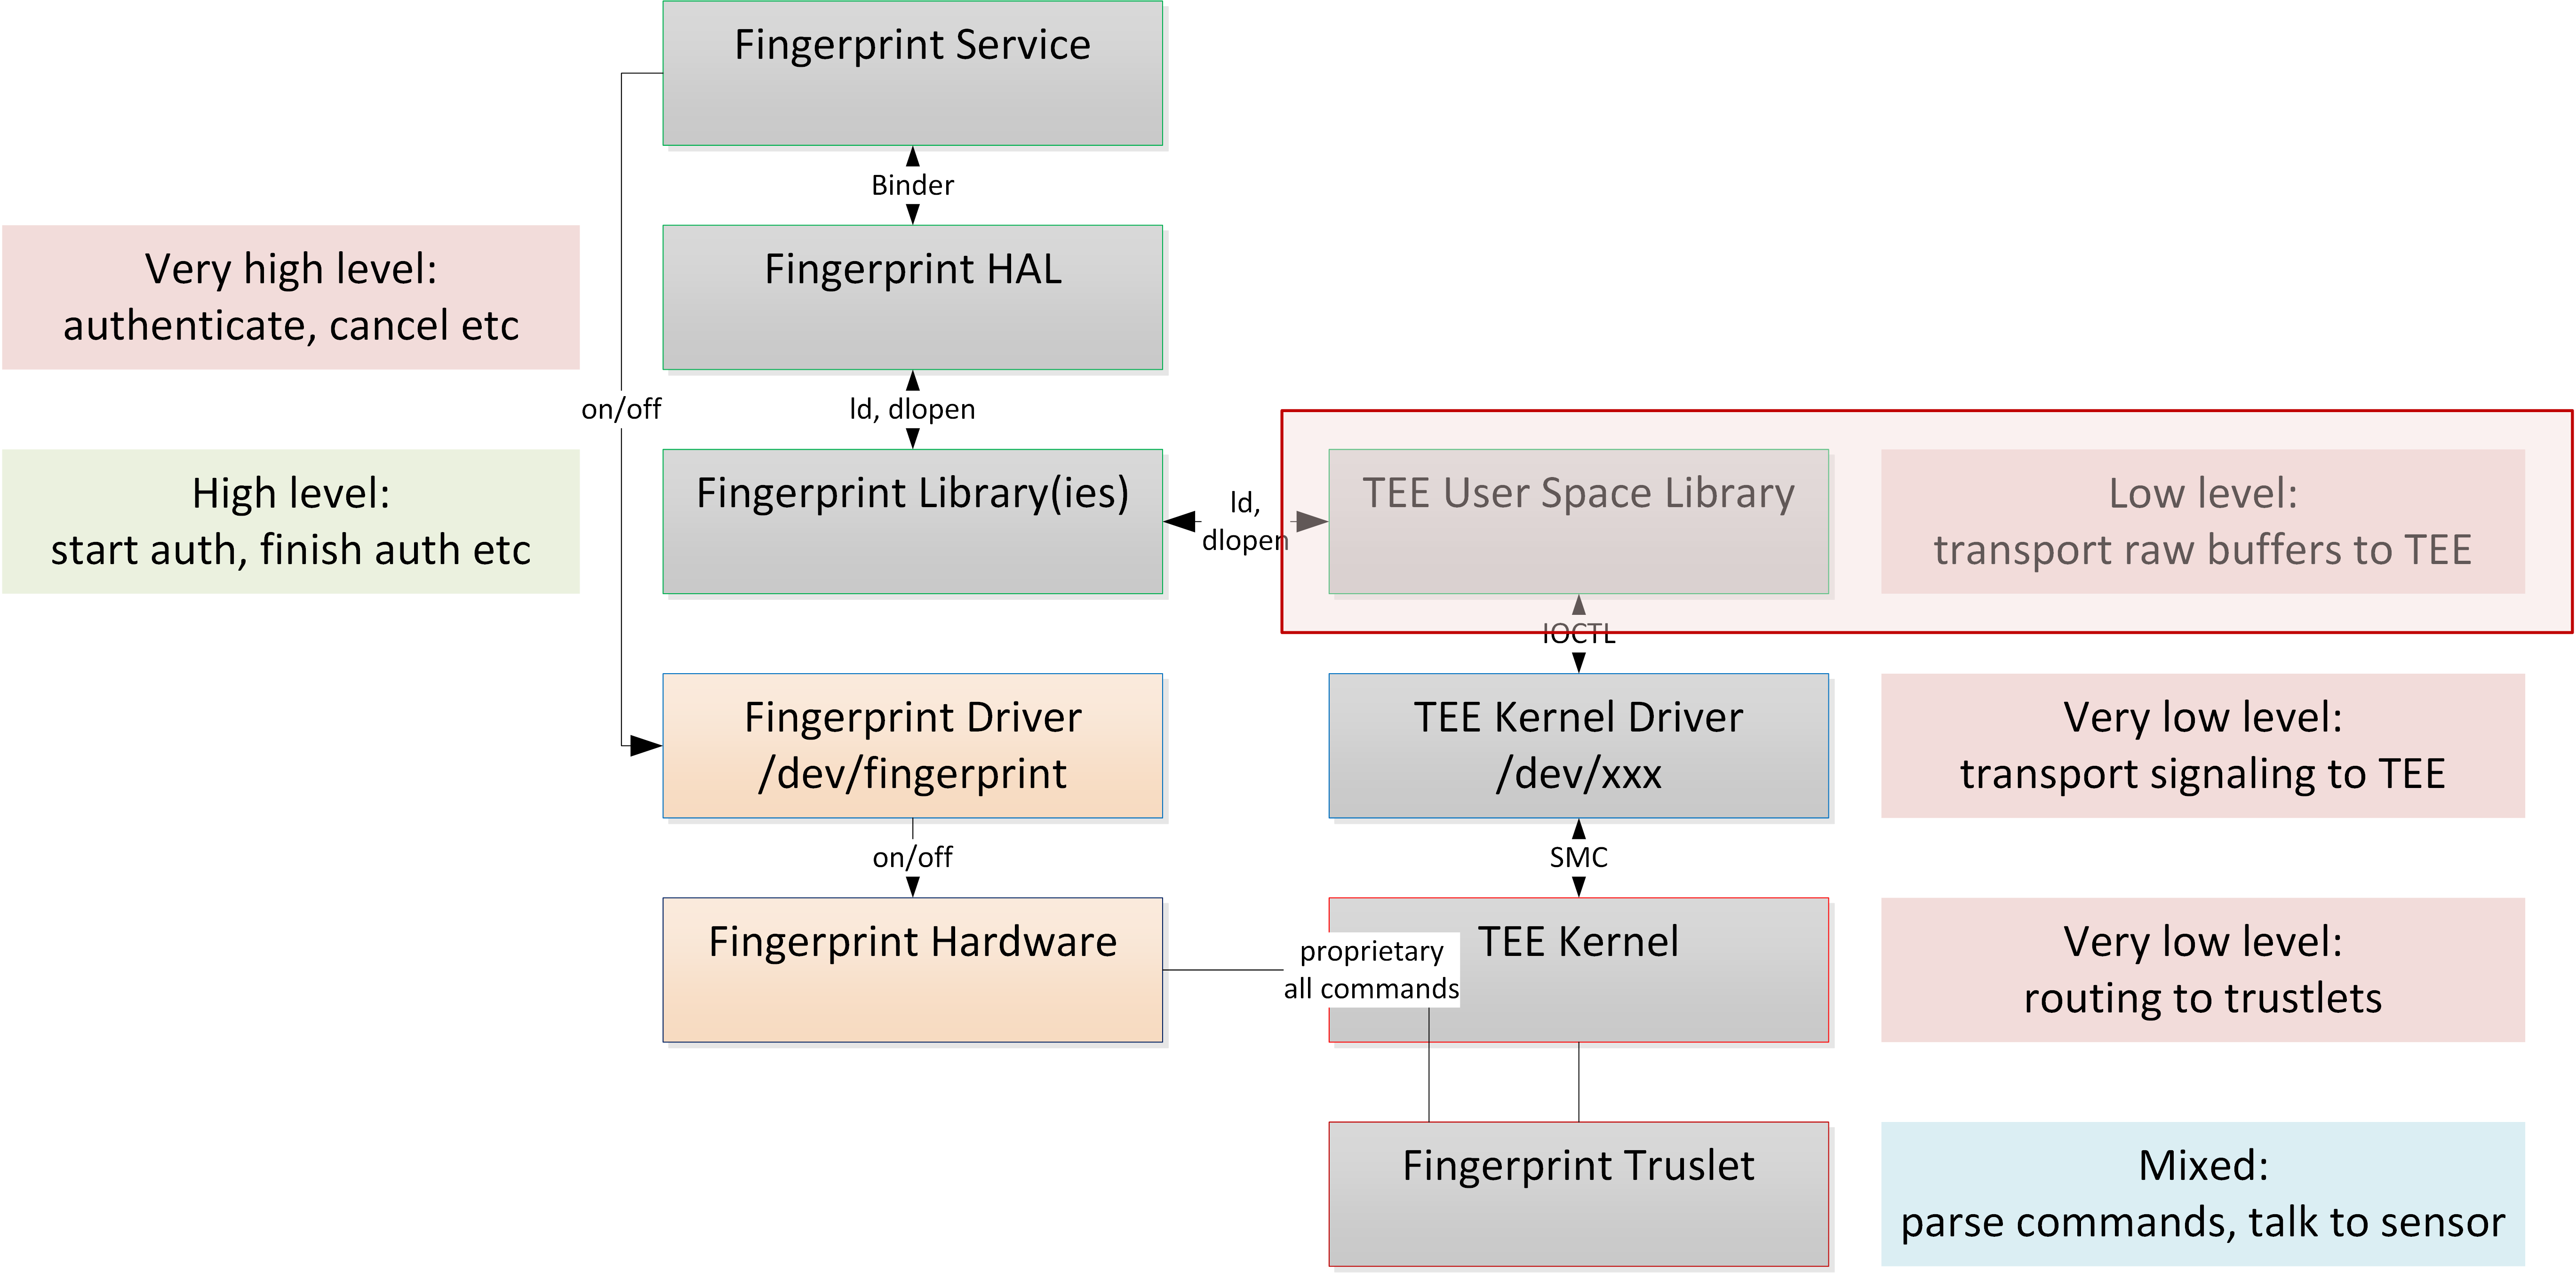
This library will vary per TEE vendor. At this point, the fingerprint sensor command built earlier is basically just an abstract buffer with some data. This library talks to the kernel driver for TEE communication and passes this buffer to the correct trustlet. If we didn’t have goodix::factoryCaptureImage to prepare the command structure for us, we could still build an appropriate one by reversing the trustlet and call libQSEEComAPI.so directly to deliver our command to the trustlet.
In this case, we do have a high-level function to call. Because we did not fully understand how all parameters to this call affected the result, we started with a simple call as our goal:
goodix::SZCustomizedProductTest::factoryCaptureImage(SZCustomizedProductTest _object, image_buffer , ae_expo_start_time, 1, 0);
This call required us to have a reference to a SZCustomizedProductTest instance as well as ae_expo_start_time.
The latter could be retrieved by calling goodix::SZCustomizedProductTest::getSensorInfo, which would mimic the behavior of a real call found in the library.
Creating an instance of SZCustomizedProductTest required a valid reference to a HalContext instance.
Luckily for us, goodix::HalBase::invokeCommand() was something that would frequently get called during normal operation of the fingerprint sensor, and the instance of goodix::HalBase included a valid pointer to HalContext that we could borrow. The logic of our exploit, therefore, became the following:
- Hook
goodix::HalBase::invokeCommandand retrieve a pointer toHalContext. - At some point after such a pointer is retrieved, call
goodix::createProductTestwith a pointer toHalContext. - Call any further product test initialization routines with valid arguments, such as
goodix::SZCustomizedProductTest::getSensorInfo. - Call
goodix::factoryCaptureImagewith all the appropriate parameters and dump the output buffer to disk for further examination.
We achieved all the above on a rooted device. Tools like Frida can help make dynamic trustlet exploitation practical.
Logic in the trustlet
In this part, we explain why our simple exploit worked and how it was fixed.
In the OnePlus 7 Pro’s fingerprint authentication trustlet, we identified the following routing functions by looking at the error handlers and exported symbols:
app_main.tz_app_cmd_handler -> gf_modules.gf_modules_cmd_entry_point
This is where a list of “modules” is iterated, and for each module, a check is performed to see if the module metadata entry has a “target id” that matches the “target id” of the command being handled. If it does, the module’s entry point address is read from the metadata structure and called, so that it can continue handling the command:
__int64 __fastcall gf_modules_cmd_entry_point(cmd_routing_info *cmd_routing_info, unsigned int buffer_size)
{
  // ...
  loop_idx_stopgap = -1LL;
  for ( module_table_entry = g_module_table;
        (*module_table_entry)->target_id != cmd_routing_info->target_id;
        ++module_table_entry )
  {
    if ( ++loop_idx_stopgap > 2 )
      return 0;
  }
  errno = ((*module_table_entry)->entry)(cmd_routing_info, buffer_size);
  *cmd_routing_info[1].gap0 = errno;
  strerr = gf_strerror(errno);
  gf_dump_log(3LL, "[gf_modules][%s] err = %d, errno = %s", "cmd_entry_point", errno, strerr);
  // ...
  return errno;
}
We discovered a symbol called g_dump_module in the trustlet:

This symbol actually points at a module with functionality to dump the image from the sensor into the REE. But this module is not present in the table that gf_modules_cmd_entry_point uses:
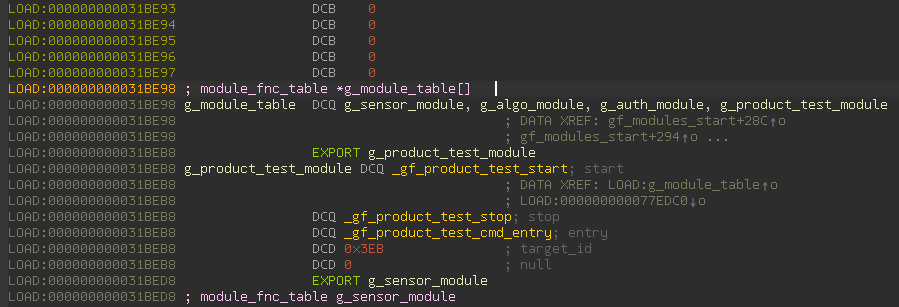
This is good: The image dumping component is excluded from the command routing logic.
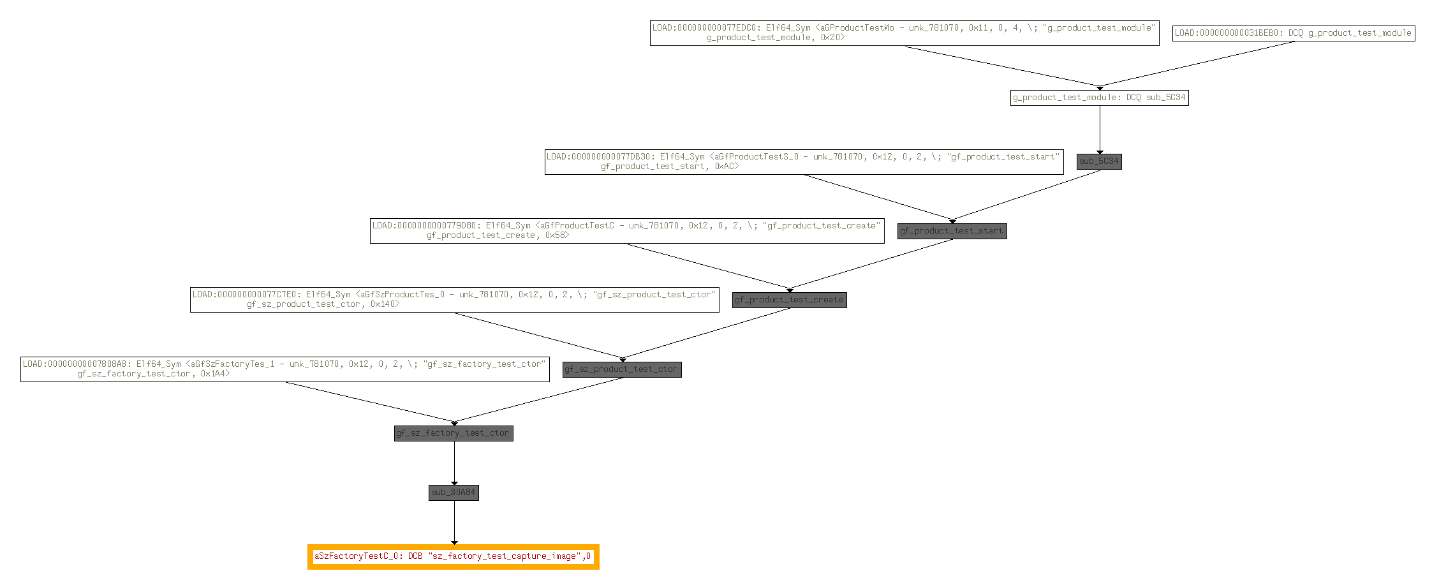
However, there was another interesting module here: the g_product_test_module. It is not unusual for testing code to have functionality that could be useful to us. Searching the strings in this binary for anything to do with image dumping revealed the following interesting function name: sz_factory_test_capture_image.
A graph of cross-references to this showed that it was somehow related to the product testing module:
By this point we had already figured out that entries in the table were described with the following structure:
struct module_fnc_table
{
  __int64 (__fastcall *start)();
  __int64 (__fastcall *stop)();
  __int64 (__fastcall *entry)();
  int target_id;
  int null;
};
“start” and “stop” functions are used to bootstrap and tear down the module. “entry” functions are used to actually handle the incoming command.
If we dive into the entry function for the product test module, we will see that it is a wrapper function that uses a global named symbol g_product_test_ctx to resolve a function table:
__int64 __fastcall gf_product_test_cmd_entry(__int64 a1, unsigned int a2)
{
  return gf_product_test_cmd_entry(g_product_test_ctx->ptest_fnc_table, a1, a2);
}
Then it calls the actual command, which uses the resolved function table to call the correct function:
__int64 __fastcall gf_product_test_cmd_entry(ptest_fnc_table_0 *a1, __int64 a2, unsigned int a3)
{
  // [COLLAPSED LOCAL DECLARATIONS. PRESS KEYPAD CTRL-"+" TO EXPAND]

  if ( a1 && a2 && a3 > 27 )
  {
    if ( a1->costomer_get_mt_info )
    {
      rv = a1->costomer_get_mt_info(a1, a2, a3);
      if ( rv )
      {
        v4 = gf_strerror(rv);
        gf_dump_log(1LL, "[gf_product_test][%s] exit. err=%s, errno=%d", "gf_product_test_cmd_entry", v4, rv);
At this point having a reference to the “start” function for the module was very useful to us. When reverse engineering complex structures, such as the ones that are about to follow, initialization routines are invaluable, because they typically use a large number of structure members and will be sprinkled with helpful error messages that help us understand the purpose of the structure member.
We followed the “start” routine for the product testing module to understand whether it would be possible for us to trigger the image capture test from the REE.
The start routine makes a call to gf_product_test_create, which reserves some memory for the function table, fills out the first entry, and calls gf_sz_product_test_ctor to continue this work. We kept naming the function pointers in the structure by using the helpful names left in error message strings that were present in the binary for logging possible runtime errors.
ptest_fnc_table_2 *__fastcall gf_sz_product_test_ctor(ptest_fnc_table_1 *a1)
{
  ptest_fnc_table_2 *result; // x0

  a1->gf_sz_product_test_cmd_entry = gf_sz_product_test_cmd_entry;
  a1->sz_product_test_data_preview = sub_16AE8;
  a1->sz_product_test_fusion_preview = sub_16EE4;
  a1->sz_product_test_get_version = sub_17420;
  a1->sz_product_test_find_sensor = sub_16CB0;
  a1->sz_product_test_set_capture_param = sub_17574;
  a1->sz_product_test_get_config = sub_17350;
  a1->sz_product_test_capture_base = sub_15094;
  a1->sz_product_test_set_enroll_template_count = sub_176C8;
  a1->get_bmp_data = sz_product_test_get_bmp_data;
  a1->sz_product_test_update_cfg = sub_17900;
  a1->sz_product_test_update_fw = sub_17A20;
  a1->sz_product_test_untrust_enroll_enable = sub_177E0;
  result = gf_sz_factory_test_ctor();
  a1->ptest_sz_fnc_table = result;
  return result;
}
By continuing this process and repeatedly going back to the “entry” function and following the functions indirectly called from there, eventually we ended up here:
__int64 __fastcall gf_sz_factory_test_cmd_entry(ptest_fnc_table_1 *a1, __int64 a2, unsigned int a3)
{
  // [COLLAPSED LOCAL DECLARATIONS. PRESS KEYPAD CTRL-"+" TO EXPAND]

  v5 = 0;
  v6 = a1->ptest_sz_fnc_table;
  switch ( *(a2 + 8) )
  {
    case 16:
      v7 = (v6->sz_factory_test_get_chip_info)(a2, a3);
      goto LABEL_32;
    case 17:
      v8 = v6->sz_factory_test_capture_image;
      goto LABEL_22;
    case 18:
      v7 = (v6->sz_factory_test_set_auto_exposure_time)(a2, a3);
      goto LABEL_32;
// ...
From the initial module entry, we know that target ID is 0x03EB, or 1003. The command ID for the function we need is 17. sz_factory_test_capture_image could be used to figure out how the resulting data is structured if REE didn’t have a library function:
__int64 __fastcall sz_factory_test_capture_image(goodix::command::FactoryCaptureImage *x0_0, unsigned int a2)
{
  // [COLLAPSED LOCAL DECLARATIONS. PRESS KEYPAD CTRL-"+" TO EXPAND]

  v15 = 0LL;
  v20 = 0LL;
  v21 = 0LL;
  v18 = 0LL;
  v19 = 0LL;
  v16 = 0LL;
  v17 = 0LL;
  if ( x0_0 && a2 > 0x1502B )
  {
    rv = sz_set_exposure_time(x0_0->ae_expo_start_time);
    if ( !rv )
    {
      gf_get_timestamp(&v16);
      LODWORD(v21) = 4;
      rv = gf_sensor_capture_image(g_sensor_ctx.fnc_table, &v17, 40u);
      if ( !rv )
      {
        ResponseBuffer = &x0_0->captureImageResponseBuffer;
        if ( !cpl_memcpy(ResponseBuffer->data, image_data, 2 * dword_39F47C * dword_39F478) )
        {
          ResponseBuffer->image_data_size = image_data_size;
          gf_get_timestamp(&v15);
          rv = 0;
          ResponseBuffer->profiling_seconds = (v15 - v16) / 1000uLL;
          return rv;
        }
        gf_dump_log(1LL, "[gf_shenzhen_factory_test][%s] memory copy error", "sz_factory_test_capture_image");
Fix and afterthoughts
The fix implemented was very simple: The command handler for ID 17 was removed from the production trustlet. This means that REE calls to goodix::SZCustomizedProductTest::factoryCaptureImage will fail.
Building sensitive functionality involving TEEs is a sophisticated process involving multiple vendors and a vast knowledge base prerequisite on both on the hardware and software sides of things. Integrating multiple SDKs is a challenge. The SDKs may have components both on the REE and TEE sides, and it can be even more of a challenge to figure out niche bugs like this. We would like to give a shout-out to OnePlus for their ability to quickly pin down the right person and resolve this issue. On the research side, we would like to thank John Kozyrakis for inspiring us to look in this direction.
We hope that with this article we’ve managed to lift the veil on inner workings of trustlets, how different components work together to provide a Trusted Execution Environment, and how to attack them.
*** This is a Security Bloggers Network syndicated blog from Software Integrity Blog authored by Georgi Boiko. Read the original post at: https://www.synopsys.com/blogs/software-security/cve-2020-7958-trustlet-tee-attack/
