

GuidePoint Security researcher discovers vulnerability in the integrity of common HMI client-server protocol

What if you could no longer trust the critical process values displayed on your HMI screen?
Executive Summary
When operating an Industrial Control System (ICS), the operator relies on the accuracy of the information reported about the industrial process in order to make decisions around adjusting parameters or initiating startup or shutdown procedures.
In the event of an emergency, like when a process is outside of allowable safety margins, the operator relies on the provided data’s accuracy to decide whether to gracefully shut down the process or elect for an emergency shutdown if the process is too far out of control.
Process data, values, and updates are typically sent over the Local Area Network (LAN) and presented to the operator through a human machine interface, or HMI. This sharing of information takes place over the network and is often done in cleartext, which can be easily intercepted, read, and manipulated by an attacker.
In this writeup, GuidePoint will share their research around a Proof of Concept (PoC) attack on the integrity of data flowing across the industrial network with the intention of intercepting, viewing, and even manipulating values sent to (and from) the HMI, with the ultimate objective to trick the operator into making a wrong decision, ultimately affecting the proper operation of the process. This research isn’t so much looking for vulnerabilities in any particular HMI software solution as it is to highlight the lack of Integrity and Confidentiality (two of the legs of the Industrial security triad – AIC) on the production network and the effect that has on the overall security of the production environment.
Note: There is a Rockwell advisory publication associated with the attack scenario disclosed in this writeup that can be found here: PN1608 – FactoryTalk® LiveData Communication Module Vulnerable to Man-In-The-Middle Attack [rockwellautomation.custhelp.com]
Disclaimer
For this POC writeup, we are targeting Rockwell Automation’s FactoryTalk View SE products. This is not to say these are the only HMI solutions vulnerable to these types of attacks. Several other (likely most) ICS equipment and software manufacturers use solutions that do not validate/verify communications between server and client, which makes them susceptible to Man in The Middle (MitM) attacks, as this writeup will detail.
The test setup
The following figure depicts the test environment used for the HMI MitM POC research work.
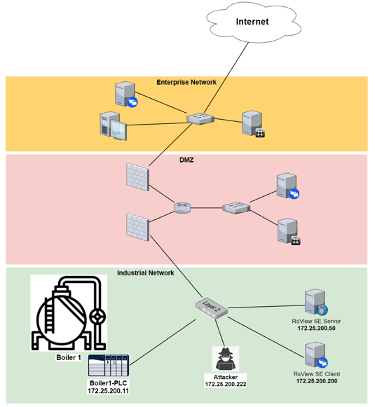
The upper levels of the architecture (DMZ and above) are shown for illustration and situational awareness only. They are not relevant to the task at hand but show the area of concern (industrial network) depicted within the Purdue reference model (What Is the Purdue Model for ICS Security? | Zscaler). The attacker shown in the Industrial network can either be physically present in the plant, plugged into the industrial network or it could be an attacker on the other side of the world who has compromised a system on the industrial network and uses that system to pivot their attacks.
About control processes
Let’s briefly discuss a control process to give some background behind the production process that we will be attacking.
In Industrial Control Systems, regulating process variables (like pressure, temperature, or flow) is a common task of the ICS. Think of this as maintaining a steady flow of gas/oil/etc. through a pipeline or maintaining steam pressure to or within a piece of equipment. Typically, the way process variables are regulated is with a PID loop. PID stands for Proportional-Integral-Derivative (PID) and consists of three parameters P, I, and D, which control the process control variables. In other words, a PID controller will try to maintain a control variable (CV) to match a setpoint (SP) by controlling a process variable (PV) (like opening/closing a valve, increasing/decreasing heater, etc.) to the best of its ability. How the PID loop responds to changes is influenced by the PID loop’s Proportional, Integral, and Derivative values. These values depend highly on the process, the environment the process is in, and the requirements around the process. The act of determining the P, I and D values of the loop is called tuning.
In general, tuning is done during ICS commissioning and is not touched unless the process changes significantly. The Setpoint of a PID loop can be changed by the operator/engineer in response to feedback from the process (HMI values).
Here is a simple example of a PID loop process. Think of a steam boiler, used to supply steam to a plant. The objective of the PID loop is to maintain the boiler output steam pressure (this is the Process Value or PV). The pressure can be influenced by controlling the gas flow rate into the boiler (this is the Control Variable or CV). The operator will set the desired boiler pressure (this is the Setpoint or SP), and the PID loop will manipulate the gas flow into the boiler to keep the output steam pressure as close to the setpoint as possible. The tuning process of the PID loop will have characterized the loop via its Proportional, Integral, and Derivative values to best maintain said pressure under the unique circumstances for the plant that is using the provided steam. The feedback from the process, shown through an HMI screen allows the operator to keep an eye on the proper functioning of the process. That same HMI screen will allow that operator to make changes to the PID loop if this is deemed necessary. Figure 10 is a simplified depiction of an HMI screen that allows the above-mentioned functionality.
The attack
In this section, we will look at how we can discover relevant information about the HMI project, attack the HMI, and compromise the integrity of the information shown on the HMI screen, with the ultimate goal being to have the operator act out of fear, based on the manipulated process data.
Network Packets
Seeing as the attack in this POC is based on manipulating network packets, let’s briefly discuss what network packets are.
When two devices on an Ethernet want to communicate with one another, they establish a connection via their TCP/IP stack. To illustrate this, consider the following packet capture from communications between a telnet client and server. Telnet is what is called a clear-text protocol, meaning commands and data are sent without encryption, visible for anyone that can see the packets to read the contents without having to decrypt the data:
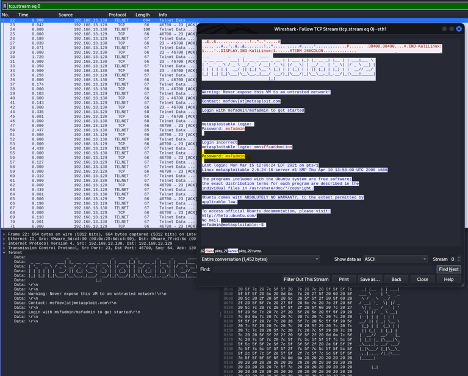
The packet capture was taken with the help of the excellent Wireshark tool, freely downloadable from https://www.wireshark.org
In this packet capture, a client device at 192.168.13.129 is communicating with a server at 192.168.13.130. One can see the data exchanged, including the login credentials (highlighted in the screenshot).
Using cleartext protocols is a terrible idea for transmitting sensitive data!
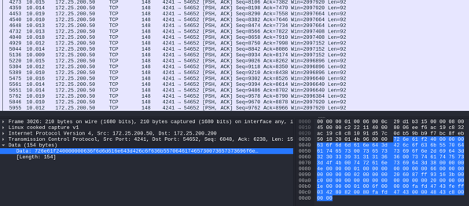
To continue the explanation of network packets, let’s look at the individual network layers within the captured packet. This should give us some information about how switches and routers handle network packets, which helps the discussion around intercepting and manipulating these network packets later in the article. Considering the following screenshot, which shows the details for one of the captured network packets:
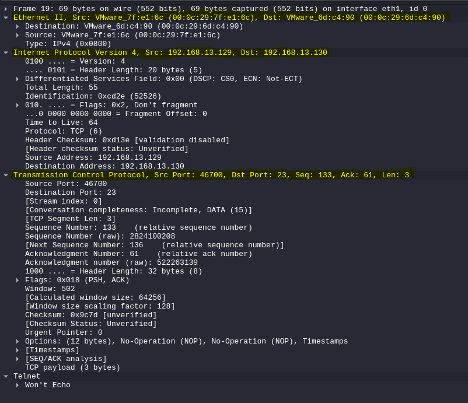
Within the network packet, the Ethernet II layer shows the packet’s physical source and destination addresses. The physical address of a device is its Media Access Control or MAC address, that is burned into the Network Interface card (NIC) of the device. The MAC address is what (layer 2) switches make their decisions on to forward frames. A MAC address normally doesn’t change for a device, and it is not routable, meaning it is meaningless outside the local network/subnet.
The next layer, the Internet Protocol (IP) layer, shows the logical source and destination addresses of the captured network packet, by means of IP addresses. An IP address is manually assigned to a device or obtained via DHCP/BOOTP. Within a local network, an IP address will need to be converted to a MAC address before it can be forwarded by a switch. This conversion is done via Address Resolution Protocol or ARP. If a device wants to know the physical address of an IP address it wants to communicate with, it sends an ARP packet–that is, a broadcast packet received by all devices on the local network–that basically asks the question “who is the device with IP address xxx.xxx.xxx.xxx? please send me your MAC address”. The response of that query will be stored in the device’s ARP table, which is a means to remember the IP to MAC relation temporarily, so the resolution process doesn’t have to be repeated for every packet. If the IP address falls outside the local network subnet range, the device will send the packet to the default gateway (router) for that subnet. Routers make decisions based on IP addresses, so adding an IP address to a packet makes it routable, so that the client and the server can be on different subnets or completely different networks on opposite sides of the world.
Where the Ethernet II and the Internet Protocol layers are tasked with getting the packet to the right targeted address, the Transmission Control Protocol (TCP) layer is responsible for setting up a connection between the server and the client’s requested service or application. The TCP destination port 23, shown in the packet capture is the port for the telnet server application that runs on the destination computer (192.168.13.130). The source port is a randomly chosen value and is used in combination with other details by the TCP protocol to track TCP sessions.
With that brief introduction, you should have an adequate understanding of the TCP/IP stack to follow along with the rest of the article. Next, let’s see how we can manipulate network packets to do our evil work with the help of a Python framework tool called Scapy.
Scapy
Taken from https://scapy.net/, Scapy is a powerful interactive packet manipulation program. It can forge or decode packets of a wide number of protocols, send them on the wire, capture them, match requests and replies, and much more. It can easily handle most classical tasks like scanning, tracerouting, probing, unit tests, attacks, or network.
Scapy also performs very well at many other specific tasks that most other tools can’t handle, like sending invalid frames, injecting your own 802.11 frames, combining technics (VLAN hopping+ARP cache poisoning, VOIP decoding on WEP encrypted channel, …), etc.
Scapy runs natively on Linux, Windows, OSX, and most Unixes with libpcap (see scapy’s installation page). The same code base now runs natively on both Python 2 and Python 3.
There are numerous tutorials for Scapy, and I recommend the reader to run through some to get familiar with the tool and uncover all its potential.
Next, let’s discuss the attack that makes manipulating HMI data possible: ARP spoofing.
ARP Spoofing
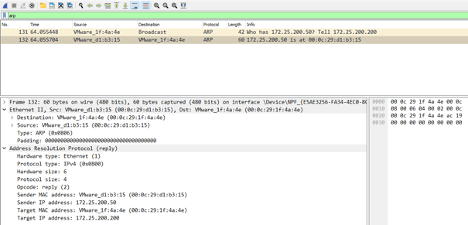
The first thing we need to do to be able to intercept network packets between the HMI client and server is to place our attacker machine (Kali Linux) in the middle of the conversation between the FactoryTalk View SE server and the client. We will achieve that by making the client think we are the server and vice versa, making the server think we are the client. This can be accomplished with an ARP spoofing attack. As explained earlier, ARP is the protocol used by the Network stack to determine the MAC address of a machine on the local network. In short, ARP works by sending a request packet on the local network asking everyone on the same network segment to respond with their MAC address if their IP address matches the one in the request. To illustrate this, consider the following figure that is an example of an ARP request network packet:
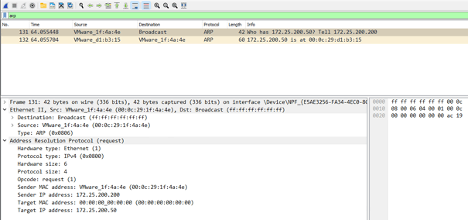
We can see the request is sent to the ff:ff:ff:ff:ff:ff broadcast address, and the target IP address is that of the FactoryTalk View server, 172.25.200.50.
The server responds to the request with the following response packet:
Here we can observe that the server responded with its MAC address and replaced the broadcast MAC address with the MAC address of the requester, the client.
During the ARP request and response process, there is no verification of the validity of the response packet. Anyone can respond to the request. There doesn’t even have to be a request packet for the receiver of the response packet to update their ARP table. This is the basis for an ARP spoofing attack. The attack will blindly send ARP response packets to the target that contain a MAC address of our choosing (the attacker machine) for the IP address we want to impersonate. The target system will update its ARP table and will start sending packets to the attacker (impersonated MAC address). Now, if we do that to both the client and server and enable packet routing/forwarding on our attacker machine, we have created a MitM scenario where all traffic between the client and server can be viewed and manipulated by the attacker.
Let’s see this in action. For this purpose, we will be using an ARP spoofing python script, built around Scapy and taken from https://www.thepythoncode.com/article/building-arp-spoofer-using-scapy. We will not be going into detail on how the script works; for that, you can visit the ThePythonCode site.
The only part of the ThePythonCode script that needs to be modified is the section at the end where we set the IP addresses for the two systems we are targeting:
# RsView Client ip addressview_client = "172.25.200.200"# RsView Server ip addressview_server = "172.25.200.50"
We must set the correct IP addresses for the FactoryTalk View client and server machines. After that, when we run the script (sudo python3 ./arpspoof.py), the output will inform us of the following:
…[+] Sent to 172.25.200.200 : 172.25.200.50 is-at 00:0c:29:7f:e1:62[+] Sent to 172.25.200.50 : 172.25.200.200 is-at 00:0c:29:7f:e1:62[+] Sent to 172.25.200.200 : 172.25.200.50 is-at 00:0c:29:7f:e1:62[+] Sent to 172.25.200.50 : 172.25.200.200 is-at 00:0c:29:7f:e1:62[+] Sent to 172.25.200.200 : 172.25.200.50 is-at 00:0c:29:7f:e1:62[+] Sent to 172.25.200.50 : 172.25.200.200 is-at 00:0c:29:7f:e1:62…
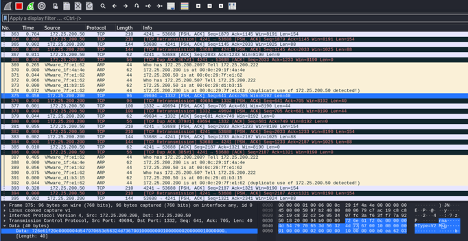
At this point, the script sends unsolicited ARP response packets to both the server and the client machines. This can be observed with Wireshark:
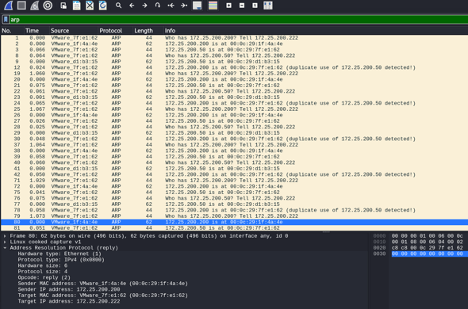
Note: Notice how Wireshark detected the duplicate use of MAC address to IP address resolution.
The result of all this is the ARP tables of the client and server machines now showing spoofed entries for each other:
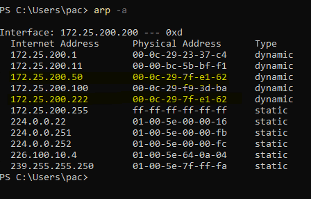
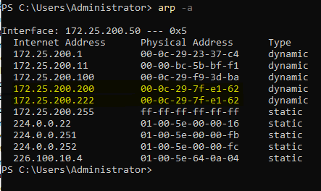
Notice how 172.25.200.50 (FT view server), 172.25.200.200 (FT view Client), and 172.25.200.222 (Kali Linux attacker machine) all have the same MAC address; 00-0c-29-7f-e1-62. Combined with the IP forwarding functionality that was enabled on the Kali Linux machine as part of the ARP spoofing script, we are now in the middle of the connection between the FactoryTalk View SE server and the client, as we can see in Wireshark on the attacker machine:
With the ARP spoofing attack now running we can move on to attacking HMI tag values.
Finding the right HMI tag to attack
Now that the ARP spoofing attack placed our attacker machine in the middle of communications between the FactoryTalk View SE server and the client, let’s look at how to use this position to find and modify HMI screen values.
How the FactoryTalk View SE handles data transfer
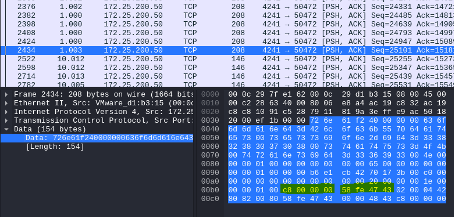
Being able to inspect every network packet sent from the server to the client and vice versa allows us to see all the data exchanged between the two. It now becomes a matter of finding the right data and the right network packets it resides in. Keeping in mind data conversion, endianness, and other factors, GuidePoint discovered the following packets to hold the data we are interested in:
Within these packets lay all the values shown on the HMI screen shown below:
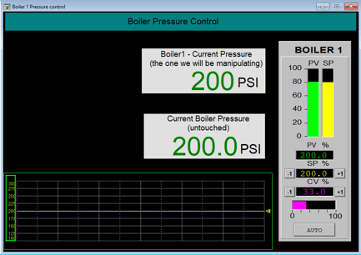
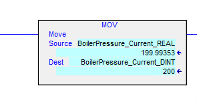
This is an overly simplified HMI screen with merely some process values and a PID control widget, purpose-built for this research. Note how both the integer value (the one we will be manipulating) as well as the floating-point value of the Current Pressure, displayed in the screenshot above are identical. This is done on purpose to better illustrate the effects of manipulating values. In the background (the PLC) we simply convert/copy the floating value into the integer value tag, as shown in the figure below:
As the pressure changes, these values should display the same value albeit it being integer vs floating-point notation.
Continuing, the trick is to figure out how values showed on the HMI screen translate to data transported in the network packets between the server and the client. It helps to have the development project for the HMI, which with access this deep into the target environment is all about finding the right file storage or workstation with the required project files. There is also another way. During the start of the HMI project on the client machine or when the operator switches screens, the server will send the .gfx file for the requested screen to the client. The .gfx file is the definition file for an HMI screen. The file is sent over the HTTP protocol during the start of the project. We can capture that file from the network with Wireshark:
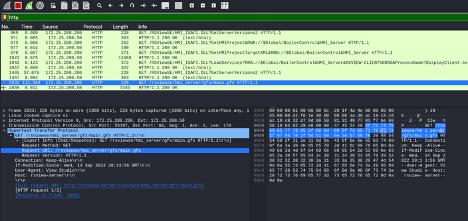
There is a ton of interesting stuff happening at this point, version checks, tag definition updates, etc. And all visible to the world because it is sent over the clear-text HTTP protocol.
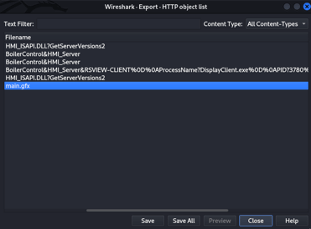
We can now use Wireshark’s export function (file-export objects-HTTP) to get a copy of the .gfx file on our machine:
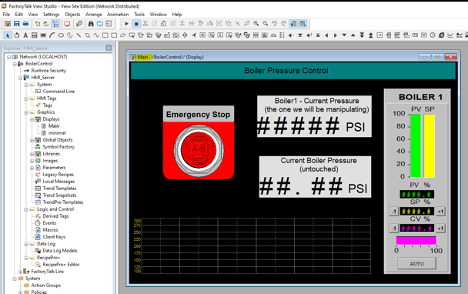
We can then open the extracted file in our (trial version of) FT View SE studio application and examine any relevant information, settings, and configurations:
Armed with all this information, we can start looking at the network packets and interpret what HMI screen values are located where in the network traffic. In very complex HMI screens, this could be further assisted by analyzing the tag definition XML files that are sent during the startup process.
Changing values
With the downloaded main.gfx file running in our demo FT View SE studio environment, we can see the following values displayed:
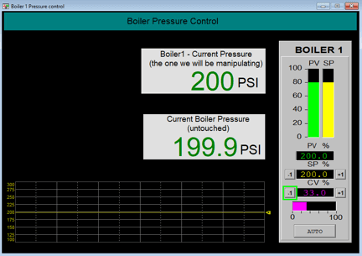
As discussed earlier, we see two pressure values for Boiler1: 200, a double integer (DINT in Rockwell terms) and 199.9, a Floating-point value or REAL in Rockwell terms. We learned these types from examining the gfx file. As said, the value 200 is a double integer or DINT, which is a 32-bit binary, 4-byte hex value. If we convert 200 into hex, that is c8, extending that to a 4-byte value would be 0x000000c8. Keeping in mind the packet data is transmitted in little-endian notation, the DINT value of 200 would be transported as the hex value “c800000000”. With that knowledge, we went out and discovered that value inside the following captured packet:
As an exercise, if we reverse the process for the next 4 bytes, highlighted in the screenshot; 58fe4743 becomes 0x4347fe58 in big-endian format, which converts to the double integer 1128791640. This value doesn’t mean much. Let’s see what converting to a different format does. The following python snippet will convert a hex value into a REAL (floating point) value:
def convert_hex_to_real(hex):
return struct.unpack('!f', bytes.fromhex(hex))[0]
Using this function gives us the following:
In [1]: convert_hex_to_real('4347fe58')Out[1]: 199.9935302734375
That is a value we CAN relate to. It is the second Boiler1 pressure value shown on the HMI screen! We now know what values in the packet to attack.
With this knowledge, GuidePoint wrote a python script that would find relevant network packets traversing the production network and find the targeted data (HMI values) within those packets. Once found it changes that interesting data to our liking, fixes up the packet, and send it off to the client.
The MitM script in action
Now that we have placed our attacker machine in the middle of the communications between the server and the client, and we know where to look for interesting values let’s see the Man in the Middle (MitM) script – mitm.py – that GuidePoint Security researchers wrote for the task of manipulation of HMI values, in action.
In a nutshell, the script will look for relevant network packets, find the value we are interested in (the DINT value for the boiler pressure), add 2000 to that boiler pressure value, and send the modified packet off to the client. Here we can see the script in action:
┌──(root㉿IND-KaliLinux)-[~/PythonProjects/HMI_MiTM]└─# sudo python3 mitm.py
[!] Interesting network packet found --- Source 172.25.200.50:4241 - Destination 172.25.200.200:50447...
[+] Extracting HMI values from network packet...
33.00006103515625
-2147449728
200.01467895507812
200.0
200
18.36710203419517
27.55064884739736
[+] Found HMI tag of interest, adding 2000 to its value...
[+] Fixing up network packet before sending to client...
Sent 1 packets.
[!] Interesting network packet found --- Source 172.25.200.50:4241 - Destination 172.25.200.200:50447...
[+] Extracting HMI values from network packet...
33.00006103515625
-2147449728
200.01467895507812
200.0200
1.836710203419517e-38
2.7550648847397363e-40
[+] Found HMI tag of interest, adding 2000 to its value...
[+] Fixing up network packet before sending to client...
…
As the script output shows, when it finds an interesting network packet between the HMI server and the client, it extracts the HMI values, locates the DINT value for the Current Boiler pressure, adds 2000 to the value and sends it off to the client. The result of running the script is a manipulated value on the operator HMI screen:

This clearly shows the manipulation of the DINT value for the Current Boiler pressure (2202), which we saw should be synchronized with the REAL value of 201.8. Also notice the trend value not effected by the MitM attack, just the one DINT value. Finally, notice the presence of the emergency button, which is normally hidden based on the value of the DINT value of the Current Boiler pressure.
That concludes the discussion on the HMI MitM attack; let’s look at the potential implications of what we just did next.
The potential implications
The following are some implications of manipulating HMI values at will.
Panic
The most apparent impact of the scenario described in this write-up is panic. The entire demo is built toward portraying fear and panic. Changing the critical control value in such a way that the operator is enticed to hit the emergency stop or starts manipulating setpoints to compensate for the “emergency” is the first possible implication.
Drift
A different approach to getting the operator to do the dirty work for us is introducing simulated drift of a critical control value. Instead of just cranking up the value to an alarmingly high or low value, we could write a snippet of python code that slowly increases the critical control value over time, maybe a few pounds of pressure a minute. The idea is that the operator starts correcting for the drift by increasing or decreasing the setpoint for the process, just a bit over time until the process gets out of hand.
Confusion
We could randomly manipulate the critical control value to show readings all over the place, jumping from high to low. This might confuse the operator and cause them to respond incorrectly, making a change to the process that can bring it down.
This work both ways
The last scenario I want to point out is a different approach to things. Until now we have talked about manipulating values going to the HMI client, but as we are sitting in between the bi-directional connection between the HMI client and server, we can also manipulate values coming FROM the client. This allows us to change the setpoints the operator is entering, or even prevent the operator from sending a start or a stop command via one of the HMI’s on-screen push buttons.
Possible mitigations
In this section, we will discuss a few potential mitigations for these kinds of attacks. In general, seeing as these are attacks on the integrity of the communications between the client and the server some form of data validation (Integrity) or encryption (Confidentiality) will take care of things.
Encrypt Server-Client communications
The first mitigation we will discuss is encrypting the communications between the HMI client and server. It must be said that mitigation by encryption is only as good as the deployed encryption solution.
Typical encryption solutions include TLS, IPsec, AES, RSA, etc. The solution can either be implemented by the ICS vendor (TLS, AES, etc.) or can be implemented by the end user., Generally speaking, IPsec lends itself best to end-user-implemented solutions.
NOTE: Rockwell Automation published instructions on how to setup IPsec for FactoryTalk Software that can be found here: Deploying FactoryTalk Software with IPsec
Network segmentation
Another possible mitigation strategy is network segmentation. By placing the client and the server on their own network segment, we make it much harder for the attacker to get to the network traffic. Of course, if the attacker manages to compromise the client of the server machines, they can still accomplish their nefarious goals.
Mitigate ARP spoofing
The next mitigation strategy works around preventing the attacker from being able to get in the middle of the communications between the HMI client and server. The most obvious fix would be to prevent ARP spoofing attacks from succeeding. There are a few methods for achieving this though it must be said ARP spoofing mitigations are challenging to implement correctly.
Validating ARP Requests
Using static ARP entries represents the easiest way to validate IP and MAC address pairs. A static ARP entry is entered manually on the end device, removing the possibility that this end device automatically modifies the ARP cache table in response to the ARP protocol. Manual ARP entries can be done for only some entries (e.g., the addresses of a critical server or the default gateway), yet others would remain dynamic. In large environments, most addresses will likely need to remain dynamic, as manual cache maintenance would be too demanding.
Preventing ARP Spoofing
Another relatively simple way of protecting against ARP spoofing is to use packet-filtering firewalls or select network switches with ARP snooping functionality. These types of devices can discover data packets from an address found twice in the network, as this duplication suggests the presence of someone disguising themselves as another host.
Training
The last mitigation strategy is around training. Train your operators to identify, verify, double-check, and not overreact.
Conclusion
We have known for years the industrial network is insecure. Among other fundamental vulnerabilities, clear text protocols (the reason this POC works) are commonplace. In most cases being able to read a value like the current pressure on Boiler nr. 1 is not a huge risk to the ICS, however, being able to modify values on the fly poses significant risks. When an operator cannot trust the values that are displayed on his HMI screen for a process that could potentially run in a geographically distant location is troublesome to say the least. At a minimum, ICS vendors need to start implementing some form of verification process for the data exchanged between the several parts of the HMI system.
Special thanks go out to the PSIRT team at Rockwell Automation for being a pleasure to work with during the responsible disclosure process of this discovered vulnerability.
*** This is a Security Bloggers Network syndicated blog from The Guiding Point | GuidePoint Security authored by Pascal Ackerman. Read the original post at: https://www.guidepointsecurity.com/blog/guidepoint-security-researcher-discovers-vulnerability-in-the-integrity-of-common-hmi-client-server-protocol/
