

External Pentest (New UI)
External Pentest
Horizon3.ai® External Pentest is an easy way to gain an additional perspective on your environment. Unlike the internal pentests, the external pentest does not require setting up a host or running a curl script. Instead, discover and authorize assets for external pentesting.
Log Into the Portal
Click here to navigate to our Portal and log in with your credentials.
Run an External Pentest
To run an external pentest, first create an Asset Group and run Asset Discovery to enumerate external facing assets. When Asset Discovery completes, authorize assets for pentesting and start an external pentest. Follow the documentation step by step or jump to one of the following sections:

Create an Asset Group
1. Navigate to External Assets to Create an Asset Group
To run an external pentest, first create an Asset Group. The Asset Group is used to scope the external pentest.

2. Click Create Asset Group
On External Assets, click + Asset Group to open the asset group configuration.

3. Configure the Asset Group
3.1 Set a Scope for the Asset Group
Name the Asset Group and provide company assets as domains, IP addresses, or a combination of domains and IP Addresses. A maximum of 700 domains can be added to the configuration. IP addresses need to be Public IPs only with a maximum input of 3000 IPs and formatted using IP/CIDR notation and /24 or smaller. Both domains and IP addresses should be comma separated. Click Next.

3.2 Optionally, add your Git and AWS Accounts
Listing Git and AWS accounts allows NodeZero to confirm ownership of these accounts and run deeper enumeration of assets.
- To add a Git Account, select +Add Account, select a Git provider and add the account name.
- To add an AWS Account, type the 12-digit AWS Account ID in the box listed below.
Once satisfied with accounts, Click Next.

3.3 Advanced Configuration Options
- Add company name(s) which NodeZero will use for Open Source INTelligence (OSINT) gathering tools and techniques to harvest company information.
- Enable brute force on subdomains to authorize NodeZero to search for well known subdomains that may not surface through OSINT discovery.
Once satisfied with advanced options, click Create Asset Group >.

Discover your Assets
4. Run Asset Discovery
Review the Asset Group configuration and click Run Asset Discovery. Alternatively, if changes are needed, click Go to Asset Group and click Edit Configuration in the top right.
NodeZero’s External Asset Discovery is a passive enumeration capability that leverages DNS, passive website crawling, certificate scraping, and Open Source Intelligence (OSINT) gathering capabilities and services to find all of the assets linked to your organization. No exploitation is performed during this operation.

5. Asset Discovery is in progress
NodeZero sends an email once Asset Discovery finishes enumeration. Return to this documentation when your Asset Discovery is complete to learn how to authorize discovered assets for external pentesting.
Authorize Assets
6. Navigate to External Assets
Now that Asset Discovery has completed, navigate to External Assets to review and authorize assets for external pentesting.

7. Click on the Asset Group
Click the external asset group with the “Done” Asset Discovery Status.

8. Review Discovered Domains
During Asset Discovery, NodeZero may find related company domains which can be added to the asset group’s configuration. To add these discovered domains to the asset group’s configuration, click Add to Config on the domain in the list. Otherwise, go to the next step.

Note: Rerun Asset Discovery on a routine basis to have the most up to date information on the status of your assets.
9. Review Subdomains to Authorize Assets
Expand a Domain to review discovered subdomains identified during Asset Discovery. To authorize assets for a pentest, select the asset, click Take Action, and then Authorize for Pentest.

Only authorize assets you are legally authorized to pentest. You are responsible for accurately defining the scope of the Services for both internal and external testing. See Terms and Conditions for more information.
9.1 Assets with Warnings
Assets may have warnings indicating that they are hosted on third party aliases. Before authorizing, verify you are legally allowed to pentest these assets. Possible reasons for the asset warnings:
- Asset links to services such as Rackspace and Digital Ocean don’t provide their pentesting guidance and NodeZero cannot confirm the allowance of pentesting their services
- Asset links to some unknown third party service and you need to determine if external pentesting is allowed or not based on terms and conditions of the service
9.2 When authorizing an asset with a warning…
When authorizing an asset with a warning, this pop-up requires verification that you are aware that you are authorizing assets that may fall outside of your own domain. From this warning, you may remove assets from this list by clicking the trash can. Click Authorize if you are legally allowed to pentest all the assets listed.

9.3 Asset IP Resolution
During an external pentest, NodeZero uses the asset’s IP Resolution to determine if an asset stays in scope for the pentest. IP Resolution may be marked as Variable or Fixed. By default, assets are set to Fixed IP Resolution.
Fixed IP Resolution indicates the IP address resolved from the domain name is not expected to change. Assets labeled Fixed will be removed from scope if the asset resolves to a different IP address during the External Pentest than it did during the Asset Discovery.
Variable IP Resolution indicates the IP address resolved from the domain name may be expected to change over time. Assets labeled Variable will remain in scope even if the IP address changes between the Asset Discovery and the External Pentest. An example of a Variable asset IP would be AWS assets for which the resolved IP address is controlled by AWS and may change between pentests.
10. Configured IPs
On the Configured IPs tab, view reachable IP addresses in the Asset Group configuration. To authorize IP address for a pentest, select the IP address, click Take Action, and then Authorize for Pentest.

11. Accounts Tab
On the Accounts tab, view Git and AWS accounts added to the Asset Group configuration. To add or remove Git or AWS accounts, edit the asset group configuration by clicking the menu button in the top right of the asset group.

Run an External Pentest
12. Navigate to Pentests to Run an External Pentest
Once an Asset Group contains the assets authorized for pentesting, you may navigate to the Pentests page to start an external pentest.

13. Click Run an External Pentest
Click +Pentest to open the Pentest Configuration and select External Pentest


14. Configure your External Pentest
14.1 Select the Scope for the External Pentest
Select a template and provide a name for the external pentest. Select an asset group with authorized assets for pentesting. To start an External Pentest using the selected template, click Run Pentest and skip to step 15. To make changes to the pentest from the selected template, click Create Custom Pentest.

14.2 Advanced Configuration Options
If creating a custom Pentest (see step 14.1), on the Advanced Configuration step, customize the services and vulnerabilities NodeZero will attempt to exploit. Click Next to see additional custom pentest options.

NodeZero may recommend setting a minimum runtime for some selected services, such as Password Spray and MITM attacks.
14.3 Additional Custom Pentest Options
If creating a custom Pentest (see step 14.1), there are custom options for the pentest.
- Set a Minimum Runtime to provide NodeZero more time for some selected services, such as Password Spray and MITM attacks.
- Set a Maximum Runtime to limit NodeZero’s runtime.
- Get NodeZero’s IP: For External Pentests, NodeZero will start paused and email you when the IP address is available. Copy NodeZero’s IP, add the IP address to your allowlist, and then resume the pentest.
Click Review to review pentest configuration.

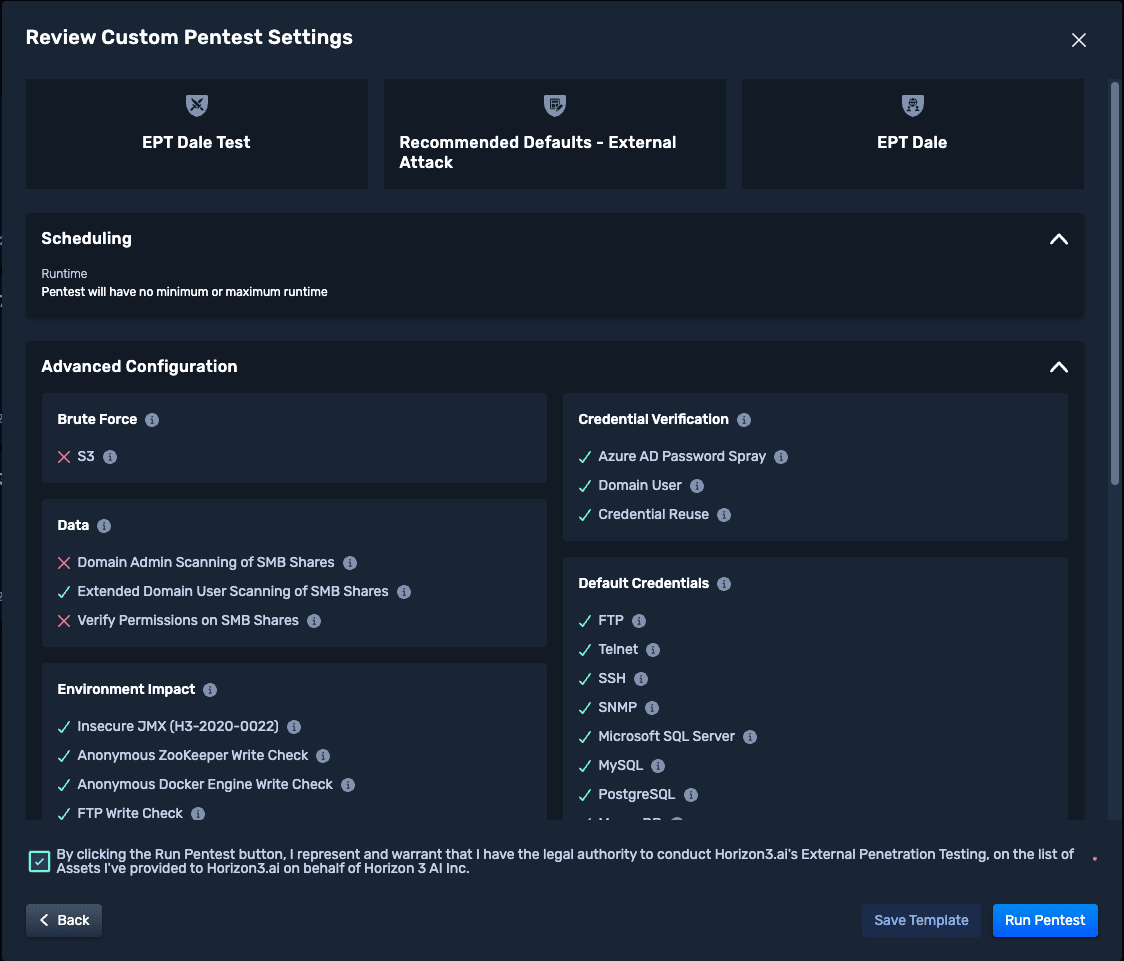
14.4 Review and Start the External Pentest
After reviewing the pentest configuration, read and check the box that acknowledges you have the legal authority to conduct Horizon 3’s external penetration test on the list of authorized assets. Click Run Pentest to start the pentest.
If you selected to Get NodeZero’s IP in the custom pentest step, the External Pentest will start in a paused state, send an email when the IP is acquired, and allow you to resume the pentest when ready from the Real Time View.
15. External Pentest is in progress
NodeZero sends an email once the external pentest completes.
From the Real Time View, you may pause and resume pentests from the interface. Pentests paused longer than 7 days will be ended.
The post External Pentest (New UI) appeared first on Horizon3.ai.
*** This is a Security Bloggers Network syndicated blog from Horizon3.ai authored by Horizon3.ai. Read the original post at: https://www.horizon3.ai/external-pentest-new-ui/
