Automate your API hacking with Autorize
What if I told you that it’s possible to automatically detect vulnerabilities like broken object level authorization (BOLA) in your in-scope APIs by simply using a web application as intended?
Would that be useful to you? Of course it would.
So read on to see how you can do this with an awesome extension for Burp Suite called Autorize.
What is Autorize?
Autorize is a popular Burp extension that acts as an automatic authorization enforcement detection engine. In other words, it can simplify your access control testing, and lets you quickly detect authorization and authentication issues in the APIs you are hacking.
The extension is free and will work in all versions of Burp Suite, including the community edition. It was written for a Python environment and therefore requires Jython to be installed on your system to work with Burp.


You can download Jython standalone JAR here if you haven’t yet.

How does Autorize work?
What Autorize does is basically attempt to make the same request multiple times and insert injected header values representing a low-privileged user (the attacker), a high-privileged user (the victim), and an unauthenticated user (used for authentication checks) into the request.
It then scans the response (header, message body, content length, etc.) and reports any findings it detects through the changes between requests.
And it can check authorization enforcement automatically without any work from you, once it’s configured and enabled of course.
Let’s do that.
Installing Autorize
You will find that Autorize is readily available in the BApp store. So to install it, simply go on the Extender tab, click the BApp Store subtab, select Autorize in the list of extensions and click on Install.
If you don’t have Jython installed, you may find that the Install button is grayed out. It might look something like this:

If the button is grayed out, you can download the Jython standalone JAR by clicking the Download Jython button. You will then need to go to the Options subtab and under Python Environment and ensure you point to the JAR you downloaded.

Once installed, you will see a new Autorize tab in Burp, and you are good to go!
Using Autorize effectively
To get the most useful results from Autorize when testing APIs, there is a common workflow that works pretty well. Let’s see this in practice by attacking our favorite demo web application crAPI.
Step 1 – Set up two test accounts in crAPI
As we want to test between two different accounts on a target, we will register them so it’s easy for us to remember.
Open up Burp. Under the Target tab, select the Scope subtab, click the Use advanced scope control checkbox, click the Add button and enter the host or IP of your crAPI instance. It will look something like this:

Now click on the Proxy tab and then the Intercept subtab. Make sure the Intercept is off and click Open Browser to launch a testing Chrome browser. Or launch whatever browser you test with, but make sure its proxy settings point to Burp.
Once the browser loads, launch an additional Incognito/InPrivate browser session. You want to do this so you can run two accounts at the same time through Burp.
In the Incognito session create your first user. Call it something like [email protected]. This represents the low-privileged user.
In the other browser session, create a second user called [email protected]. This represents the high-privileged user. You will use this account as you go about testing the web application.
Step 2 – Configure Autorize with the attacker’s token
Now back to the Incognito session, sign in as the attacker, and copy the resulting authorization token header that is set. The best way to capture that would be to look at the first request after the sign-in from the HTTP History in Burp and look for the “Authorization” header.
When testing other APIs, you might have additional cookies and headers that represent a session that you may also want to copy. In this case though, the Bearer token is enough.
Now go to the Autorize tab, and in the Configuration tab, paste your headers in the available Temporary Headers field. It might look something like this:
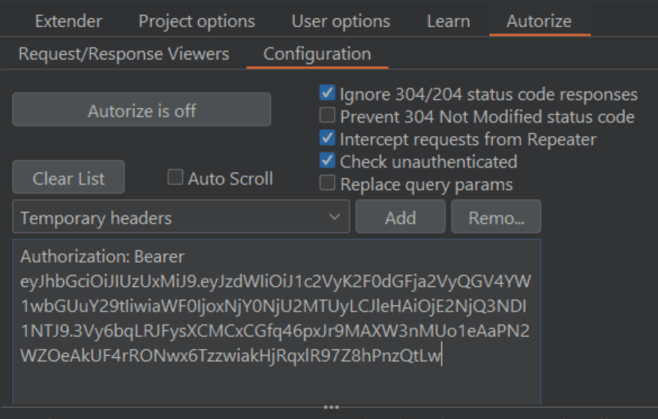
Now click the Autorize is off button to turn it on and start intercepting requests. The extension will now follow all your requests and inject the attacker’s token in an effort to conduct automatic authorization detection in the victim’s session. It will also remove all cookies and headers to also test for unauthenticated access.
Unfortunately, all this may not be quite useful yet. We need to figure out a way to check the enforcement status to know if authorization enforcement has actually occurred. And we want to filter out a lot of noise from traffic not in scope.
Step 3 – Configure Interception Filters
Autorize will be intercepting every request. You may want to filter for only requests going to the server, or the API endpoints in scope. One way to do this is through interception filters.
You can use regex or simple string filters to look for things. In our case, I will filter only for the crAPI host. I could filter for /api/ if I wanted to further refine things, but I’m fine with just the host here. So I select a Type of URL Contains (simple string), enter the hostname of my target, and click Add filter.
It looks something like this:

Step 4 – Use the web app so data can flow through the enforcement detector
Now start using the web application as the victim. As you do, if you look in Burp, you will start seeing it lighting up like a Christmas tree.
The Autorize table will start to show you the request’s URL and enforcement status, along with content length.

You will notice the request enforcement status is color coded. If you see anything that is red that says “Bypassed!” you will want to look at it as a possible vulnerability.
CAUTION: Just because it is marked as Bypassed! doesn’t necessarily mean it’s actually vulnerable. If you don’t configure the enforcement detector properly you could be seeing false positives.
If you see an orange/yellow “Is enforced??” status, it means Autorize isn’t sure if the specific URL is authorization enforced. Under the Request/Response Viewers tab you can check if the modified response body includes indicators that could determine this. If so, you can configure the enforcement detector filters to look for a fingerprint value or a modified response body; you can even use a content length filter to quickly scan for anomalous behaviors in the requests by response size.
Tips for getting more out of Autorize
Once you get used to Autorize, you can start tweaking it to make it a bit more useful for you. Here are a few things I typically do to make it easier on myself.
Enable Autorize in Repeater
In the Autorize configuration tab, there is a checkbox labeled Intercept requests from Repeater. If you enable that, then Autorize will not only capture traffic from the standard proxy, but it will also capture requests sent through Repeater.
Use Table Filters
I really don’t care about endpoints that are properly enforced. I only want to see data that reflects areas I need to look closer at. You can filter that out by unselecting all options except for “Bypassed!“.

You might want to consider checking for “Is enforced???” for a while to make sure you get a good feeling about how to configure enforcement detector.
Configure enforcement detector for 401 codes
When you get a chance to test an administrative context for a web app, always do a run-through with the enforcement detector configured to look for Status Codes that match 401. It is a leading indicator that the endpoint may allow low-privileged users access to administrative functionality.
Make sure you ALSO check this for unauthenticated users. When you do, you potentially increase the business impact of the vulnerability; unauthenticated access to administrative functions almost always pays out higher bounties.
Conclusion

Autorize is a powerful tool for automating API security testing. It can help you quickly scan through requests and responses to find authorization and authentication vulnerabilities. By configuring it correctly, you can ensure that only authorized requests are passed through to the target server.
You can also use it to filter out unimportant data so that you can quickly focus on specific areas of concern. With these tips in mind, you should be able to get more out of your security testing process and improve your API hacking.
Interested in other resources for API hacking? Make sure you check out my free Ultimate Guide to API Hacking Resources.
The post Automate your API hacking with Autorize appeared first on Dana Epp's Blog.
*** This is a Security Bloggers Network syndicated blog from Dana Epp's Blog authored by Dana Epp. Read the original post at: https://danaepp.com/automate-your-api-hacking-with-autorize