

How To Start DevSecOps Within the Public Cloud—a Technical Guide
Setting the Stage: Application Security for Containerized Applications in AWS
Organizations everywhere are either moving to or are already operating in some capacity within the public cloud. Digital transformation and cloud journey are just two examples of the overloaded terms used to describe how businesses are adapting to the new normal of driving revenue through software delivery.
Regardless of what they’re calling it, as companies mature in this process, cloud vendors such as Amazon Web Services (AWS) have stepped up to help by developing services around building, deploying, managing, and scaling systems in the cloud. Platform-as-a-Service is a type of cloud service offering that enables organizations to manage their applications in the cloud without the complexity of building and maintaining the infrastructure typically associated with application delivery.
This blog focuses on incorporating application security into a containerized application stack on the AWS cloud.
How It Works: Securing Applications Using AWS Fargate
AWS Fargate is a serverless compute engine for containers that works with both Amazon Elastic Container Service (ECS) and Amazon Elastic Kubernetes Service (EKS). Fargate makes it easy for you to focus on building your applications by:
- Removing the need to provision and manage servers
- Enabling application-based resource specifications and payment plans
- Deploying a security posture with reference architecture/blueprints
The instructions below detail a popular method customers can use to instrument applications deployed to AWS Fargate using Kubernetes on EKS (further information can be found here).
Now that we have our deployment target, let’s focus on DevSecOps. DevSecOps is a hot topic within the software industry. In general, DevSecOps aims to bake security into the rapid-release cycles that are typical of modern application development and deployment. Current security frameworks tend to address vulnerabilities from a peripheral standpoint, which was not originally intended for cloud-native development and distributed architectures.
Security instrumentation—embedding security into the application stack—delivers on the concept of DevSecOps (shifting left and extending right). This allows the application to be self-protecting across every stage of the software development life cycle (SDLC)—from the first line of code, through production, and into the next iteration. Instrumentation enables continuous security telemetry without disrupting development, greater accuracy via runtime behavioral analysis, security automation that integrates with the existing continuous integration/continuous deployment (CI/CD) pipeline, and embedded testing and protection that scales across distributed architectures.
The Contrast Application Security Platform offers these exact capabilities by instrumenting an agent within your application code. The Contrast agent gives developers and operations teams access to unique application security solutions:
- Contrast Assess provides application security testing (AST) for vulnerability assessment in development.
- Contrast OSS delivers automated open-source security and compliance controls for libraries and third-party components.
- Contrast Protect observes runtime threats and blocks application attacks in production.
We will concentrate on Contrast Assess for the outlined example below to help teams become more security conscious, minimize false positives, and increase throughput. Below is a diagram of how the Contrast solution works with AWS services to deploy an application to an EKS cluster using AWS Fargate as the deployment mechanism.
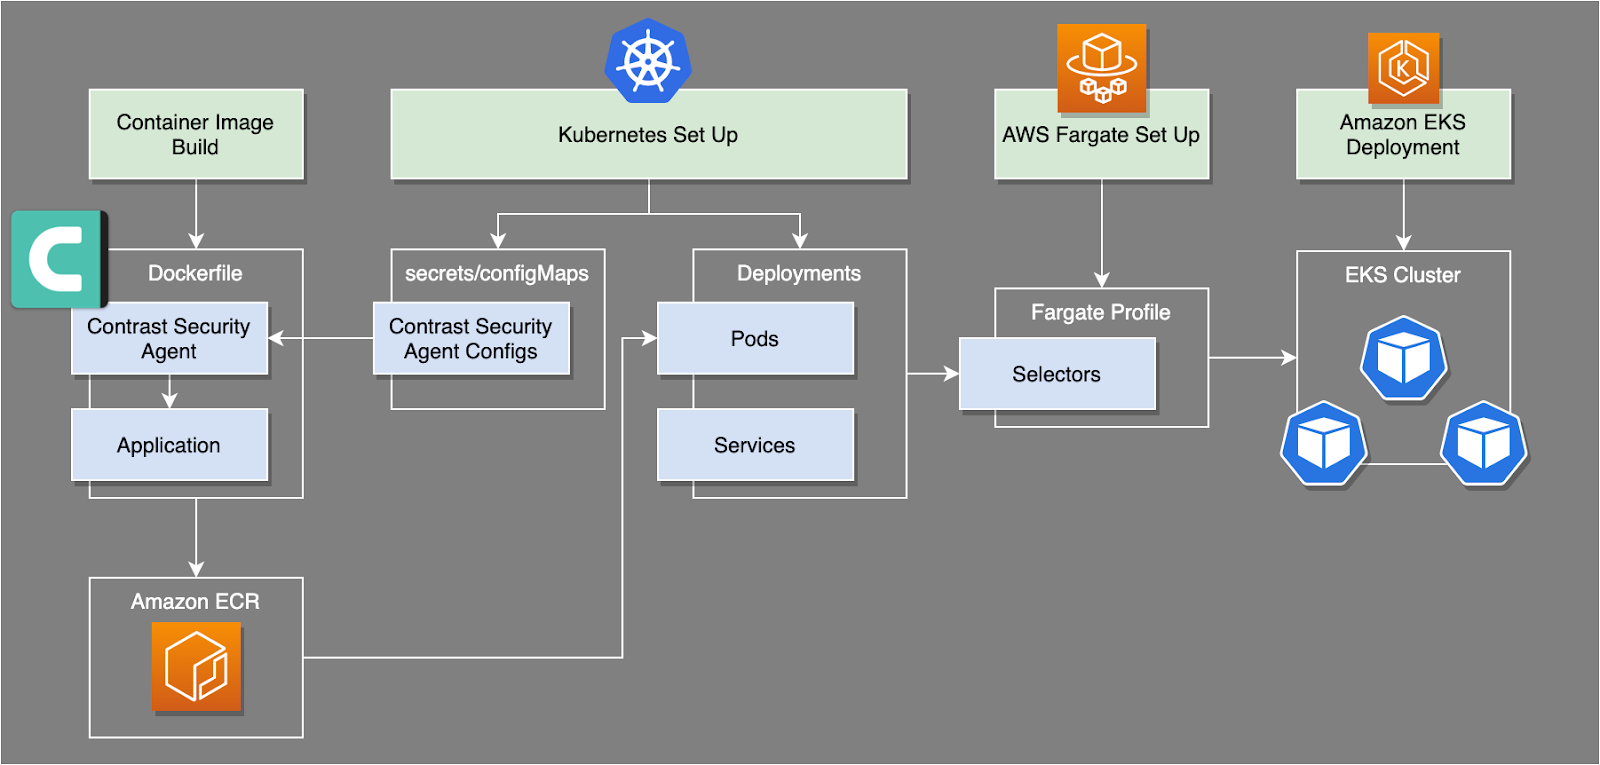
Using Contrast Assess to secure an application deployed via AWS Fargate
For this example, we will be deploying a sample Java web application with a Contrast Security agent onto an EKS cluster via AWS Fargate.
(For more information on how Contrast agents are instrumented for different application stacks, please refer to the link here.)
(If you would like a tutorial on how to deploy an application to an EKS cluster via Fargate, please refer to the link here.)
Let’s take a look at what we need to get started.
Process summary
The specific steps involved include:
-
Create an application image that includes the Contrast Java agent jar file and Contrast Agent configurations using a Dockerfile
-
Push the new image to Amazon ECR
-
Run the application stack deployment on AWS Fargate
-
Confirm results in the Contrast Security Team Server UI
Prerequisites
- Familiarity with DevOps practices and how Docker, Kubernetes (EKS), and Fargate work together to deploy an application onto an EKS cluster
- Configuration files needed to run an application on EKS and AWS Fargate
- The configuration information needed to connect a Contrast agent to the Contrast dashboard
- An existing and functioning EKS cluster
- A Contrast Security Account on a licensed Team Server Instance. You can use the Contrast Community Edition (CE) if desired.
- A working application (we will use WebGoat for this demo)
- Local Docker client
- Local Git client
Instructions
Let’s get started by first taking a look at the application we plan to deploy with Contrast Security, a simple Java web application called WebGoat. In order to take a look inside the repository’s file structure, let’s clone the repository using the following commands based on your favorite CLI:
Now that we have our files available locally, let’s take a look at how our Dockerfile should be constructed.
Step 1: Update the application’s Dockerfile with a Contrast Security agent
In order to get the Contrast Security agent inside our running application container, we will edit the Dockerfile to:
- Download and add the Contrast Security agent artifact (JAR file) to the container image
- Configure the application container image to instrument the Contrast Security agent during the application deployment
Since we are performing a Kubernetes deployment, the configurations for our Contrast Agent will be passed via Kubernetes secrets/configMaps. The configurations necessary for our Contrast Security agent house all the information the agent needs to communicate with our Contrast Security Team Server. (For further information on how agent configurations can be handled with Docker/Kubernetes implementations, please refer to the link here.)
Add the Contrast Java agent jar file to the application image
To pull the Java agent into your image, simply add the following to your Dockerfile:
RUN apt-get update
&& apt-get install -y gnupg
&& curl https://pkg.contrastsecurity.com/api/gpg/key/public | apt-key add –
&& echo “deb https://pkg.contrastsecurity.com/debian-public/ all contrast” > /etc/apt/sources.list.d/contrast-all.list
&& apt-get update
&& apt-get install -y contrast-java-agent
The command above will run commands inside the container that downloads the latest Contrast Security Java agent using the debian package manager.
Enable the Java agent in the image to instrument the application during deployment
For this containerized application, the agent is deployed using the following command within the Dockerfile:
(For more information on how to instrument a Contrast Security Java agent, please see the link here.)
We will pass our environment variables and configurations for our Contrast Security agent via Kubernetes secrets/configMaps, which we will handle in subsequent steps. Once your edits are completed, the Dockerfile should resemble the following:
FROM adoptopenjdk/openjdk8:debianslim
# Install WebGoat
# we do not use the WebGoat Docker image because it is based on Debian Jessie which is end of life
ADD https://github.com/WebGoat/WebGoat/releases/download/7.1/webgoat-container-7.1-exec.jar /opt/webgoat/webgoat-container-7.1-exec.jar
# If you are using our Community Edition, this URL is what you need. If you already have a Contrast account or
# you are in a formal evaluation with us, change the resource name (the ce.contrastsecurity.com portion of the URL)
# to reflect your Contrast TeamServer
ENV CONTRAST__API__URL=https://ce.contrastsecurity.com/Contrast
# Install Contrast agent
RUN apt-get update
&& apt-get install -y gnupg
&& curl https://pkg.contrastsecurity.com/api/gpg/key/public | apt-key add –
&& echo “deb https://pkg.contrastsecurity.com/debian-public/ all contrast” > /etc/apt/sources.list.d/contrast-all.list
&& apt-get update
&& apt-get install -y contrast-java-agent
EXPOSE 8080
CMD [“java”,”-javaagent:/opt/contrast/contrast-agent.jar”,”-jar”,”/opt/webgoat/webgoat-container-7.1-exec.jar”]
Now it’s time to build and give our container image a quick test run before jumping into our Fargate deployment.
Build and run the container locally
The container can be built as per the regular build step. Here is an example:
To test run the container, simply start it the normal way, such as running the following command:
Note: The Contrast Agent will not communicate with the Contrast Security Team Server until the Kubernetes secrets/configMaps are deployed with our application into our EKS cluster.
We now have the image we want to deploy. Next, let’s push the container image to our Amazon ECR for storage and ultimately from which Fargate will pull in order to deploy to our EKS cluster.
Step 2: Push the image to Amazon ECR
Before we push our local container image to the Amazon ECR, we need to ensure that we are logged into the ECR. (For more information on how to connect to your Amazon ECR, please see this link.)
Push the local Docker image to the Amazon ECR instance using your CLI
Run the following command to push the new Contrast-enabled image to Amazon ECR:
Now, let’s deploy our application to AWS Fargate.
Step 3: Run the application deployment using AWS Fargate
In order to deploy to our application via AWS Fargate, we need to ensure that our Kubernetes deployment files contain the necessary matching labels and namespaces for our deployment. This mechanism is how AWS Fargate knows where to deploy Kubernetes applications. Before we go ahead and deploy our application, we need to take our agent configurations and pass them via Kubernetes secrets/configMaps.
Create Kubernetes secrets/configMaps manifest files using Contrast Security agent configurations
Contrast authentication and configuration options are specified in a yaml file. It is also possible to specify these options with environment variables, configMaps, and/or command line options.
Create a file in the root directory of the pulled git repository named contrast_security.yaml. The contents of the file should resemble the following:
(A complete list of options and their order of precedence are available here: Contrast Configuration Options / Order of Precedence.)
api:
url: <YOUR_CONTRAST_URL>
api_key: <YOUR_API_KEY>
service_key: <YOUR_SERVICE_KEY>
user_name: <CONTRAST TEAM SERVER USERNAME>
# Set the name for this application
agent:
java:
standalone_app_name: <YOUR APPLICATION NAME>
# Enable Contrast Assess product – sample configuration
inventory:
enable: true
assess:
enable: true
protect:
enable: true
# The following environment variables are leveraged during the deployment of the Contrast Security agent and application
env:
OrgID=<YOUR ORGANIZATION ID>
Auth=<YOUR AUTHORIZATION HEADER>
APIKey=<YOUR_API_KEY>
CONTRAST__BASEURL=<YOUR CONTRAST URL>/api/ng/<YOUR ORGANIZATION ID>
SERVER_NAME=<NAME OF YOUR SERVER FOR YOUR APPLICATION>
The information above can be found on the Contrast Security Team Server under “User Settings >> Profile” and then scrolling to the bottom of the screen.
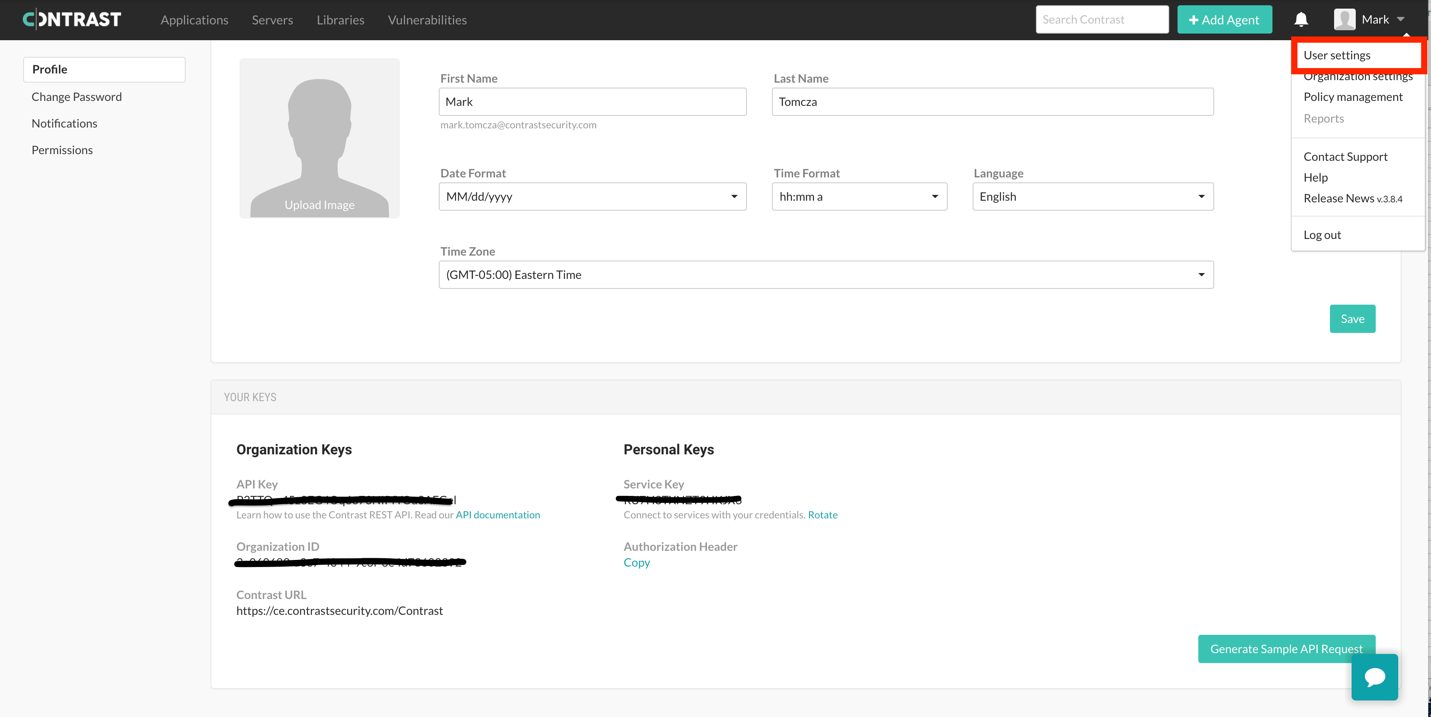
Locating user profile settings on the Contrast Security Team Server
Deploy secrets/configMaps to EKS cluster
Let’s create the Kubernetes secret for our agent configurations by typing the following using the kubectl command:
Once created, the EKS cluster will have this secret available for our application to leverage.
Please Note: The Kubernetes secret must be deployed to the same namespace/selector you use to deploy your application via AWS Fargate.
Deploy Kubernetes manifests for deployments and services to EKS cluster
Before we deploy our pods and services, let’s verify the following:
- Image in the deployment yaml has the Contrast agent available
- Kubernetes secrets are leveraged within deployment manifests
Once verified, run Kubernetes as you normally would through the CLI using the commands below:
Contrast performs security testing in the background while you use the application, perform QA testing, or run automated test scripts. No hacking or security testing is required.
The application that is used for this demonstration has been deliberately equipped with vulnerabilities to showcase how Contrast Security can enable organizations to incorporate application security into their application stacks.
Now that we have our application deployed, let’s log in and take a look at a basic SQL injection.
Step 4: Instrument the application and check the Contrast UI for vulnerability results
Go to the URL landing page of the application and log in.
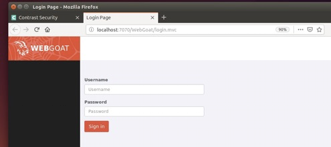
WebGoat login page
Next, in the WebGoat navigation area, open “Injection Flaws” and then click “String SQL Injection.” In the “Last Name” field, enter “Smith.” Notice that this is not an attack or anything special—it’s a simple, normal interaction in the WebGoat UI.
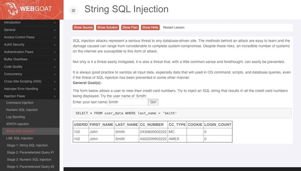
WebGoat’s “String SQL Injection” summary page
You can verify that Contrast is properly enabled by visiting the Contrast UI and selecting the “Servers” tab. You should see a new server that indicates recent activity.
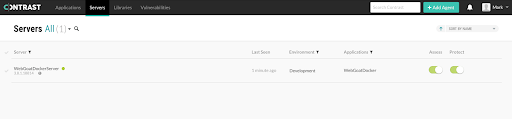 Verify that Contrast is enabled in the “Servers” tab
Your application now has a live dashboard in the Contrast UI that will be continuously updated with telemetry from the Contrast Java Agent:
-
Browse to your Contrast UI
-
Select “Applications” and select your application from the list
-
View overall statistics on the main dashboard
-
Select “Vulnerabilities” to view details of security issues discovered by Contrast
-
Select “Libraries” to view libraries with known vulnerabilities identified by Contrast
-
Select “Attacks” to view attacks detected and prevented by Contrast
-
Use the “Route Coverage” capability to discover untested attack surface
Here’s a screenshot of the SQL injection vulnerability below:
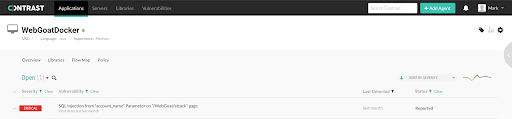
Contrast’s live dashboard for WebGoat application telemetry
Remember, Contrast Security instruments its full platform of solution capabilities and features through the Contrast Security agent. Thus, you also get Contrast OSS and Contrast Protect out of the box.
Let’s take a look at how Contrast Protect blocks a user from exploiting the SQL injection vulnerability—which is a natural extension into higher-level environments, since this is where the application is made available to the outside world.
Navigate to the “Servers” page—top left, next to “Applications.” Make sure “Protect” is turned on (green).
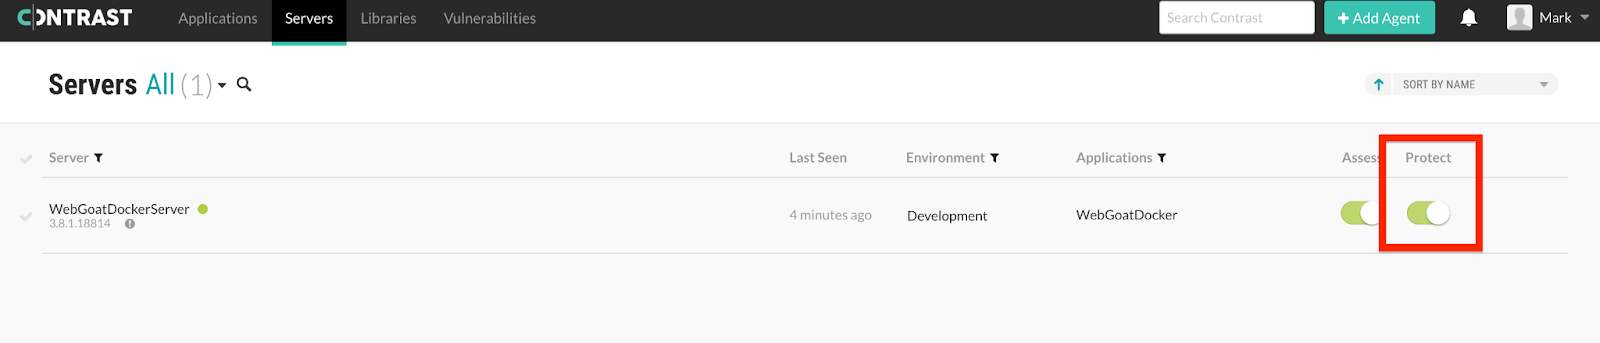
Contrast “Servers” tab: confirming that “Protect” is turned on
Next, navigate back to the WebGoat Application View and you should see “Protect” enabled.
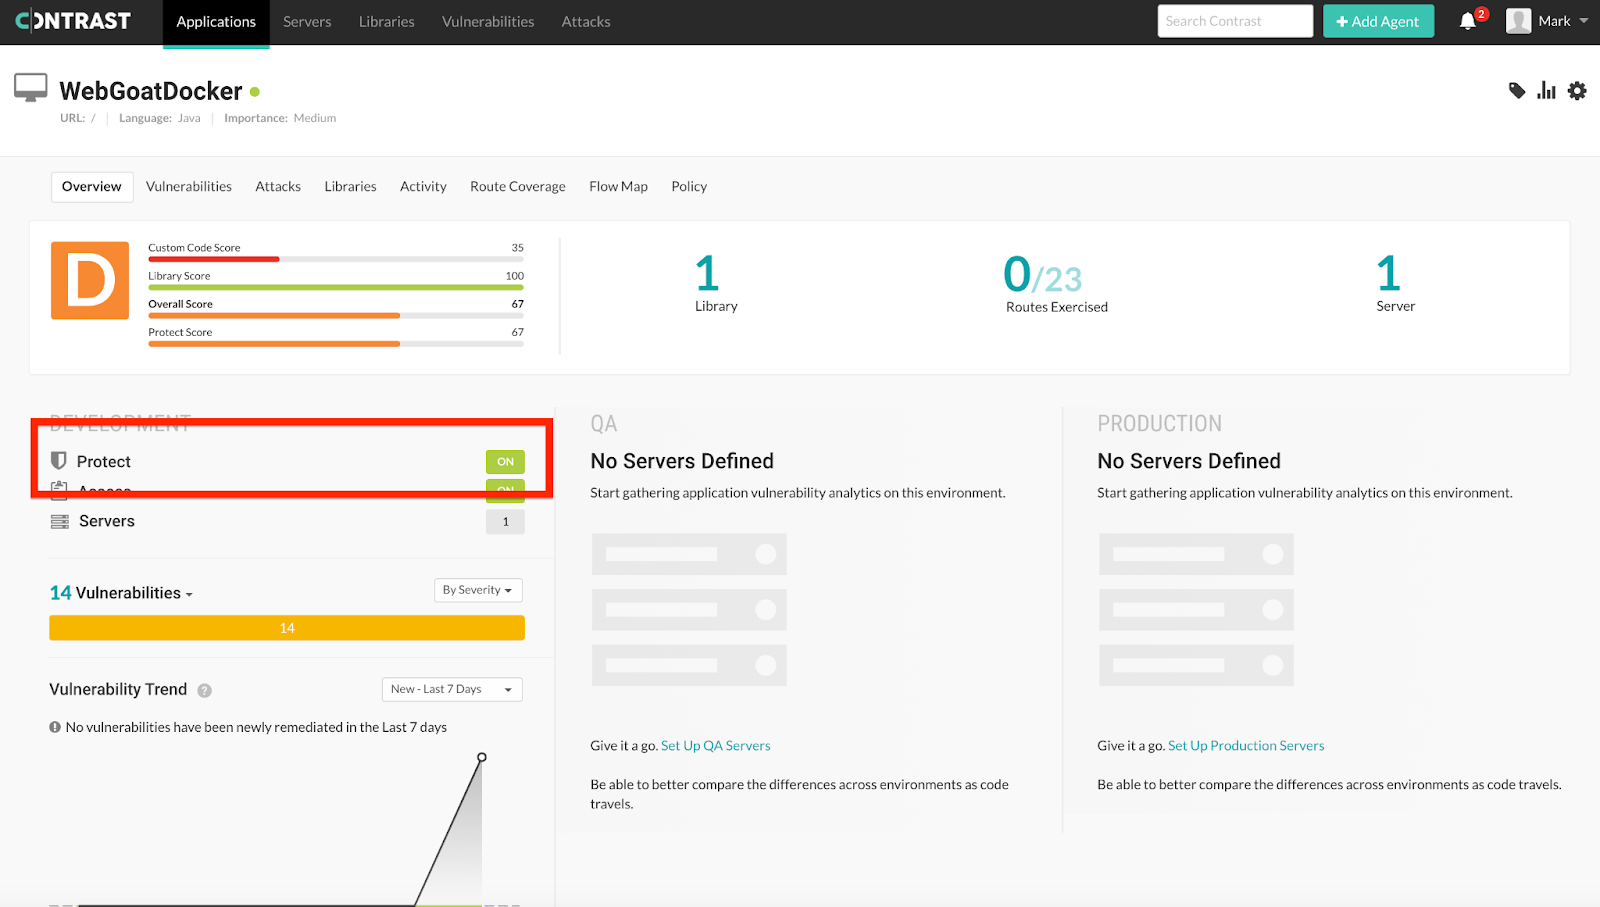
The application view showing “Protect” is enabled
Now that we have Contrast Protect running, let’s make our way to “Policy,” click “Protect,” and then search for “sql” in order to find the SQL injection rule that Contrast Protect will be referring to. Switch the capability from “Monitor” to “Block” in order to prevent the user from being able to exploit the SQL injection vulnerability we found in our WebGoat application.
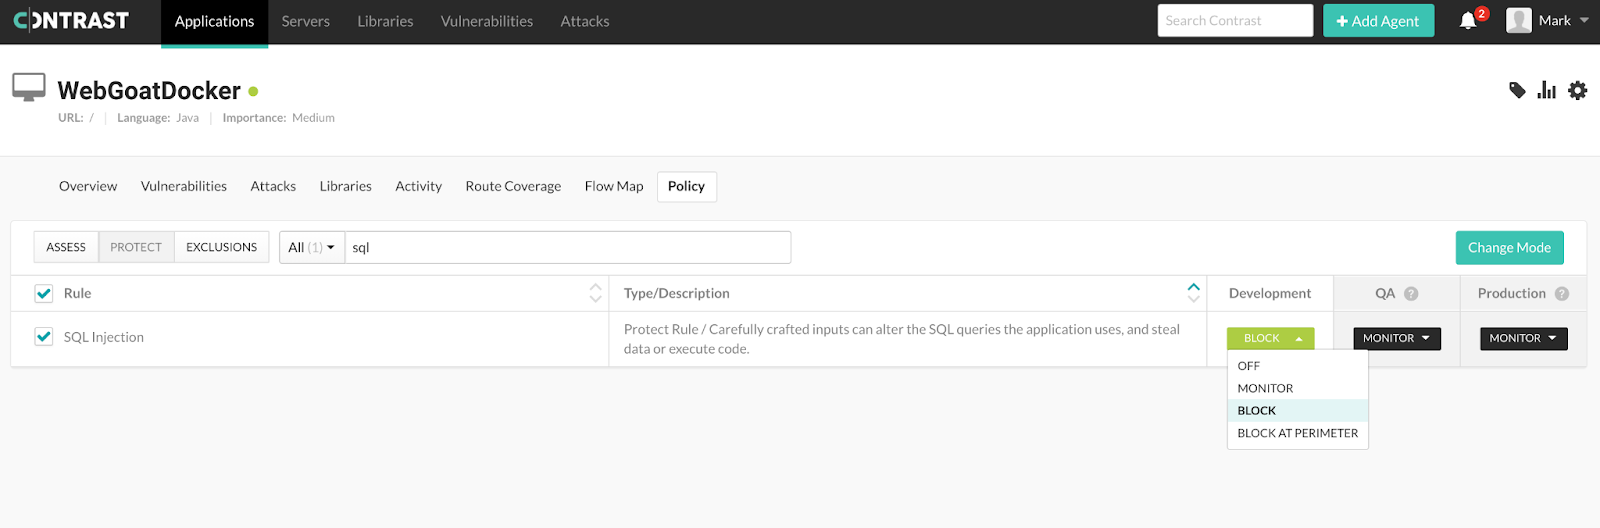
Changing the “Protect” SQL injection policy to “Block”
Note: The Contrast Security agent takes a minute or two to enable the change in configuration.
Next, navigate back to the Webgoat application to see what happens when we try to run the same user search as before—but this time let’s pass the string “Smith’ or ‘1’=’1” as the parameter to see if we can exploit the SQL injection vulnerability.
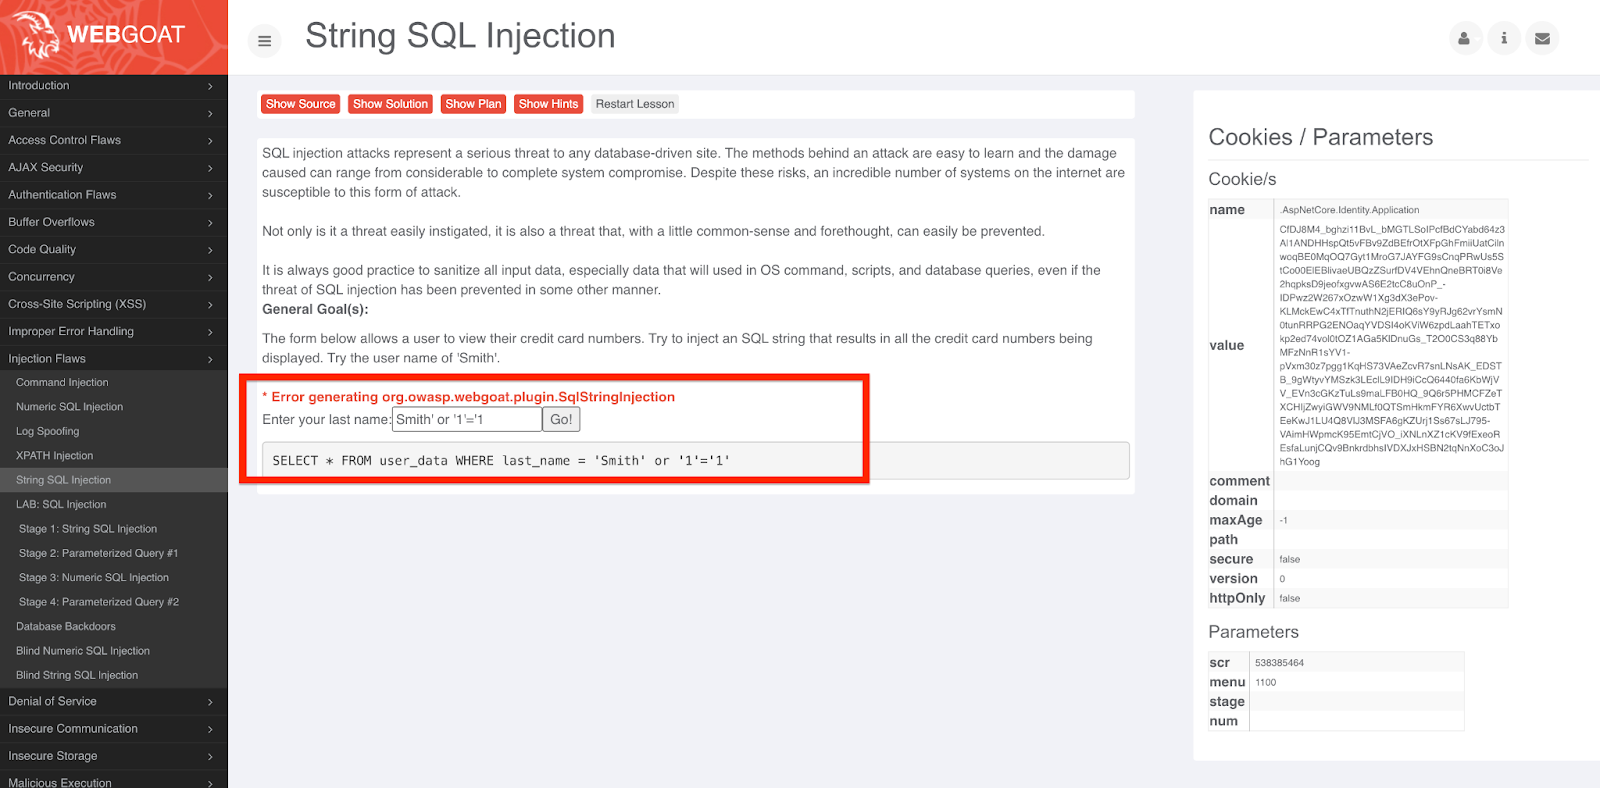
Attempting to exploit a SQL injection vulnerability in WebGoat
Because Contrast Protect has been enabled to block the SQL injection exploit, the application denies the user the ability to execute the search and an exception surfaces notifying the user of the issue.
Contrast has successfully blocked the potential attack—all we had to do was turn on Contrast Protect. This will in turn give you the ability to block attacks and enable your teams to enhance the application without having to worry about outside users exploiting vulnerabilities. No changes to higher-level environments are needed until your teams are able to deliver the enhancements necessary to address the exploits Contrast finds.
What’s Next?
Just to recap—we onboarded an application into EKS via AWS Fargate. We made sure the Contrast agent was baked into the container image that was being deployed and passed the agent configuration details via Kubernetes secrets/configMaps.
We can now start to evaluate our application security posture (vulnerabilities and exploits) and proceed to enhance our application, making our application safer and more secure in the process. Security—especially at the application layer—is essential to ensure that your applications are not only safe from attackers but protected against any type of threat that may compromise your users or IP.
Once you’re up and running with your first application, it then makes sense to repeat the steps above across the remainder of your application portfolio. The Contrast platform’s seamless scalability ensures that application security testing and protection capabilities are embedded wherever your applications are developed and delivered.
*** This is a Security Bloggers Network syndicated blog from AppSec Observer authored by Mark Tomcza. Read the original post at: https://www.contrastsecurity.com/security-influencers/how-to-start-devsecops-within-the-public-cloud-a-technical-guide
