

Step-By-Step Asset Discovery with Acunetix
One of the biggest pains of larger businesses is that they usually do not have a single library that lists all their assets. There are many reasons for this, for example, many businesses are actually a merger of several organizations and their structure tends to be very complex.
Acunetix includes unique technology aimed to help organizations know what to scan before they actually start scanning. In this article, we will show you step-by-step how to use this feature called web asset discovery.
Step 1. Discover during Acunetix Activation
You can start discovering your assets during the activation of Acunetix. When you activate your installation, you enter your email address on the license activation page. This email address is then used to discover your websites. In this example, we used the email address [email protected].
To check the websites that Acunetix discovered during this step, go to Discovery.

Step 2. Discover while Adding Targets
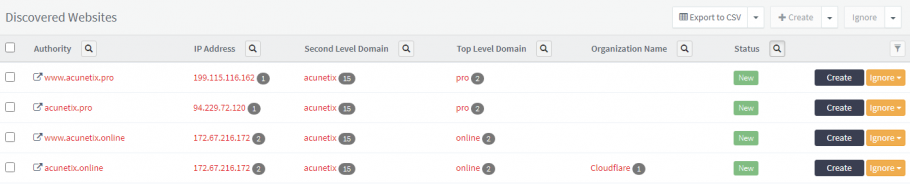
When you add a target to your list of scan targets, Acunetix also automatically performs asset discovery. In this example, we have added https://acunetix.com and http://testphp.vulnweb.com as new targets. Acunetix automatically found additional websites:
Step 3. Adjust Asset Discovery Settings
The default asset discovery settings cause Acunetix to find a lot of possible websites. This results in a large number of false-positive matches. You can reduce the number of false-positive matches by reviewing your asset discovery settings.
Match Settings
The match settings can be adjusted to refine the behavior of the asset discovery function.
Email Matching
The email matching function uses the second-level domain of your account to match websites — you can see this function in action in Step 1 above.
Website Matching
Website matching uses the second-level domain of the added target to match any additional websites with the same second-level domain. So, in our Step 2 example, asset discovery attempted to match any websites with <any subdomain>.acunetix.<any TLD> in its URL.
Reverse IP Lookup
If your website is hosted on a shared hosting solution where third-party websites share your IP address, you can disable the reverse IP lookup option.
Second-Level Domains
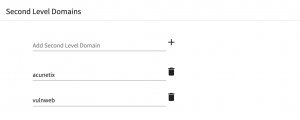
If your organization has websites that use several second-level domains, you can specify the relevant second-level domains to improve the accuracy of the asset discovery process. Using our example websites in Step 2 above, you can specify this:
Now, click on the Save button to refresh the Discovery list.
Excluded Top-Level Domains (TLDs)
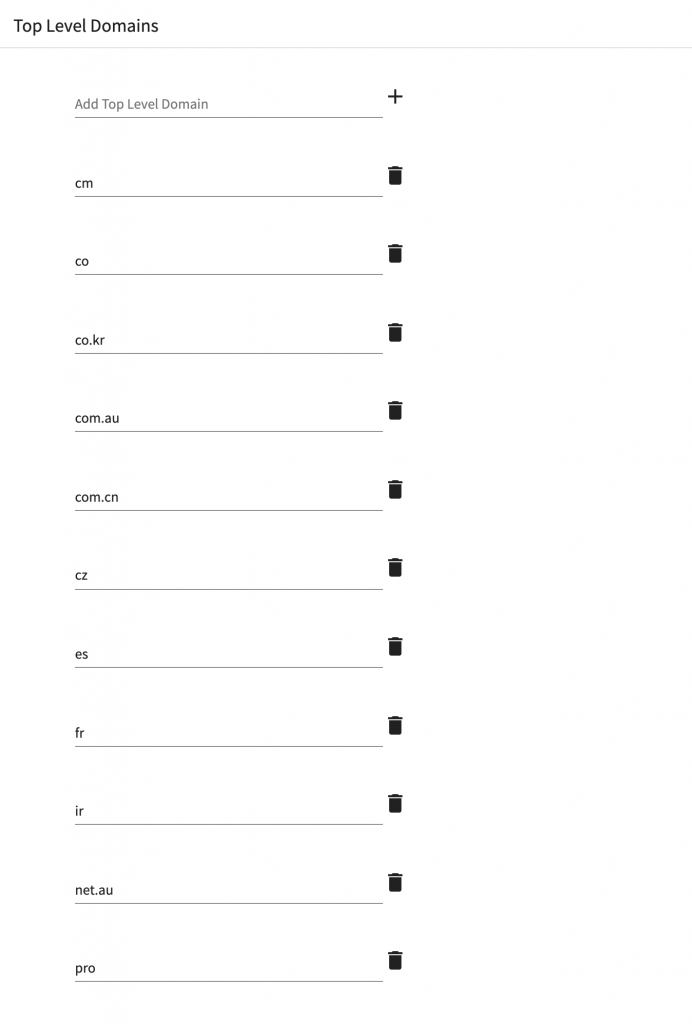
Your Discovery list may contain a number of second-level domain matches in TLDs that are not relevant to your requirements. You can specifically exclude TLDs from the asset discovery function. In our example, you can specify the following TLDs to be excluded:
Now, click on the Save button to refresh the Discovery list.
Step 4. Review the Discovery List
You can now take a second look at your Discovery list:
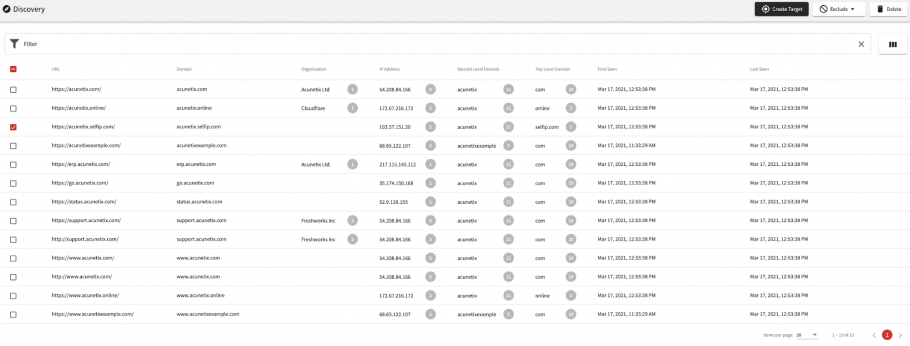
This list contains much fewer false positives compared to the first run. Now you can proceed to the final step.
Step 5. Set the Ignore Flag on False Positives
One item in the list is acunetix.selfip.com; this is a false positive.
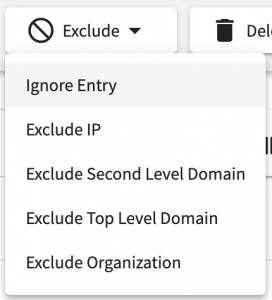
Select the item, click the Exclude button for this item, and select the Ignore Entry menu option.
Now your asset discovery function provides you with a sanitized Discovery list.
Get the latest content on web security
in your inbox each week.
THE AUTHOR

Technical Writer
Kevin Attard Compagno is a Technical Writer working for Acunetix. A technical writer, translator, and general IT buff for over 30 years, Kevin used to run Technical Support teams and create training documents and other material for in-house technical staff.


*** This is a Security Bloggers Network syndicated blog from Web Security Blog – Acunetix authored by Kevin Attard Compagno. Read the original post at: http://feedproxy.google.com/~r/acunetixwebapplicationsecurityblog/~3/7C40kmROdyI/
