

Scanning a REST API for Vulnerabilities

Many complex web applications are built using REST APIs. Acunetix can help you ensure the security of all your REST APIs just as effectively as in the case of monolithic web applications and websites. In this article, you will learn how to discover and fix vulnerabilities in a REST API using OpenAPI, Swagger, or WADL definitions:
- Build a simple REST API
- Create API definition files in different specifications:
- OpenAPI 3.0
- Swagger 2.0
- WADL
- Scan the API
- Identify vulnerabilities
- Mitigate and/or resolve the vulnerabilities
- Rescan the API to confirm resolution
Step 1: Build a Simple REST API
The first step is to build a simple REST API that you can scan. You will build an intentionally vulnerable REST API so that you can later see how Acunetix discovers the vulnerability.
To be able to build your simple REST API, you need a local web server with an accompanying database server. In this example, we used a local WampServer (wamp64) on localhost (also accessible via 192.168.0.11) with a MariaDB database server. You can use any other web server and other database types, too, for example, MySQL. If you do, simply modify the paths in the examples accordingly.
To build the REST API, perform the following steps:
- Create a database on your web server to store your data
- Create a C:wamp64wwwexampleincludesconfig.php file to store the parameters that are required to connect to the database
- Create a C:wamp64wwwexamplecoreinitialize.php file that will contain commands needed to initialize the API
- Create a C:wamp64wwwexamplecoreuser.php file for the user class that defines the API functions that we will provide; in this example we will provide a single API function called read_by_id
- Create a C:wamp64wwwexampleapiread_by_id.php file for the API function read_by_id
- Create a C:wamp64wwwexampleclientclient.php file that will present an input form to the user and use the API to retrieve the requested information; this will be your web application user interface
Create a Database on Your Web Server
Run the following commands from the database server root prompt:
MariaDB [(none)]> CREATE USER 'restuser'@'localhost' IDENTIFIED BY 'restuserpass';
MariaDB [(none)]> CREATE DATABASE restdb;
MariaDB [(none)]> GRANT ALL PRIVILEGES ON restdb.* TO 'restuser'@'localhost';
MariaDB [(none)]> USE restdb;
MariaDB [restdb]> CREATE TABLE `users` (`id` int(11) NOT NULL AUTO_INCREMENT,`fname` varchar(30) DEFAULT NULL, `lname` varchar(30) DEFAULT NULL, `email` varchar(30) DEFAULT NULL, PRIMARY KEY (`id`) );
MariaDB [restdb]> INSERT INTO users (fname, lname, email) VALUES ('John', 'Smith', '[email protected]');
MariaDB [restdb]> INSERT INTO users (fname, lname, email) VALUES ('Jane', 'Doe', '[email protected]');
Build the Config File
Create a C:wamp64wwwexampleincludesconfig.php file as follows:
<?php
$db_host = 'localhost';
$db_name = 'restdb';
$db_user = 'restuser';
$db_pass = 'restuserpass';
$db = new PDO('mysql:host='.$db_host.';dbname='.$db_name.';charset=utf8',$db_user,$db_pass);
?>
Build the Initialization File
Create a C:wamp64wwwexamplecoreinitialize.php file as follows:
<?php
  defined('SITE_ROOT') ? null : define('SITE_ROOT', 'C:wamp64wwwexample');
  require_once(SITE_ROOT . 'includesconfig.php');
  require_once(SITE_ROOT . 'coreuser.php');
?>
Build the User Class File
Create a C:wamp64wwwexamplecoreuser.php file as follows:
<?php
  class User{
    private $conn, $table = 'users';
    public $id, $fname, $lname, $email;

    public function __construct($db) { $this->conn = $db; }

    public function read_by_id() {

      $query = 'SELECT id, fname, lname, email FROM ' . $this->table . ' WHERE id = ' . $this->id;
      $query_count = 'SELECT count(*) FROM ' . $this->table . ' WHERE id = ' . $this->id;
      $statement_count = $this->conn->prepare($query_count);
      $statement_count->execute();
      $statement = $this->conn->prepare($query);
      $statement->execute();

      $row = $statement->fetch(PDO::FETCH_ASSOC);

      $statement_row_count = $statement_count->fetchColumn();
      if ($statement_row_count==0) {
        http_response_code(404);
      } else {
        $this->id = $row['id'];
        $this->fname = $row['fname'];
        $this->lname = $row['lname'];
        $this->email = $row['email'];
      }
    }
  }
?>
Build the read_by_id API Function
Create a C:wamp64wwwexampleapiread_by_id.php file as follows:
<?php

  header('Content-Type: application/json');
  include_once('../core/initialize.php');

  $user = new User($db);
  $user->id = isset($_GET['id']) ? $_GET['id'] : die();
  $user->read_by_id();

  $uarray = array('id'=>$user->id,'fname'=>$user->fname,'lname'=>$user->lname,'email'=>$user->email);

  print_r(json_encode($uarray));

?>
Build the Web Application User Interface
Create a C:wamp64wwwexampleclientclient.php file as follows:
<?php

if (isset($_GET['id']) && $_GET['id']!="") {
  $id = $_GET['id'];
  $url = "http://192.168.0.11/example/api/read_by_id.php?id=".$id;

  $client = curl_init($url);
  curl_setopt($client,CURLOPT_RETURNTRANSFER,true);
  $response = curl_exec($client);
  $result = json_decode($response);

  echo "<table style='border: 1px solid black;'>";
  echo "<tr><td>Order ID:</td><td>$result->id</td></tr>";
  echo "<tr><td>First Name:</td><td>$result->fname</td></tr>";
  echo "<tr><td>Last Name:</td><td>$result->lname</td></tr>";
  echo "<tr><td>Email Address:</td><td>$result->email</td></tr>";
  echo "</table><br><br><hr><br><br>";
 }
?>

<form action="" method="GET">
<label>Enter User ID:</label><br />
<input type="text" name="id" placeholder="Enter User ID" required/>
<br /><br />
<button type="submit" name="submit">Submit</button>
</form>
Step 2. Create API Definition Files
OpenAPI 3.0 Specification
Create a C:wamp64wwwexampleapiapi_example_OpenAPI3.yaml file as follows:
openapi: '3.0.0'
info:
  title: UsersExample
  version: '1.0'

servers:
  - url: http://192.168.0.11/example/api

paths:
  /read_by_id.php:
    get:
      summary: Single user identified by id
      parameters:
        - name: id
          in: query
          description: id to identify user
          schema:
            type: integer
      responses:
        '200':
          description: Successfully returned a single user
          content:
            application/json:
              schema:
                $ref: '#/components/schemas/user'
        '404':
          description: No user with specified id was found

components:
  schemas:
    user:
      type: object
      properties:
        id:
          type: integer
        fname:
          type: string
        lname:
          type: string
        email:
          type: string
Swagger 2.0 Specification
Create a C:wamp64wwwexampleapiapi_example_Swagger2.yaml file as follows:
swagger: '2.0'
info:
  version: '1.0'
  title: UsersExample
  contact: {}
host: 192.168.0.11
basePath: /example/api
schemes:
- http
consumes:
- application/json
produces:
- application/json
paths:
  /read_by_id.php:
    get:
      description: Single user identified by id
      summary: Single user identified by id
      operationId: Singleuseridentifiedbyid
      deprecated: false
      produces:
      - application/json
      parameters:
      - name: id
        in: query
        required: false
        type: integer
        format: int32
        description: id to identify user
      responses:
        200:
          description: Successfully returned a single user
          schema:
            $ref: '#/definitions/user'
          headers: {}
        404:
          description: No user with specified id was found
          schema: {}
definitions:
  user:
    title: user
    type: object
    properties:
      id:
        type: integer
        format: int32
      fname:
        type: string
      lname:
        type: string
      email:
        type: string
tags: []
WADL Specification
Create a C:wamp64wwwexampleapiapi_example.wadl file as follows:
<?xml version="1.0" encoding="utf-8"?>
<application xmlns:xsi="http://www.w3.org/2001/XMLSchema-instance" xmlns:xsd="http://www.w3.org/2001/XMLSchema" xmlns:schemas="http://192.168.0.11/example/api/schemas" xmlns="http://wadl.dev.java.net/2009/02">
  <doc title="UsersExample" xml:lang="en" />
  <grammars>
    <xs:schema xmlns:tns="http://192.168.0.11/example/api/schemas" targetNamespace="http://192.168.0.11/example/api/schemas" xmlns:xs="http://www.w3.org/2001/XMLSchema">
      <xs:element name="user" type="schemas:user" />
      <xs:element name="Singleuseridentifiedbyid_Response" type="schemas:Singleuseridentifiedbyid_Response" />
      <xs:complexType name="user">
        <xs:sequence>
          <xs:element minOccurs="0" name="id" type="xs:integer" />
          <xs:element minOccurs="0" name="fname" type="xs:string" />
          <xs:element minOccurs="0" name="lname" type="xs:string" />
          <xs:element minOccurs="0" name="email" type="xs:string" />
        </xs:sequence>
      </xs:complexType>
      <xs:complexType name="Singleuseridentifiedbyid_Response">
        <xs:sequence>
          <xs:element minOccurs="1" name="response" type="schemas:user">
            <xs:annotation>
              <xs:documentation>Successfully returned a single user</xs:documentation>
            </xs:annotation>
          </xs:element>
        </xs:sequence>
      </xs:complexType>
    </xs:schema>
  </grammars>
  <resources base="http://192.168.0.11/example/api">
    <resource id="_read_by_id.php" path="/read_by_id.php">
      <method id="Singleuseridentifiedbyid" name="GET">
        <doc title="Single user identified by id" xml:lang="en">Single user identified by id</doc>
        <request>
          <param name="id" style="query" type="xsd:integer">
            <doc title="id" xml:lang="en">id to identify user</doc>
          </param>
        </request>
        <response status="200">
          <doc title="200" xml:lang="en">Successfully returned a single user</doc>
          <representation element="schemas:Singleuseridentifiedbyid_Response" mediaType="application/json" />
        </response>
        <response status="404">
          <doc title="404" xml:lang="en">No user with specified id was found</doc>
        </response>
      </method>
    </resource>
  </resources>
</application>
Step 3. Scan Your API
In this example, our API is defined here:
- https://192.168.0.11/example/api/api_example_OpenAPI3.yaml (the OpenAPI 3.0 specification)
- https://192.168.0.11/example/api/api_example_Swagger2.yaml (the Swagger 2.0 specification)
- https://192.168.0.11/example/api/api_example.wadl (the WADL specification)
To scan the API with Acunetix:
- Create a new target with any of the specification URLs listed above; note that each of the URLs describes the same API and will therefore expose the same vulnerabilities; we supplied three different ones so that you have proof that Acunetix supports all common REST API definition standards
- Deploy PHP AcuSensor to your API
- Launch a Full Scan against your API and wait for it to complete
Step 4. Identify Vulnerabilities in Your API
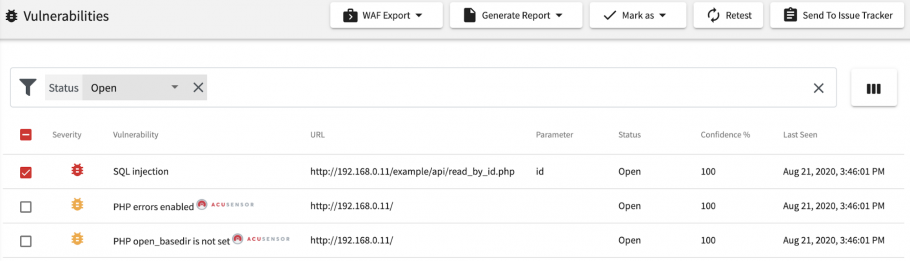
Examine the list of vulnerabilities for your target.

We shall concentrate on the SQL injection vulnerability for this exercise.
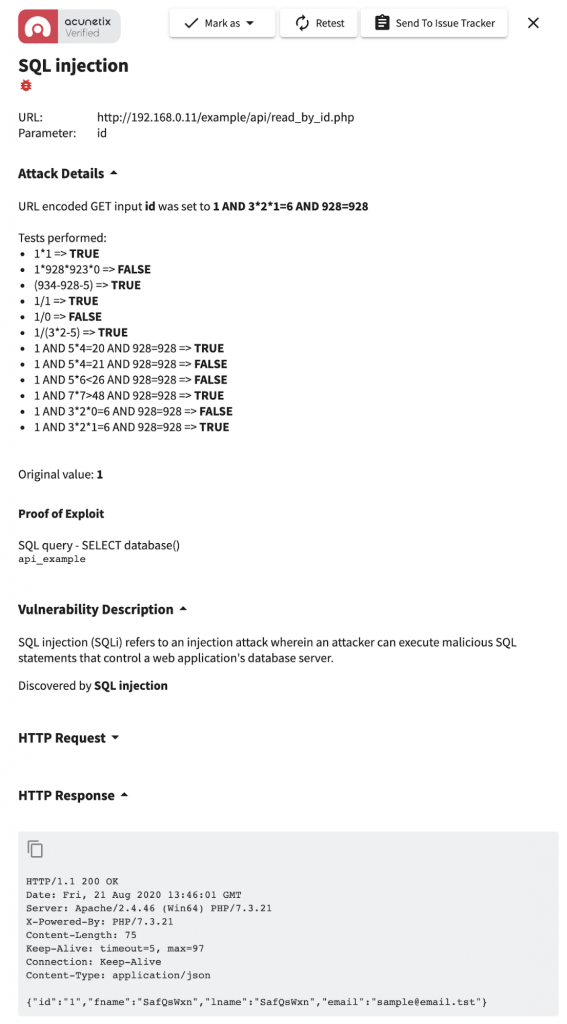
In the Attack Details section, Acunetix shows that the input field was successfully populated with potentially malicious content. This means that the data that is inserted into the input field is not being validated correctly. Acunetix also provides a proof of exploit: it tells you the name of the database used by your back-end code (an API user should not be able to access such information).
Step 5. Resolve the Vulnerabilities
A quick look at the function read-by_id inside the user.php class file can reveal the root cause. The queries are built using string concatenation:
$query = 'SELECT id, fname, lname, email FROM ' . $this->table . ' WHERE id = ' . $this->id;
$query_count = 'SELECT count(*) FROM ' . $this->table . ' WHERE id = ' . $this->id;
$statement_count = $this->conn->prepare($query_count);
$statement_count->execute();
$statement = $this->conn->prepare($query);
$statement->execute();
The $this->id variable is being simply concatenated to the query string without any validation. We need to adjust the code by parameterizing the query string, ensuring that any parameters passed are correctly escaped and quote-encapsulated, disallowing further exploits. The new code snippet would look like this:
$query = 'SELECT id, fname, lname, email FROM ' . $this->table . ' WHERE id = ?';
$query_count = 'SELECT count(*) FROM ' . $this->table . ' WHERE id = ?';
$statement_count = $this->conn->prepare($query_count);
$statement_count->bindParam(1, $this->id);
$statement_count->execute();
$statement = $this->conn->prepare($query);
$statement->bindParam(1, $this->id);
$statement->execute();
Step 6. Rescan to Confirm Resolution
Go to the list of vulnerabilities for the scan and select the vulnerability you have attempted to fix.
Now click on the Retest button — this will create a new scan to test the selected vulnerabilities again. The results will show that you have successfully resolved the vulnerabilities.
Get the latest content on web security
in your inbox each week.
THE AUTHOR

Technical Writer
Kevin Attard Compagno is a Technical Writer working for Acunetix. A technical writer, translator, and general IT buff for over 30 years, Kevin used to run Technical Support teams and create training documents and other material for in-house technical staff.


*** This is a Security Bloggers Network syndicated blog from Web Security Blog – Acunetix authored by Kevin Attard Compagno. Read the original post at: http://feedproxy.google.com/~r/acunetixwebapplicationsecurityblog/~3/yssuaDKrMO0/
