

How to Build a Microsoft Flow Custom Connector to Spanning API
Since joining the team at Spanning, I’ve had the pleasure of helping customers craft solutions using the Spanning Backup for Office 365 API. We have a very popular PowerShell module and I have been demonstrating how to use the module in PowerShell scripts to automate the license application for users.
Recently, I was asked if we could use Microsoft Flow to do the same thing. It turns out that you can and it’s easy! Microsoft Flow provides a feature called a Custom Connectors that empower you to craft your own solutions with REST API endpoints like the Spanning Backup for Office 365 API.
Why Build a Flow Custom Connector?
Spanning Backup for Office 365 provides many great features through the Tenant Portal or with the API wen using our PowerShell module. Still, there may be other use cases a company might want to explore, like enabling a Spanning User License when a user is added to a Azure AD Security Group. A Microsoft Flow Custom Connector can make this possible. You could also run a scheduled Flow to determine when you are approaching your license limit to remind you to add additional licenses. Any query you can make of our API is possible from Flow with a Custom Connector.
Overview
To create a Flow Custom Connector, you need to first generate a API Key for your Spanning Tenant. Then you will use that key to allow Microsoft Flow to make requests of your tenant. In this post I’ll show you a simple flow that you could create to license a single user. In the video that accompanies this post I’ll show you how to monitor an Azure AD Group and license the users that are added.
Generate the Spanning API Token
Step 1) Navigate to your Spanning Backup for Office 365 Portal.
Step 2) Choose Settings and scroll down to the API Token Click Generate Token.
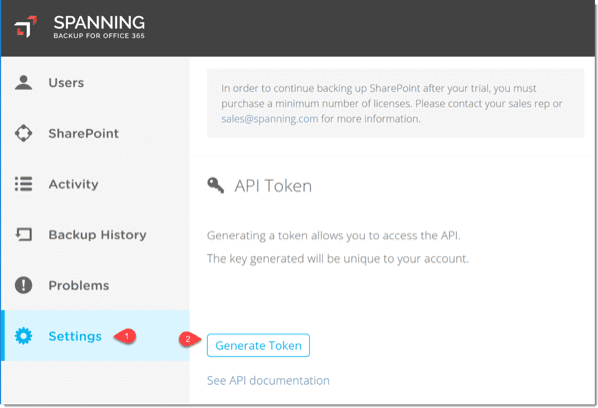
Step 3) The new API Token will be displayed. Be sure to copy it and save it somewhere safe. This key allows access to your Spanning Tenant, so treat it like a password. When you navigate away from the page it will disappear.

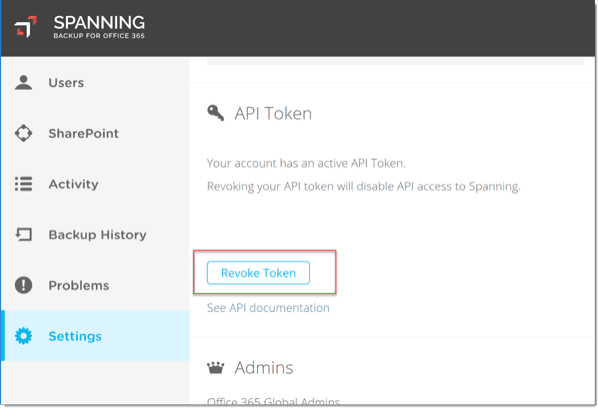
Note: If you only see the Revoke Token button, someone else generated the Token already. If you cannot get the current token, you need to know who generated the Token, and check that it’s okay to click Revoke Token and then generate a new token. Of course, this will invalidate the previous token and you will need to update the locations where it is being used.
Use PowerShell to Create an Authentication Header
Step 1) Download the Spanning Backup for Office 365 PowerShell module.
Step 2) Open PowerShell and import the module.
PS>> Import-Module .\SpanningO365
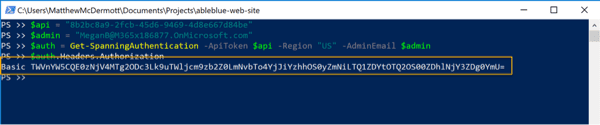
Step 3) Get the Spanning authentication token by passing your API Token, Region, and Admin Email.
PS >> $api = “8b2bc8a9-2fcb-45d6-9469-4d8e667d84be”
PS >> $admin = “[email protected]”
PS >> $auth = Get-SpanningAuthentication -ApiToken $api -Region “US” -AdminEmail $admin
Step 4) Output the Authorization header and copy it for later use.
$auth.Headers.Authorization
Create a Custom Connector in Microsoft Flow
In a related post, Create a Custom Flow Connector for the Microsoft Graph, I demonstrate how to use Postman to test your requests before jumping into Microsoft Flow. In this post we’ll start in Flow.
Step 1) Navigate to Microsoft Flow.
Step 2) From the “gear” menu, choose Custom Connectors.

Step 3) On the Custom connectors page, choose the Create custom connector menu and select Create from blank.
Step 4) Give your connector a Name like Spanning backup API. Click Continue.
Step 5) You can supply an icon and background color, but the important part here is to provide the correct Host for your region.
a. US – o365-api-us.spanningbackup.com
b. APAC – o365-api-ap.spanningbackup.com
c. EMEA – o365-api-eu.spanningbackup.com

Step 6) Click Create connector.
Configure Connector Security
The Spanning API authenticates with an Authorization Token that you previously generated in PowerShell and saved. In this section you will apply that token to the Connector Security.
Step 1) Click on the Security tab.
Step 2) Click Edit.
Step 3) Choose API Key for the type of authentication. The API Key section should be displayed.
Step 4) In the Parameter label field enter API Token.
Step 5) In the Parameter name field enter Authorization.
Step 6) In the Parameter location field leave the default Header.
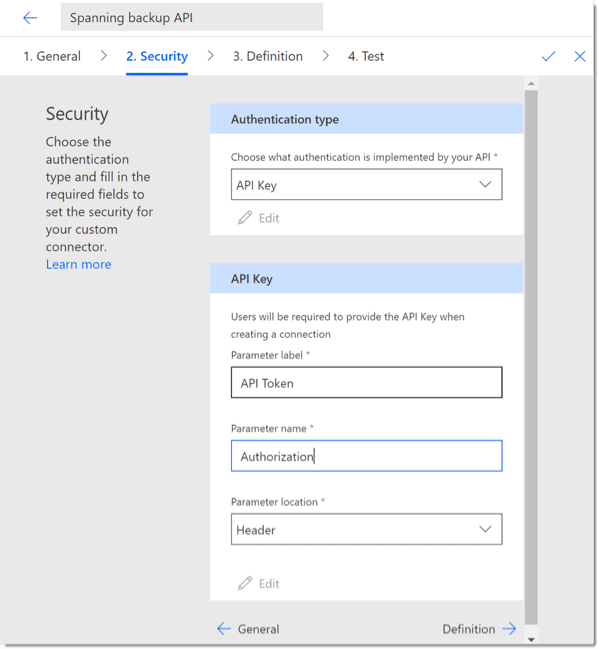
Step 7) Click Update connector.
Configure Connector Definition
For this example, I’d like to implement two different requests, one to get the Tenant information and another to apply a license to a user. (The Spanning API is documented here)
Request 1) Get Tenant Information
Request: GET https://o365-api-{{Region}}.spanningbackup.com/tenant
Response:
{
“licenses”: 100,
“users”: 106,
“assigned”: 16,
“status”: “trial”
}
Request 2) Assign License to User
Request: POST : https://o365-api-{{Region}}.spanningbackup.com/user/{{UserPrincipalName}}/assign
Response:
{
“userPrincipalName”: “[email protected]”,
“licensed”: true
}
Armed with this information we can create two custom actions to enable automation with Microsoft Flow.
Step 1) Click on the Definition tab.
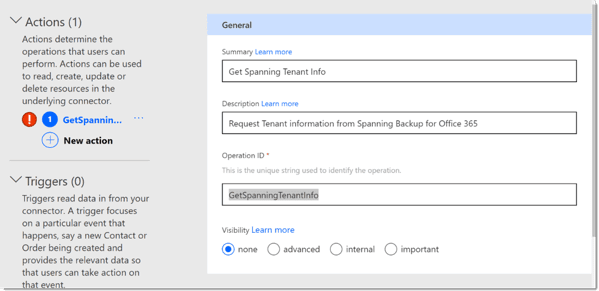
Step 2) Under Actions, click New action. Complete the General section as follows:
a. Summary: Get Spanning Tenant Info
b. Description: Request Tenant information from Spanning Backup for Office 365
c. Operation ID: GetSpanningTenantInfo
Step 3) Request, click Import from sample.
Step 4) In the Import from sample blade, choose GET and enter the Spanning API URL for your region.
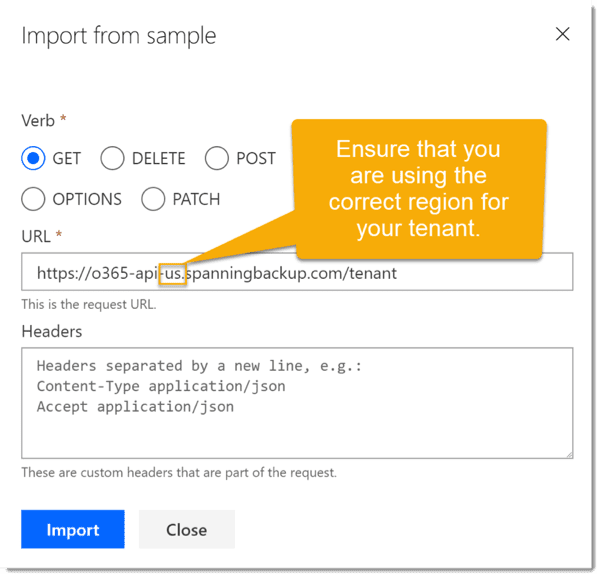
Step 5) Click Import.
Step 6) In the Response section, click Import from sample.
Step 7) On the Import from sample blade, paste in the Tenant response from above.
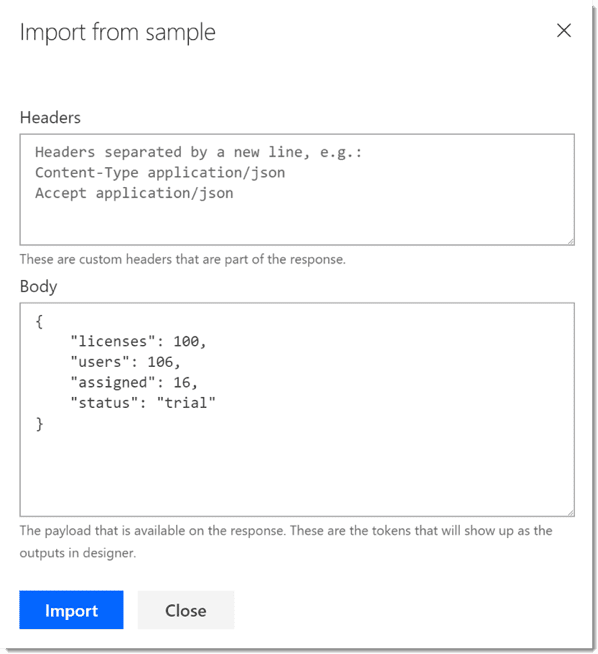
Step 8) Click Import.
Step 9) Click Update connector to save your changes.
Test the Tenant Info Connection
Step 1) Click the Test tab.
Step 2) Under Connections, click New connection. You will be redirected to a page to enter your API Token. Paste in the token you previously copied and click Create connection.

Step 3) You should see an alert that you need to update the connector to test your changes. Click Update connector and if necessary click the Refresh button.

Step 4) You should be able to pick your connection from the list of connections.

Step 5) Click Update connector once more and you should see the GetSpanningTenantInfo Operation. Click Test Operation.
Step 6) You should get an OK 200 response from your tenant.

Add User Licensing
Step 1) Click on the Definition tab.
Step 2) Click New action.
Step 3) Complete the General section as follows:
a. Summary: License Spanning User
b. Description: Apply a license to a Spanning User
c. Operation ID: LicenseSpanningUser
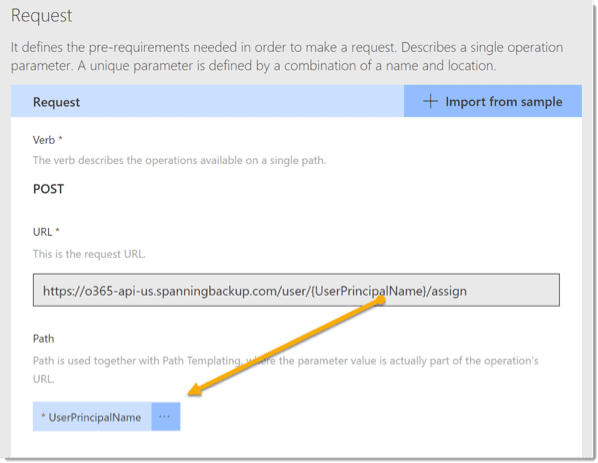
Step 4) In the Request section, click Import from sample.
Step 5) Choose POST and paste in the following request ensuring that you set the correct region.
a. https://o365-api-{region}.spanningbackup.com/user/{UserPrincipalName}/assign

Step 6) Leave the other fields blank and click Import.
Step 7) You should see that the UserPrincipalName variable is converted to a parameter.
Step 8) In the Response section, click Add default response. In the Import from sample blade, paste in the response body into the Body field.
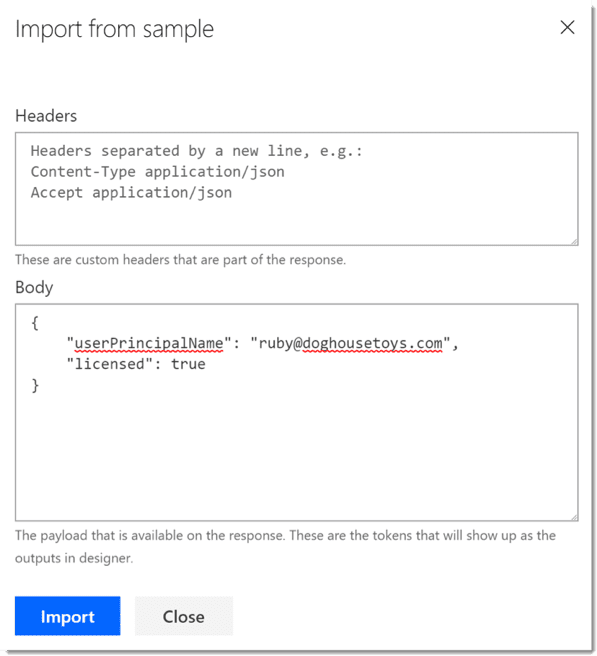
Step 9) Click Import.
Step 10) Click Update connector.
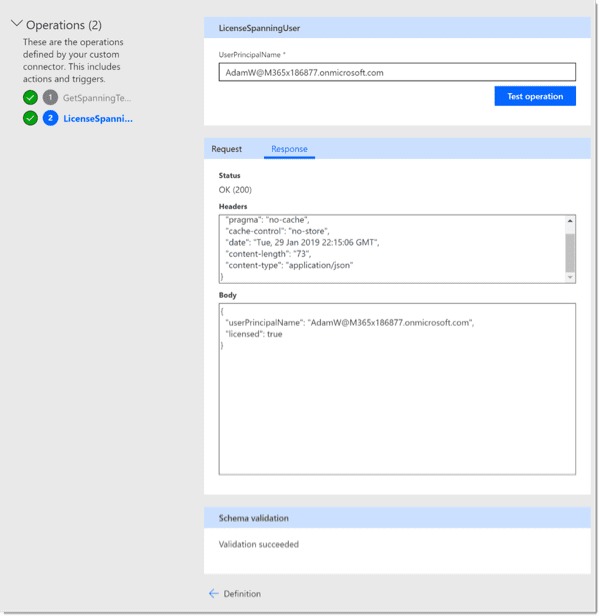
Step 11) Click on the Test tab and you should see two operations. Click LicenseSpanningUser.
Step 12) Supply a valid UPN for a user and click Test operation.
Step 13) You should get an OK 200 response and see the user is licensed.
Step 14) Click Update connector. If all of your tests worked correctly, you are ready to create your Flow.
Test the Connector in Flow
At this point you are ready to test the Connector. To do this create a new Flow. I prefer to begin from a manual action like a button push, but you can use any trigger you like. For this simple scenario I am going to accept an email address for the UPN value and then license the user. Then I’ll send a designated administrator an email containing the user information and the updated Tenant information.
Step 1) Click My Flows.
Step 2) Click New | Create from blank. Click Create from blank again.
Step 3) In the Search connectors and triggers field type Button. Select Flow button for mobile.
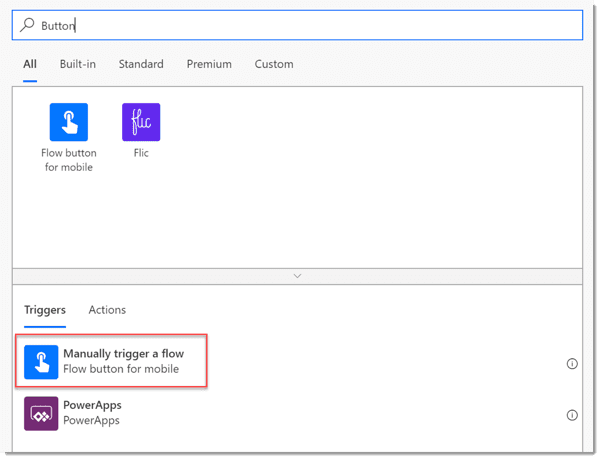
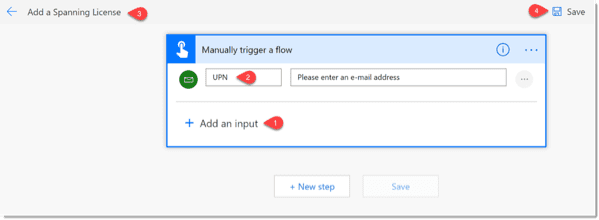
Step 4) Click Add an input. Choose Email type and change the label to UPN.
Step 5) In the Flow Title field change the value to Add a Spanning License. Click Save.
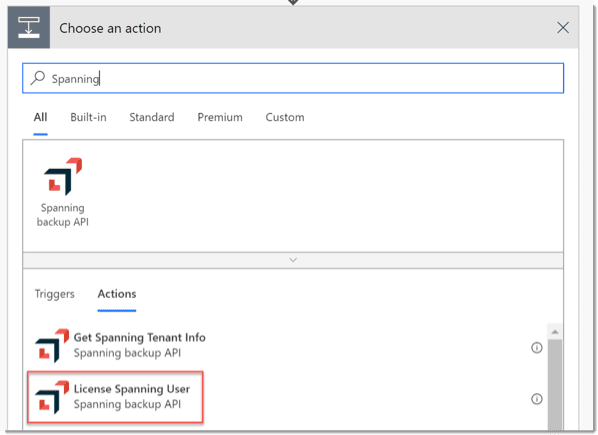
Step 6) Click New step. Type Spanning in the search box.
Step 7) Choose the License Spanning User action.
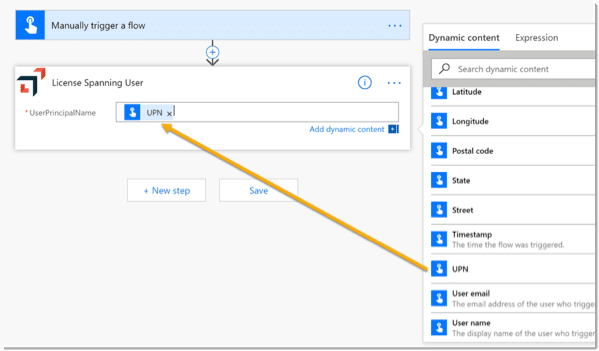
Step 8) In the UserPrincipalName field for the License Spanning User action add the UPN output from the Manually trigger flow trigger.
Step 9) Click New step and search for Spanning. This time choose the Get Spanning Tenant Info action and add it to the Flow.
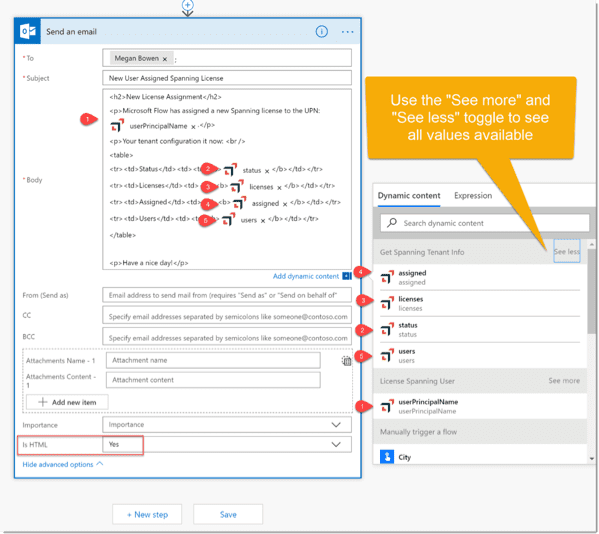
Step 10) Click New step and add a Send an email action.
Step 11) Configure the Send an email action as follows:
a. To: Specify your email address
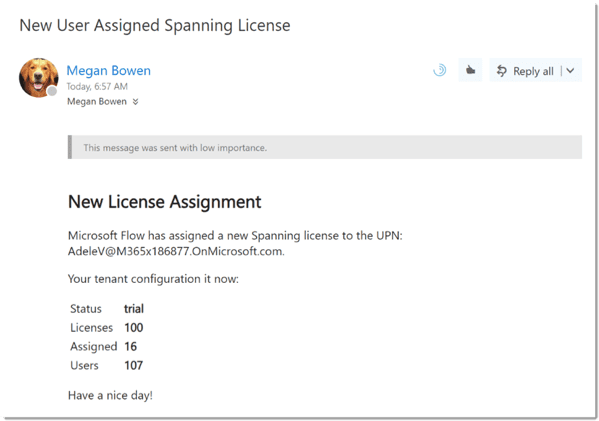
b. Subject: New User Assigned Spanning License
c. Body: Use the following HTML substitute the tokens as indicated.
<h2>New License Assignment</h2>
<p>Microsoft Flow has assigned a new Spanning license to the UPN: {UPN}.</p>
<p>Your tenant configuration it now: <br />
<table>
<tr><td>Status</td><td><td><b>{status}</b></td></tr>
<tr><td>Licenses</td><td><td><b>{licenses}</b></td></tr>
<tr><td>Assigned</td><td><td><b>{assigned}</b></td></tr>
<tr><td>Users</td><td><td><b>{users}</b></td></tr>
</table>
<p>Have a nice day!</p>
Step 12) Click Show advanced options and change the Is HTML value to Yes.
Step 13) Click Save.
A Final Test
Time to test your Flow.
Step 1) Click Test.
Step 2) On the consent page click Continue.
Step 3) On the Run Flow page enter the UPN of a user you wish to license. This field will validate the user from your Office 365 Tenant. In my case the dialog hides the user lookup, so you need to scroll a little and select the user. Once selected, they should appear below the dialog.
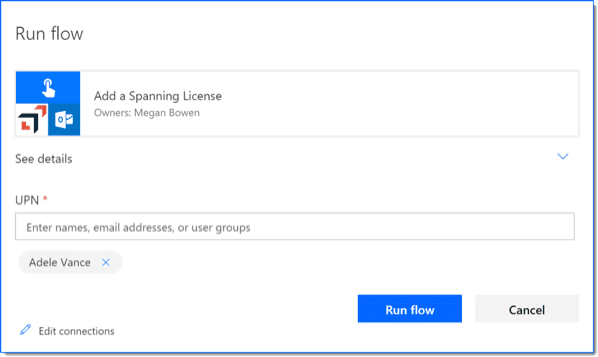
Step 4) Click Run flow.
Step 5) Click Done on the confirmation dialog and view the results of your test.
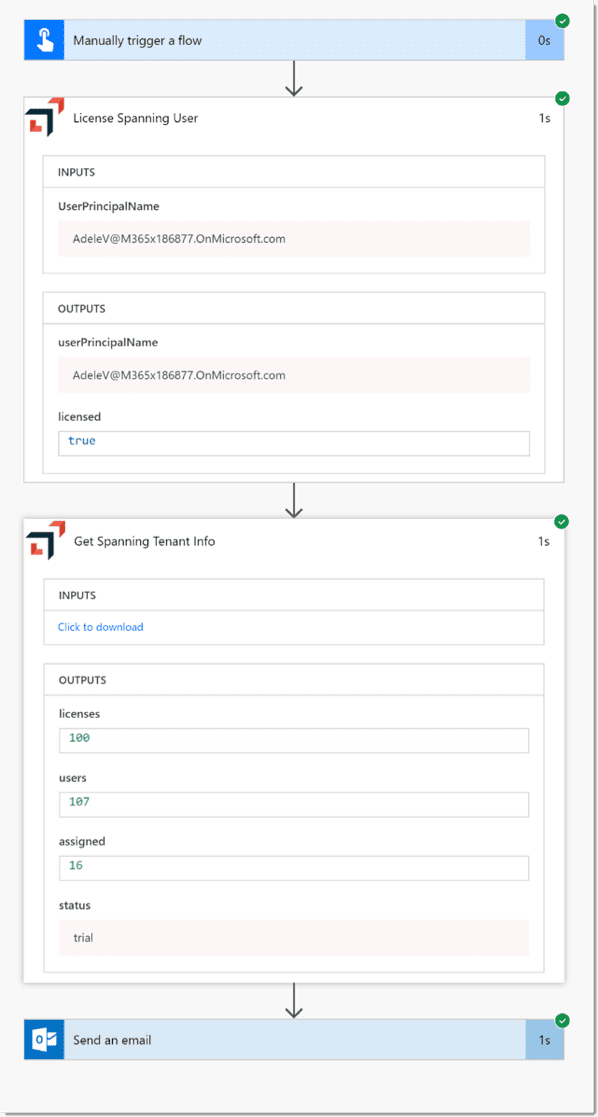
Step 6) You should see that all steps had run successfully. Further, when you open each action, you should see the values that were processed with each step.
Step 7) Finally, open your email and you should see the email confirmation.
Conclusion
Now that you have the Spanning API connector configured you can add additional actions and create more complex Flows with the connector. For example, you could use a Custom connector to monitor an Azure AD Group. Then when the group changes you could act based on those changes, like adding licenses to the users added to the group. I’ll cover that in the video below.
*** This is a Security Bloggers Network syndicated blog from Spanning authored by Matt McDermott. Read the original post at: https://spanning.com/blog/build-microsoft-flow-custom-connector/
