

How to build a serial port fuzzer with Defensics SDK
Defensics SDK makes fuzz testing possible for custom protocols. Learn how to create a custom injector using the Defensics SDK API.

Fuzz testing is never a bad idea. If you aren’t testing your implementation with malformed or unexpected inputs, someone else may be able to exploit a weakness simply from running the system. And fuzz testing (or fuzzing) is not only about finding potential security issues—it can also increase the overall robustness of the system.
Synopsys Defensics® is a generational fuzzer that creates test cases based on a detailed model of a protocol. Defensics includes over 250 prebuilt test suites as a turn-key fuzz testing solution for most common network and file protocols. It’s important to note that if your protocol isn’t in the extensive list of test suites, that doesn’t mean your protocol implementation is safe.
Modern applications typically consist of a variety of codebases working together as a system. For example, a single application might encompass embedded IoT code, mobile app code, and server-side APIs and systems; together, they present a broad attack surface for malicious actors. A malicious actor might desolder and hardwire a sensor on your IoT-board and fuzz the sensor communication protocol to find out if malformed input can allow code execution on the host processor, and to see if server-side APIs are called with malformed data.
About Defensics SDK
The Defensics SDK enables you to develop test suites for uncommon, custom, or proprietary protocols and file format parsers. Test suites created with the Defensics SDK appear in the Defensics GUI the same way as all prebuilt test suites. All you need to do is provide a data model. A data model is a machine-readable representation of a protocol. Defensics uses the data model to create outgoing messages and parse incoming messages. As such, all test cases are based on your data model and message sequences, and they are automatically created by the Defensics generational test case engine.
If you want to learn more about how to set up the Defensics SDK and how the SDK PCAP wizard can help you create data models, please check our tutorials on how to set up and use the Defensics SDK.
In addition, you can refer to the following articles on the capabilities of the Defensics SDK:
- How to Cyber Security: Fuzz a tank
- Fuzzing Bitcoin with the Defensics SDK, part 1: Create your network
- Fuzzing Bitcoin with the Defensics SDK, part 2: Fuzz the Bitcoin protocol
- Find more bugs by detecting failure better
The role of the injector
An injector is responsible for delivering the test cases to the test target. The injector performs the initialization of the delivery channel, sends and receives data from the channel, and closes the delivery channel at the end of the test case.
The Defensics SDK has built-in injectors for TCP/IP, HTTP, TLS, UDP, SCTP, WebSocket, Ethernet, GATT, and RFCOMM for exporting files. This means if your protocol is running on top of a TCP/IP connection, you can just configure the built-in TCP/IP injector for use.
The following example shows how the built-in TCP injector is initialized and used in a test sequence:
Injector io = tools.injector().tcp(“127.0.0.1”, 1234);
tools.setSequence(
io.send(myProtocolReq),
io.receive(myProtocolResp));
The first parameter to the TCP injector is the target host address, and the second parameter is the target port. The injector is used to first send and then receive a message from a TCP socket. The Defensics SDK also provides a custom TCP injector channel that can customize a built-in injector for any special protocol that transports over a TCP socket.
If your test target doesn’t support the built-in injectors provided by the Defensics SDK, there are two options:
- Tunnel the built-in injector traffic by using tools like socat on Linux
- Create a custom injector with the Defensics SDK API
As an example of the second option, this article shows how to create a protocol test suite with a serial port injector.
Setting up the project
In embedded devices, UART/SPI/I2C are popular interfaces for communication between onboard chips or between a host PC and a board. On PCs running the Defensics test suite, you can use a USB UART cable (also called a USB serial port cable)—a common debugging tool in embedded system software development. When the cable is connected to a PC, it appears as a serial port to the operating system.
The primary Defensics SDK programming language is Java. If you have a Java library implementing your injector method, you just need to bundle the library with the test suite. For a serial port, the Java library jSerialComm (https://github.com/Fazecast/jSerialComm) provides platform-independent serial port access. If you have an injector library written with another language, you will also need to create a Java-native interface mapping between the test suite Java code and your native code.
Our project setup is running Windows 10 on a host PC and testing a Raspberry Pi console connected via USB UART cable. In this example, the test suite is fuzzing the protocol behind the serial connection and not the serial communication itself.
The Defensics SDK work environment and project is set up in accordance with the developer guide found in the SDK delivery package. The package also contains full source code for this example project, as well as other SDK examples.
Initializing the injector
The first step when using an external library is to include the library in your test suite project. Simply copy and paste the .jar file under the project /lib folder on the same level with sdk.jar, and update the gradle dependencies to include the library. If you’re using developer-mode Test Runner, remember to include additional libraries on the classpath variable given on the suite load. Otherwise, the Test Runner will not be aware of classes on the added library.
Figure 1: Extending the Java classpath with external libraries on developer-mode Test Runner
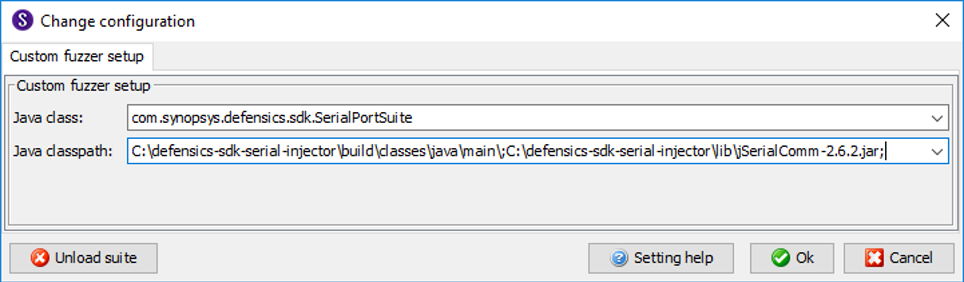
When APIs from an additional library—jSerialComm in this case—are available on your project, you can configure the injector for use before starting the test run. Adding new injector settings is straightforward with the Defensics SDK, and defined settings are automatically available both at the command line and in the Defensics monitor GUI.
By default, when a setting value is changed in the Defensics GUI, it will reload the suite’s data model. This is needed when the setting value changes the test case content, and that affects the data model. When the injector setting has no effect on the data model, it can be defined as a no-reload setting, as seen in the code below. The no-reload setting value can be changed without reloading the model.
tools.settings()
.addChoiceSetting(“–data-bits”,
“Number of data bits”,
tools.settings().createChoice(“7”, “7 bit”),
tools.settings().createChoice(“8”, “8 bit”).setDefault())
.setGroup(GROUP_SERIAL_PORT)
.noReload();
In this example, we’re creating a setting for the data bits selection. In the GUI, this appears as a drop-down list with two options (7-bit mode or 8-bit mode) under its own setting group called “serial port.” The default is 8-bit mode. From the command line, the parameter –data-bits 7 can be used to change the default.
Figure 2: Created settings are automatically shown on the Defensics GUI
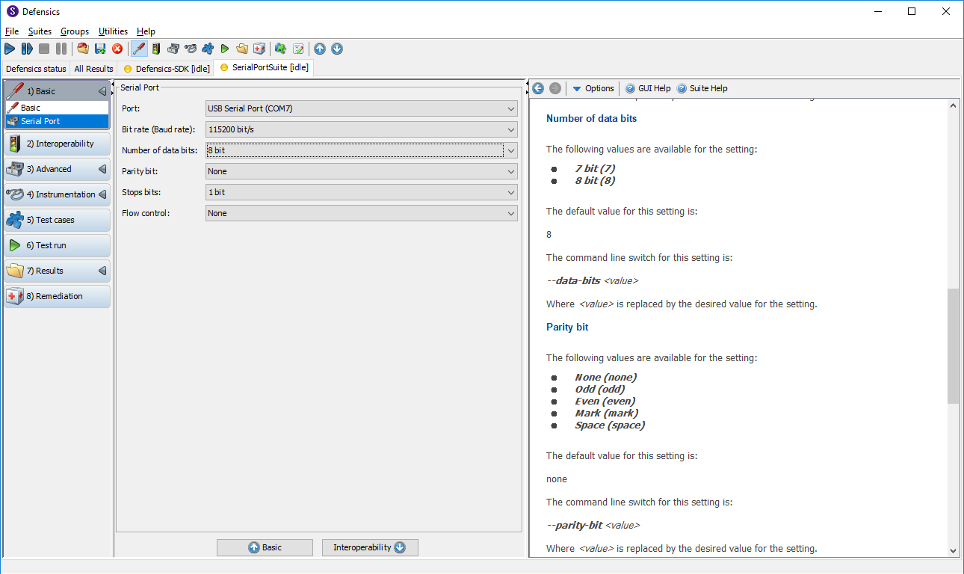
From the example, you can find settings created for all typical serial port configuration parameters such as speed and flow control. The jSerialComm library is only used when we want to create a list of available serial ports on the host PC.
SerialPort[] ports = SerialPort.getCommPorts();
These ports are then mapped into a choice setting.
ArrayList<FuzzSettingChoice> portChoices = new ArrayList<>(ports.length);
for (SerialPort port : ports) {
portChoices.add(
tools.settings().createChoice(
port.getSystemPortName().replace(“.”, “-“),
port.getDescriptivePortName()));
}
tools.settings().addChoiceSetting(“–com-port”,
“Port”,
portChoices.toArray(new FuzzSettingChoice[0]))
.setGroup(GROUP_SERIAL_PORT)
.noReload();
After you’ve defined all the settings required by the injector, you can create the delivery channel.
Creating the custom injector
A custom injector works the same way as any built-in injector. The custom injector is created by implementing the SDK-defined interface CustomChannel. The interface is quite simple.
void close(InjectorEngine engine) // Close the channel.
void open(InjectorEngine engine) // Open the channel.
void receive(InjectorEngine engine, Message message) // Receive a message from the channel.
void send(InjectorEngine engine, Message message) // Send a message to the channel.
All these methods are called automatically during the test run.
In the open() method, we read the user settings and configure the injector. For example, the data-bits setting can be read and assigned to the serialPort object.
String value = getEngine().settings().getSettingValue(“—data-bits”);
serialPort.setNumDataBits(Integer.parseInt(value));
After the configuration is done, we can open the serial port connection.
Public void open(InjectorEngine engine) throws IOException {
inBuffer = new ByteArrayOutputStream(INPUT_BUFFER_DEFAULT_SIZE_BYTES);
initWithUserSettings(engine.getSdkEngine());
initWithControlSettings(engine);
if (serialPort != null) {
if (serialPort.isOpen()) {
throw new EngineException(
“Serial Port ( “ + serialPort.getSystemPortName() + “ ) already in use!”);
}
serialPort.openPort();
}
}
After the test case ends, the serial port can be closed by returning it to the state such that the next open() call can be handled.
Public void close(InjectorEngine engine) {
inBuffer.reset();
if (serialPort != null) {
serialPort.closePort();
}
serialPort = null;
}
Both open() and close() methods are called for each test case, not only when the test run is started. The send() and receive() calls have one-to-one matching with the <send> and <recv> definitions on your sequence file.
In the send() method, data from the message has to be put on the injector channel. The data is from the test case and might contain anomalies, huge overflows, or underflows, so you must send the data to the channel without making any assumptions about the content. If there is a need to limit the data size, don’t do it here. Instead, configure the model by setting limits. See the example with TestCaseConfig.
public void send(InjectorEngine engine, Message message) throws IOException {
MessageElement element = message.getRoot();
byte[] bytes = element.encode();
if (serialPort.isOpen()) {
serialPort.writeBytes(bytes, bytes.length);
if (transmitEnds.length > 0) {
serialPort.writeBytes(transmitEnds, transmitEnds.length);
}
}
}
Handling data reception is a little more complex. Depending on the protocol, data reading can be blocked with a timeout or nonblocking read until a certain number of bytes or special transmission end mark is received. The received data should have a perfect match with MessageElement, defined as a type for the recv tag in the sequence file. If the data doesn’t match the type, the unexpected message handler is called automatically. The unexpected message handler deals with typical messages that can be received out of sequence in the protocol.
In the serial port example, there’s a blocking wait with a timeout for the first byte of data. After the first byte is received, the data is read until the user-defined end-of-line character is received.
public void receive(InjectorEngine engine, Message message) throws IOException {
engine.getSdkEngine().log().out(“CustomChannel receive()”);
int numRead;
int endMark = -1;
byte[] readBuffer = new byte[INPUT_BUFFER_DEFAULT_SIZE_BYTES];
// read until end of the line indication received or read timeouts
do {
numRead = serialPort.readBytes(readBuffer, readBuffer.length);
if (numRead > 0) {
inBuffer.write(readBuffer, 0, numRead);
if (receiveEnds.length > 0) {
endMark = indexOf(inBuffer.toByteArray(), receiveEnds);
}
}
} while (numRead > 0 && endMark == -1);
// no data received
if (inBuffer.size() == 0) {
throw new EngineException(“Timeout! No data received.”);
}
// handle the data received
byte[] data = inBuffer.toByteArray();
inBuffer.reset();
// if transmission end mark found
if (endMark > 0) {
message.getRoot().assignData(Arrays.copyOfRange(data, 0, endMark));
// keep the data received after end mark
if (data.length > (endMark + receiveEnds.length + 1)) {
inBuffer.write(Arrays.copyOfRange(data, endMark + receiveEnds.length, data.length));
}
} else {
// no end mark, handle all data.
message.getRoot().assignData(data);
}
}
Running example
Every test suite execution starts with build() when the suite is loaded either via the GUI or from the command line. In the serial port example, previously shown settings and the custom injector are created inside the method call.
public void build(BuilderTools tools) throws Exception {
// Read data model
tools.factory().readTypes(tools.resources().getPathToResource(“model.bnf”));
// Create settings
SerialPortSettings serialSettings = new SerialPortSettings(tools);
// Create messages
createMessages(tools);
// Create io
CustomInjector io = tools.injector().custom(new SerialPortInjector());
// Create test sequences
tools.buildSequence(io)
.createSequencesFrom(
tools.resources().getPathToResource(serialSettings.getSequenceFile().getValue()));
// Create and set handler for unexpected messages
MessageElement unexpected = tools.buildSequence(io)
.messagesFromFile(tools.resources()
.getPathToResource(serialSettings.getUnexpectedSequenceFile().getValue()));
io.setUnexpectedMessageHandler(unexpected)
.maxReadMessages(100)
.debug(true);
// limit maximum overflows due the limited bandwidth
tools.testCaseConfig().maximumOverflowLength(512); // bytes
}
Now that the test suite has appeared on the GUI, the user can configure the injector from settings on the GUI. When the correct settings are selected, the user can test whether the test suite interoperates with the target device. Interoperability is verified with valid test cases, which are the test sequences you defined in the sequence file.
In the serial port example, if you look at the test case run logs, you can see how the custom channel methods are called.
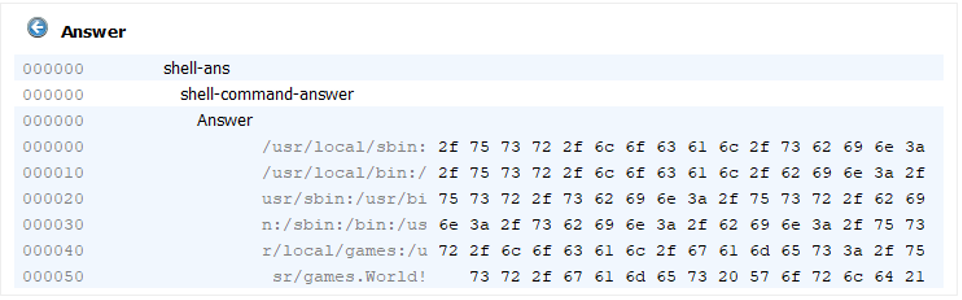
Figure 3: A valid case sends an echo command to Raspberry Pi’s serial console and reads back the answer

Data sent in this valid case example is an “echo Hello World!” command. In the data model, the command has three arguments.
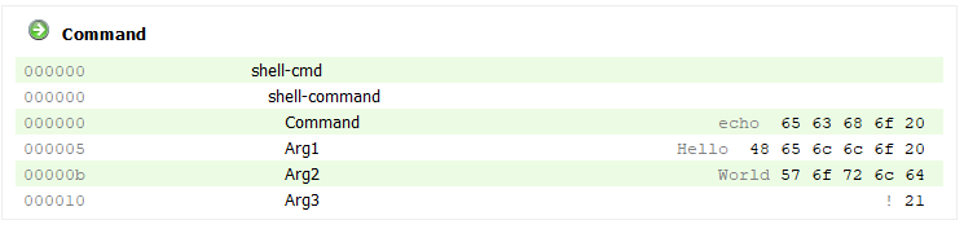
The answer for the valid case is “Hello World!” as expected.

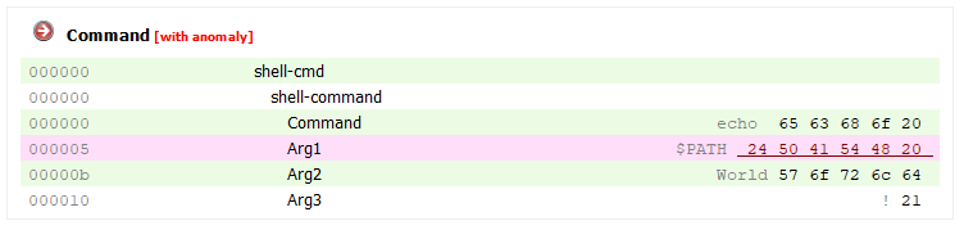
The answer to the example anomaly case is reasonable for Linux users, but it might not be the one expected by a protocol user.
Fuzz testing smarter with Defensics SDK
Defensics is an extremely powerful tool for protocol fuzz testing. The first time you run Defensics against your custom protocol implementation, you’ll be amazed to see the errors found in your code. The custom protocol test suite written with Defensics will help you locate errors, and the sequence editor enables you to quickly create valid test cases for interoperability testing.
Synopsys Defensics SDK makes fuzz testing possible for custom protocols, even when a custom delivery channel is used. From the serial port example, you can see that adding a custom injector to a test suite is not a complex task.
Find more bugs with Defensics SDK
![]()
*** This is a Security Bloggers Network syndicated blog from Software Integrity Blog authored by Kari Hulkko. Read the original post at: https://www.synopsys.com/blogs/software-security/serial-port-fuzzer-defensics-sdk/
