

Leveraging MixMOde to monitor AWS Cloudtrail
What is AWS CloudTrail?
AWS CloudTrail is a service that allows you to log and audit your AWS Account. With CloudTrail, you can log, continuously monitor, and retain account activity related to actions across your AWS infrastructure. https://aws.amazon.com/cloudtrail/ For enterprises with cloud or hybrid environments, CloudTrail is a valuable data source providing insights into the API calls that are being used to access your AWS accounts.
The challenge with utilizing CloudTrail for cybersecurity is twofold. First, the tool logs every call into your AWS accounts so logging can be quite voluminous. In fact, one resource places the signal to noise ratio of CloudTrail event to be about 1:25,000. Second, the logs produced are not susceptible to traditional security detection via intelligence feeds, attack signatures or hash values. As such it can be difficult to know parse potential threats from normal behaviors.
Why does CloudTrail Matter for Security?
In July 2019 the FBI disclosed that former Amazon employee, Paige Thomposn, was arrested in connection with the hacking of 31 companies’ AWS environments. According to the criminal indictment, Thompson created a program to scan AWS customers looking for a specific web application firewall misconfiguration. Once found, this misconfiguration could be exploited to extract account credentials and gain access to the target AWS account and exfiltrate data.
What makes this interesting is that this attack occurred on March 22, 2019 but was not discovered until July 19, 2019 when the hacker herself Paige Thompson was bragging about it on GitHub. Further, once the organizations they were made aware a quick review of their CloudTrail logs revealed exactly what happened, when it happened and by whom. The problem is these 31 companies simply were not looking at their CloudTrail logs from a security perspective.
How MixMode can help you leverage CloudTrail for CyberSecurity
MixMode’s approach to CloudTrail security monitoring and detection is simple. We ingest your CloudTrail logs into our platform, apply a layer of our Proprietary Artificial Intelligence to give you advanced anomaly detection and alerting, correlate those anomalies with your underlying network data and give you access to forensic search and investigation of these logs.
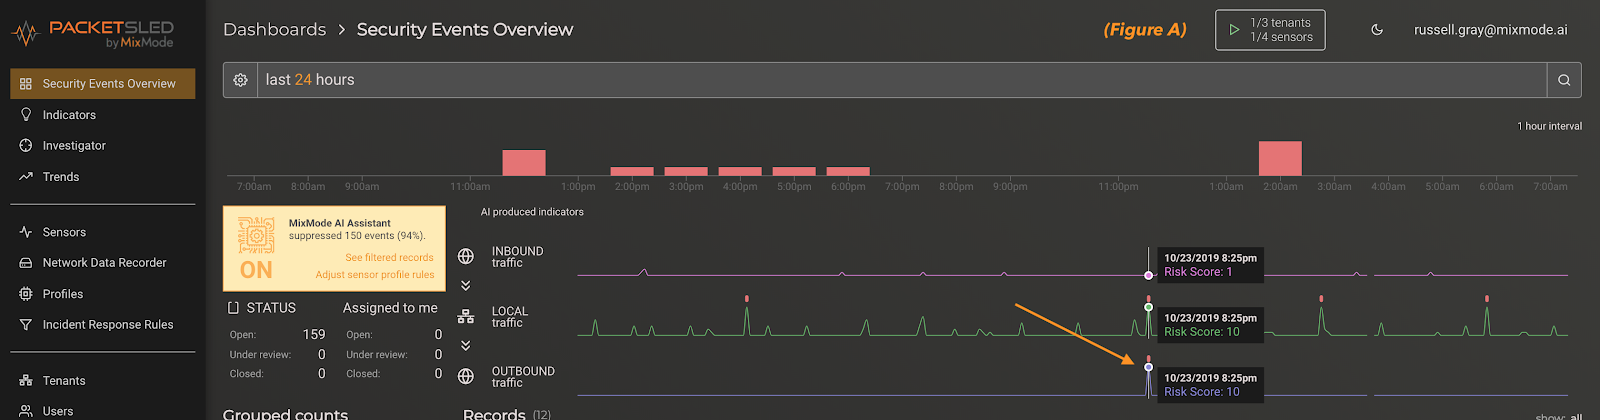
The following is a walkthrough of a scenario where the MixMode AI had flagged a specific CloudTrail activity as anomalous. Below is a screenshot of the MixMode Security Events Overview dashboard for CloudTrail in an AWS environment. For this AWS environment, there were a total 32,038 logs ingested over the prior 24 hours. As you will see, out of those 32k logs the AI has surfaced only five Risk Level 10 anomalies to investigate. This is significant for two reasons: 1) out of over 32k records we have only 5 events to investigate, and 2) MixMode’s proprietary AI was able to detect 5 anomalous actions from simple API call logs.
In the screenshot below we can see a visualization of the CloudTrial environment baseline and anomaly detections (figure a). These baseline and anomalies are broken out by directionality into three feeds; Inbound Traffic, Internal Traffic and Outbound Traffic. This helps highlight exactly what type of threat or anomalie you are seeing and where you need to look.
In figure a below, we can clearly see the five Risk Level 10 events (4 local & 1 outbound). For this walkthrough we will focus on the outbound event that is flagged by the MixMode AI during the 8:25 pm time frame on 10/23/2019. In the CloudTrail framework the outbound anomaly is more interesting, so we should start there.

By clicking into this AI Risk Level 10 indicator we are presented with a list of events and IP addresses from the 5-minute event timeframe. A quick review of these details allows us to zero-in on the anomaly based on the activity and the IP address (figure b). This showcases the power of the MixMode unsupervised AI to find anomalous patterns and surface them to a security analyst with only 2 clicks from the dashboard to full details.
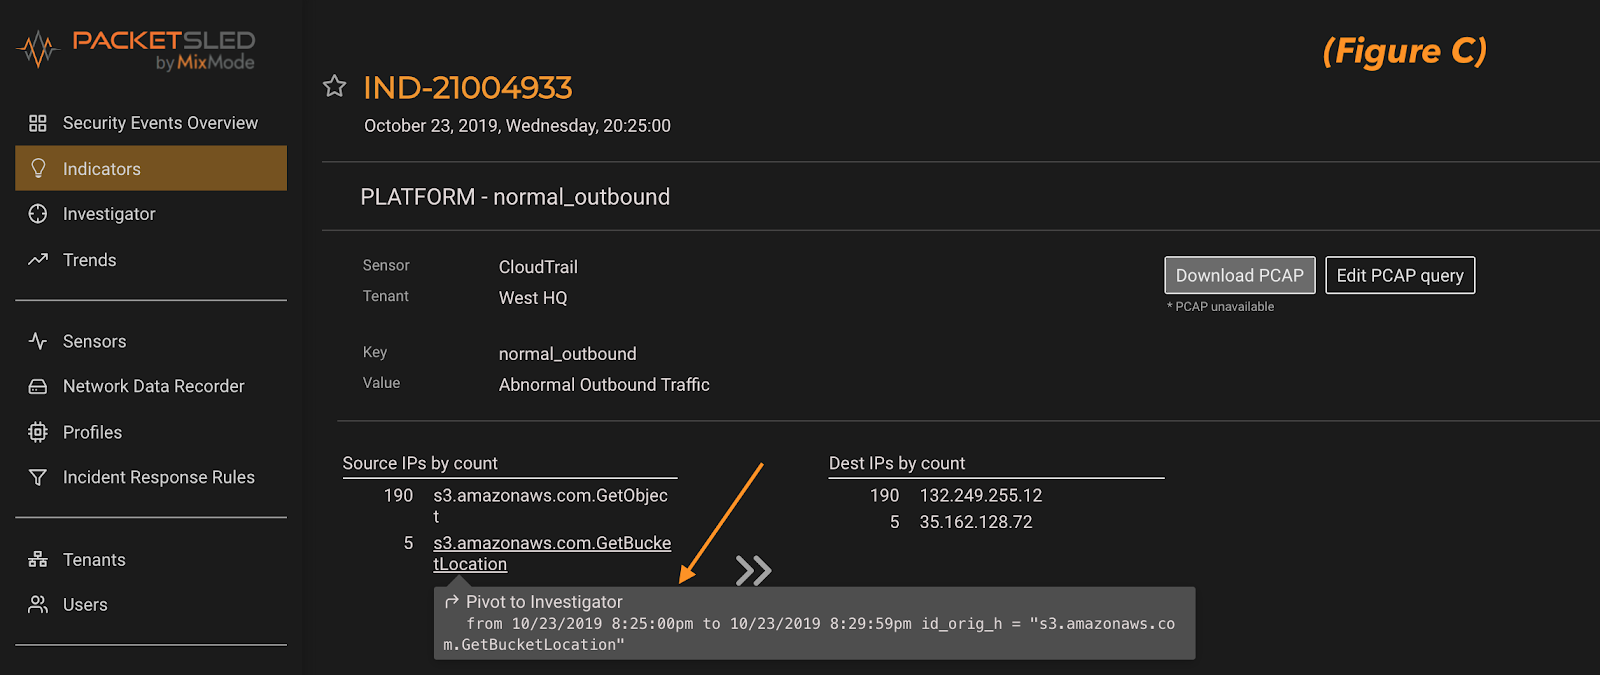
From here we can seamlessly pivot to a full investigation of what else this suspicious IP address has been up to in our environment or who else has run this command and when (figure c).
Once we pivot to MixMode investigator we have access to all of the CloudTrail log details and fields (figure D). As full forensic platform, MixMode provides the depth and breadth of details needed for you to investigate events surfaced by the AI. In this instance, once we have analyzed the anomalous log we are presented with a number of options to continue our investigating by querying or pivoting off of the CloudTrail log details (figured d).

Manual Rule Creation to Supplement Anomaly Detection
In addition to MixMode’s unsupervised AI anomaly detection and forensic search capabilities, the platform also allow you to create rules to be alerted to certain activities whether they present as an anomaly or not. For example, as we will discuss below there are certain CloudTrail eventNames that you would want to be aware of whether or not they present as malicious. These are typically things like stopping CloudTrail logging, deleting trails or modifying trails.
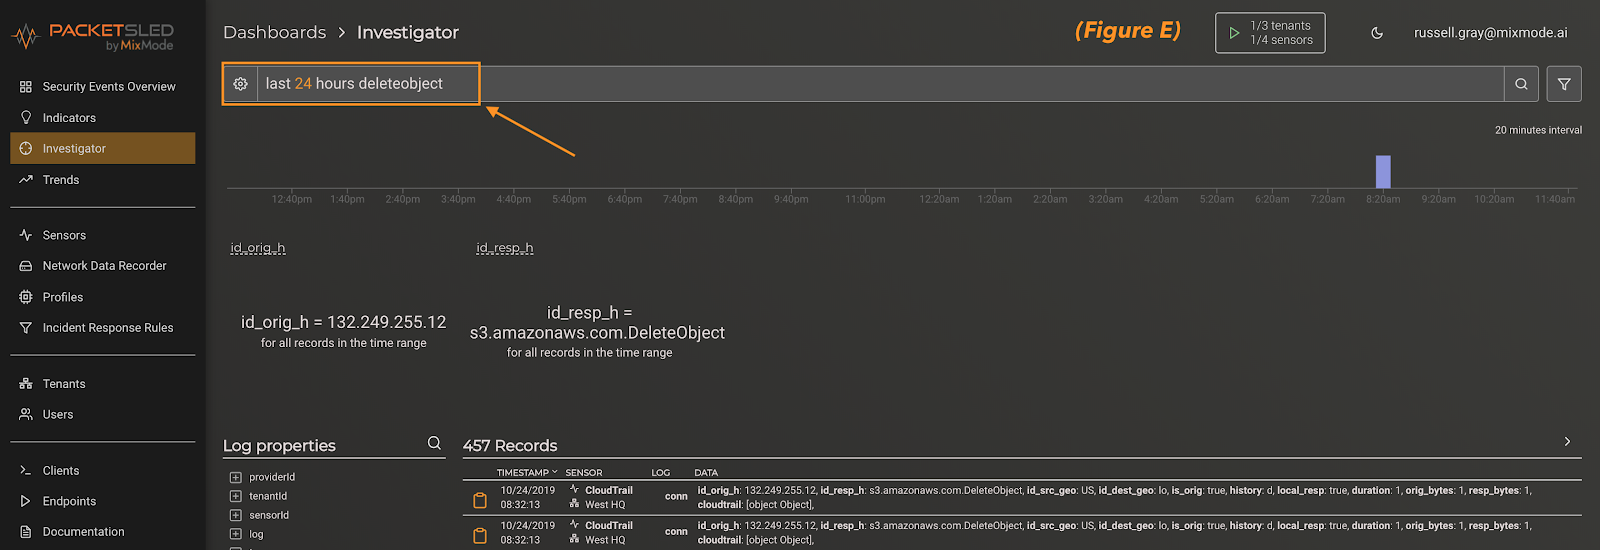
The easiest way to create a rule in MixMode is to begin with an investigator query. This can be a manual search of simple keyword as you see in figure e, or you can pivot off an AI anomaly alert. In this case, we simply searched for the keyword “deleteobject.”
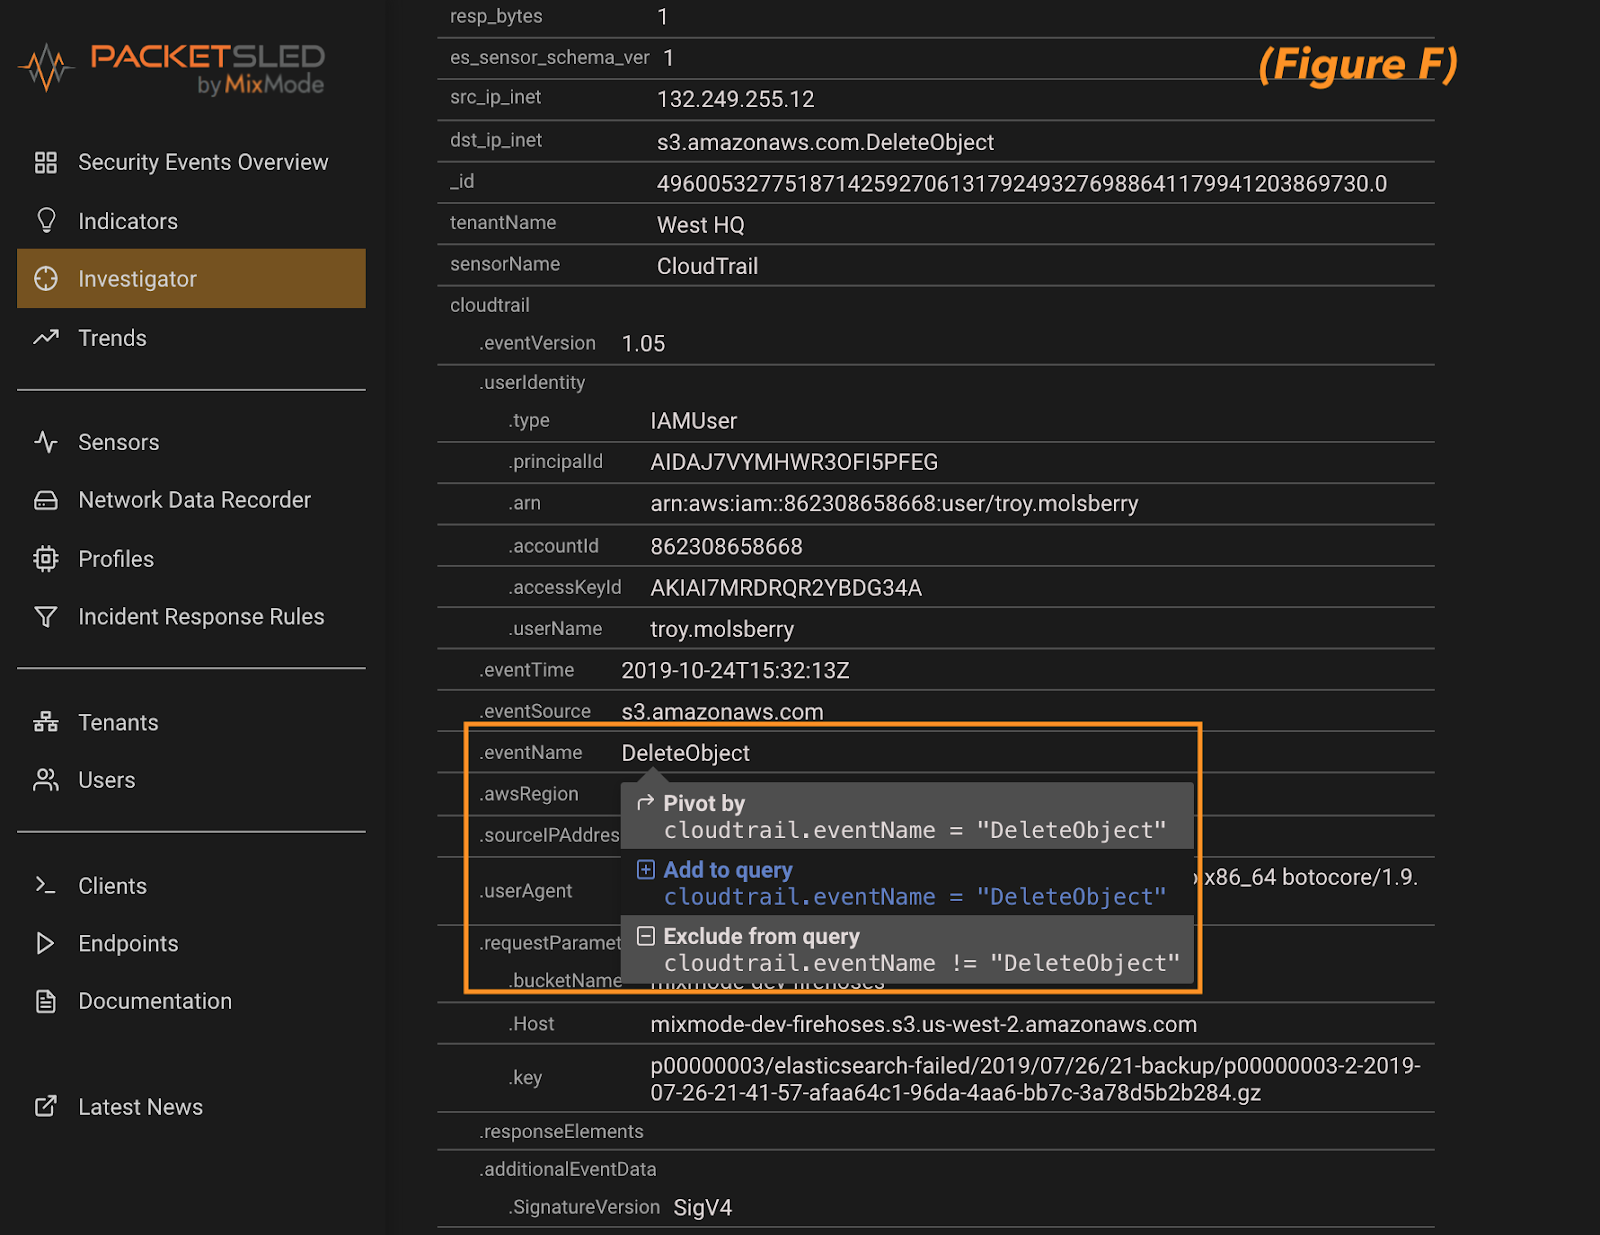
Next, you can expand the individual records to see what field your keyword presents in. For this example, DeleteObject appears in the eventName field. Once verified, click on the field and add it to the query (figure f). This will set us up to make sure we create the rule off of the correct field in the next step.
Closing out of the record details you can see the search has populated in the search pane at the top of the investigator screen. At this point all we need to do is click the funnel icon at the far right of the screen to create the rule (figure g).

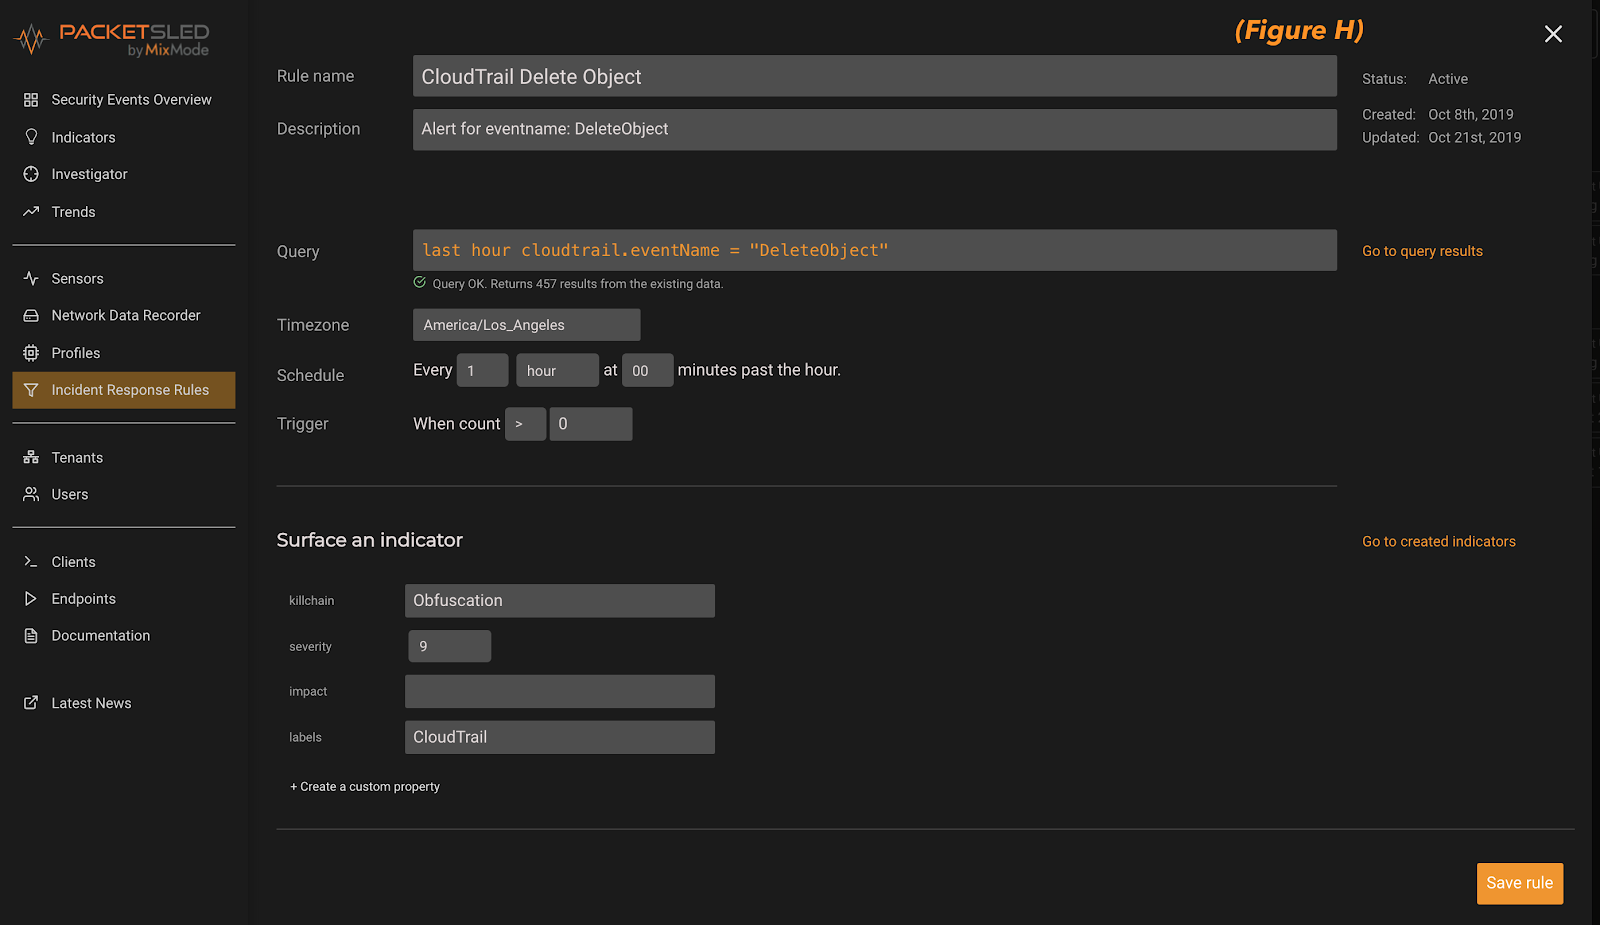
Finally, below you can see the rule creation dialog box (figure h). Here we can give it a name/description an decide how often we want the rule to run. In addition, we can decide on the killchain stage, severity and label for the indicator that the rule will surface. Click “Save Rule” in the bottom right hand corner and you are done! In addition, you can always come to this page, via the menu on the left, and create rule directly (bypassing the investigator query).
What should you look for in CloudTrail?
As mentioned above, CloudTrail captures a log of all API calls for an AWS account and its services. As a logging tool it captures many fields and details which may be useful but for the CyberSecurity use case there are certain fields that are more useful than others. The following is not an exhaustive discussion but is meant to be guide or a jumping off point to help you get started.
eventName
This is commonly seen as the most important field to look from a cybersecurity perspective. This field describes the action created by the API call. There are specific naming conventions that make it clear whether the call is an account change action (PutObject / DeleteObject) or a read only action (GetBucketLocation).
Pay close attention to the event “StopLogging” as this is an event that comes from CloudTrail when someone is deactivating CloudTrail logging. This is good to know whether it is malicious or benign.
Another event to follow is the “ListBuckets” or “ListAllMyBuckets” commands. These were very useful in identifying the malicious actor in the July breach as these commands are not very common in the ordinary course of business but would be useful to an attacker.
eventSource
The field indicates the AWS service that is the subject of the event. For example, it could be s3.amazonaws.com, which means the event was generated by the S3 service. Similarly, ec2.amazonawsa.com represents an EC2 service generated event.
userAgent
The user agent field can be an easy give away of malicious activities. Bad actors usually do not do a great job of masking their identity. In addition, perhaps your AWS environment has a defined set of users that you can use when considering alerts.
awsRegion
This is an easy one and susceptible to rule-based alerting in addition to AI anomaly detection. Keep an eye out for activities in regions where you do not have a presence or regular usage.
sourceIPAddress
This field will be vital to any investigation and can be used to determine whether the malicious activity originates. If one AWS service calls another service, the DNS name of the calling service is used.
MixMode Articles You Might Like:
Top Security Pain Points Revealed: Building Baselines, Cloud, and Visibility Among Concerns
Too Many Alerts: A National Security Threat?
Whitepaper: Unsupervised AI – AI for Complex Network Security
4 Ways to Protect Your Business from Zero-Day Attacks
Anomaly Detection with Unsupervised AI in MixMode: Why Threat Intel Alone is Not Enough
The Difference Between Artificial Intelligence and Machine Learning in Network Security
Unsupervised AI as a Service: Predictive Intelligence for Cybersecurity
*** This is a Security Bloggers Network syndicated blog from MixMode authored by Russell Gray. Read the original post at: https://mixmode.ai/blog/leveraging-mixmode-to-monitor-aws-cloudtrail/
